I can’t remember exactly when I made my first jersey knit shorts using the Peppermint Magazine Spring Shorts pattern, but it was definitely pre-pandemic! I wanted to clear out some extra jersey knit from Pico Textiles in my fabric stash. I decided to try the pattern to see how it worked in a knit fabric, even though the original design is for woven fabrics. I only meant for those shorts to be a short-term solution until I got better fabric. However, more than five years later, they are the only shorts that have lasted in my closet. All the other patterns I’ve made eventually ended up in the trash bin.
Last summer, when I was down to just my ratted, old Spring shorts, I wanted to make more. Unfortunately, my dad’s PTE surgery, hiking, and rehab got in the way. I knew I couldn’t go another summer wearing shorts full of holes. Now, I am slowly trying new patterns and making myself lounge shorts that aren’t just workout clothes.
Analyzing Style and Fit
The Plateau joggers feature a high rise, unique side pockets that eliminate the side seam, and a 2-inch wide elastic waistband. The pattern comes in two size ranges: 0–20 for hips 33 to 48 inches, and 14–32 for hips 45 to 63 inches. View A is a full-length jogger, which I am not reviewing here. View B is a pair of shorts with a 3.75 to 3.9-inch inseam and a scalloped hem for added interest. The pattern also includes optional back patch pockets. In terms of ease and fit, the pattern has positive ease at the hips, meaning the joggers are not intended to be tight.
I bought this pattern specifically for the unique side pocket construction. I love the look of a clean side with no seam because it adds fun visual interest. I am at the point with my sewing where I want to try patterns that offer something new I haven’t seen before. This pattern was perfect for that reason.
Sizing


The pattern comes in two different, non-overlapping size ranges. According to Closet Core’s site:
“Our 0-20 size range is based on a B cup bust with an average height of 5′-6″. Please note that B cup does not refer to bra sizing, but rather the difference in inches between high and full bust. A 2″ difference between those measurements is equivalent to a B cup (a difference of 1″= A cup, 2″ = B cup, 3″ = C cup etc.) If the difference between your high bust and full bust is higher than 2″, you may need to make a full bust adjustment for select patterns.”
“Our 14-32 size range is based on a D cup bust and pear-shaped lower body with an average height of 5′-6″. Please note that D cup does not refer to bra sizing, but rather the difference in inches between high and full bust; a 4″ difference between those measurements is equivalent to a D cup (a difference of 1″= A cup, 2″ = B cup, 3″ = C cup etc.). If the difference between your high bust and full bust is greater than 4″, you may need to make a full bust adjustment for select patterns. If the difference is smaller, you may need to make a small bust adjustment.”
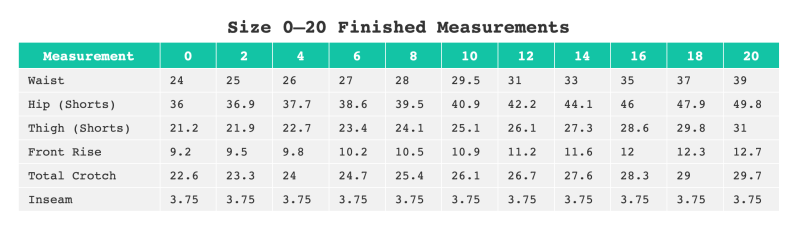
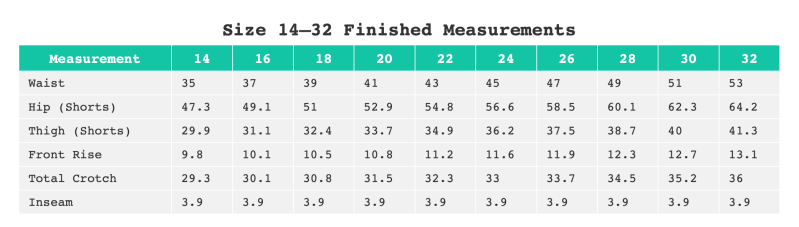
If you compare the size 14 finished garment measurements, you can see the 0–20 size range has a smaller waist compared to the 14–32 range (33 inches versus 35 inches). A better comparison based on waist measurement would be a size 16 in the 0–20 range and a size 14 in the 14–32 range. Both have a 35-inch finished waist, but the other measurements differ:
- Hip: 46 vs 47.3
- Thigh: 28.6 vs 29.9
- Front Rise: 12 vs 9.8
- Total Crotch: 28.3 vs 29.3
- Inseam: 3.75 vs 3.9
If you pick a size based on hip measurements, then size 18 in the 0–20 range is more comparable to size 14 in the 14–32 range. Both have roughly the same finished hip measurement of 47 inches, a thigh measurement of almost 30 inches, and a total crotch length of 29 inches. However, the waist and front rise are vastly different:
- Waist: 37 vs 35
- Front Rise: 12.3 vs 9.8
What does this tell me? The 14–32 size range is definitely drafted for those with a greater difference between their hip and waist measurements, meaning it is for curvier figures. The front rise is slightly shorter but the overall crotch length is roughly the same, which gives more room for the booty! You definitely cannot simply swap between the same size numbers across the two ranges.
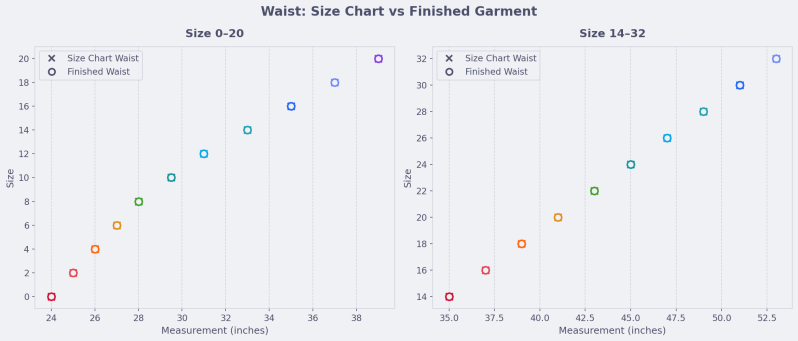
I also plotted the body size chart against the finished garment measurements to make sure nothing odd cropped up. Closet Core patterns are well-established, so I wasn’t expecting any mistakes, and I didn’t find anything alarming. Whew!

The hip ease makes a lot of sense too. There is slightly more ease in the smaller sizes and slightly less ease in the larger sizes. I have seen ease addressed in many ways across size charts, but this grading method makes the most sense for this pattern style. Every size has several inches of ease, and a little is added or removed across the range to ensure all sizes maintain the same aesthetic look. You wouldn’t want to see all the ease removed on larger sizes, comically ridiculous amounts added to smaller sizes, or random ease changes based on size.
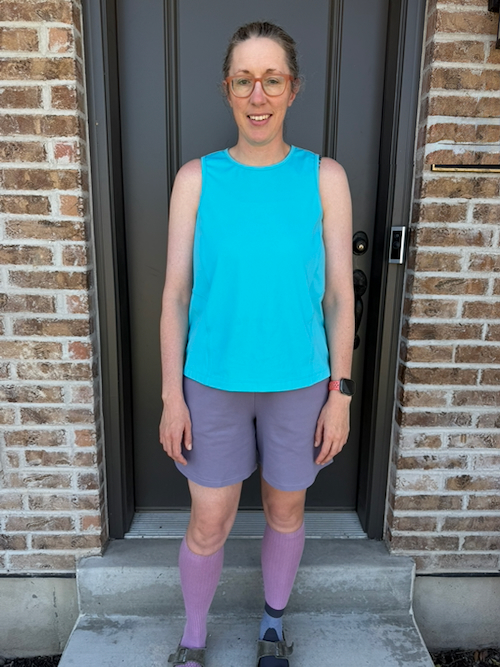
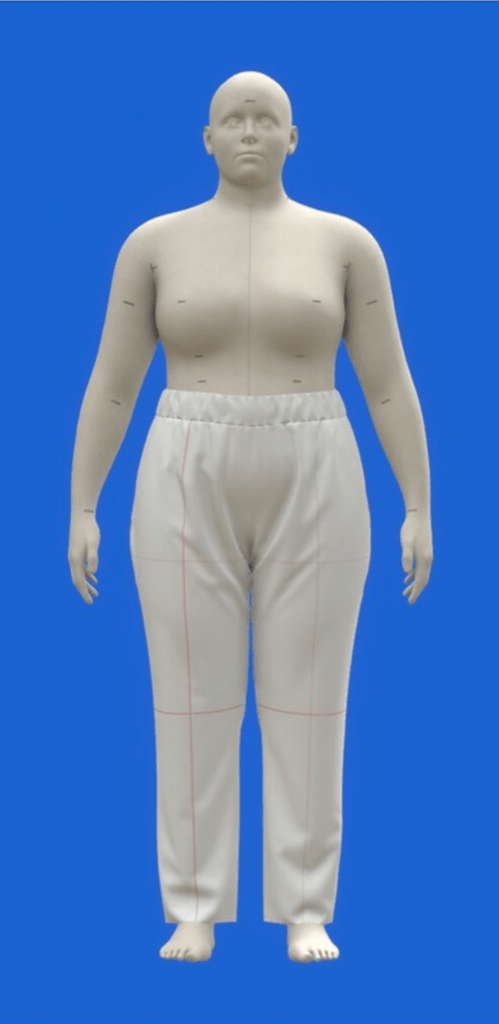
My body measurements haven’t changed much since I last made shorts: 39-inch bust, 33 to 34-inch waist, and a 45-inch lower torso. As always, I used my measuring band method for the lower torso. My hips are technically 42 inches, but the measuring band gives a more consistent fit reference when picking pattern sizes. Because I measure 45 inches with the measuring band, I ended up making a size 16 from the 0–20 size range.
Materials
Last August, I ordered a bunch of Minerva Core Cotton Lycra Jersey, but they accidentally sent the wrong fabric for one of my cuts. The mystery fabric was the correct color, but it was much heavier, double-knit, and looked like a Ponte di Roma. I knew it was a double-knit because the raw edges didn’t curl. Single-knit fabrics are notoriously frustrating because their raw edges love to curl.
My guess was that they sent me the Minerva Core Heavy Ponte Roma Double Stretch Knit. This fabric is 60% Viscose, 35% Polyester, and 5% Elastane at 360 GSM, whereas the Lycra Jersey I ordered is 95% Cotton and 5% Elastane.
I am usually hesitant about using viscose and polyester blends and it is very difficult to find 100% cotton Ponte di Roma fabric. My guess is that because the knit stitch is so tight, it requires a very thin thread. Unless you use something premium like Supima cotton, you can’t get cotton thread fine enough for the Ponte stitch. Since Supima cotton is expensive, manufacturing cotton Ponte isn’t in high demand. That is just my guess.
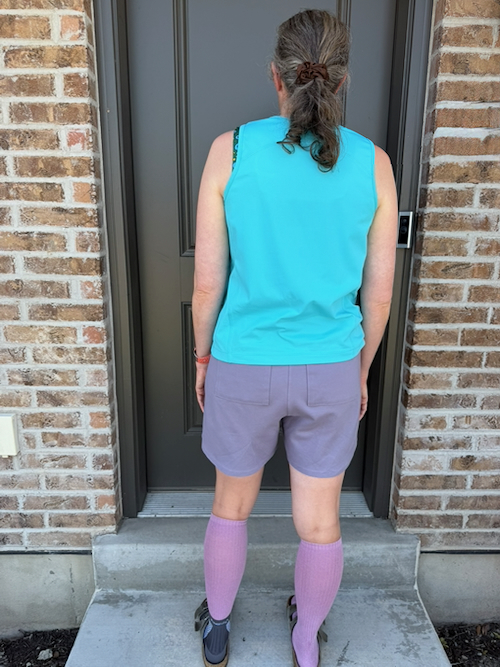
Despite my misgivings about the blend, I fell in love with my first pair of shorts. I ended up ordering samples of what I thought was the mystery fabric to confirm. I ordered the Minerva Core Heavy Ponte Roma, along with two other options: Meet MILK Tencel Lyocell Ponte Roma Double Stretch Knit and the Meet MILK Two-Tone version. The Meet MILK fabric is 68% Tencel Lyocell, 27 to 30% Nylon, and 2 to 5% Elastane, ranging from 280 to 330 GSM. As far as I can tell, my final garment is made from Minerva Core Heavy Ponte Roma. I wasn’t happy with the Meet MILK fabric. The solid was OK but I didn’t love the color options. The Two-Tone version was thin and see-through. I ended up buying more Minerva Core Heavy Ponte Roma to make a couple more shorts.
The Challenge of Checking Balance on Shorts
It’s a little more difficult to check pattern balance when you don’t have a full pant leg to work with. Yes, technically I could check the balance on the full-length version of these joggers and extrapolate those findings to the shorts, but this post is all about the shorts!
The first hurdle is figuring out where to place the center drapeline. Without a hem at or below the knee, there’s no foolproof way to locate it.
ℹ️ For this style of joggers, the drapeline starts at the center of the ankle hem and runs up to the waistline perpendicular to the floor. If the pattern is drafted correctly, the drapeline should bisect the kneeline. After the knee, the drapeline is no longer in the center of the pant leg. Therefore, the drapeline on shorts will always be off-center. Without the kneeline or hem it is impossible to know where to draw the drapeline.
Fortunately, that’s usually okay. If the drapeline happens to be only slightly off for your body, you only have about 3 to 4 inches of fabric below the crotch level to deal with. However, if the drapeline is really far off, the shorts won’t fit right, and you’ll need to make an adjustment.
Identifying a Misaligned Drapeline
If the grainline is off, the legs of your shorts will swing toward either the inseam or the outseam even if you’ve already adjusted the waistline.
ℹ️ Always fit the waistline first to get your front-to-back balance correct. Worry about the drapeline placement afterward.
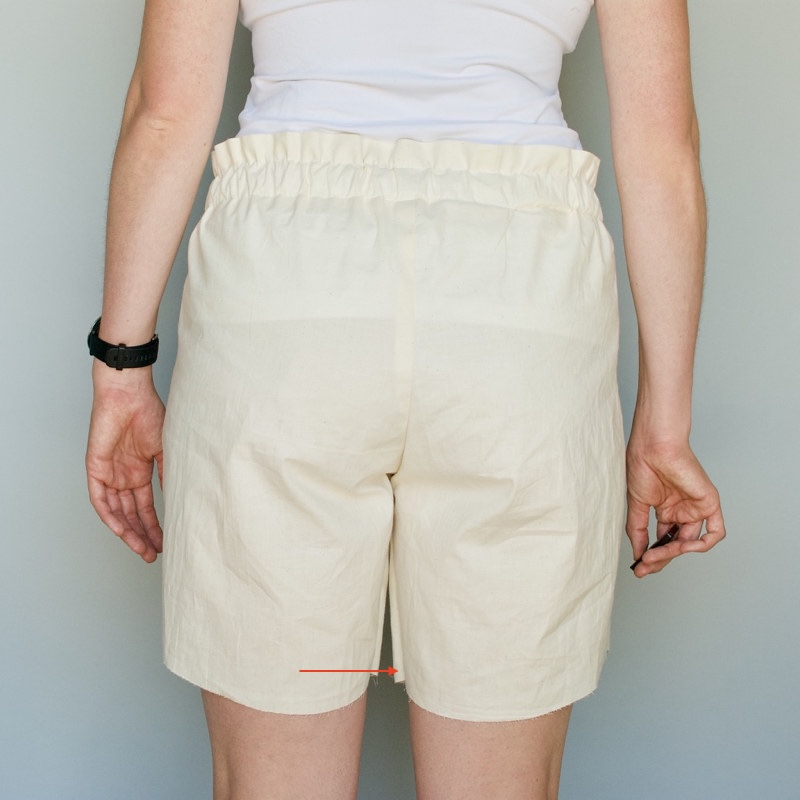
If the shorts swing toward your inner thighs, it will feel like you have “hungry inner thighs” trying to gobble up the fabric. You will also see classic wrinkles under the butt that look like pull lines. If the shorts have plenty of circumference, for your upper thighs, then the fit issue isn’t about size; it’s a shape and balance issue.

If you see the same type of wrinkles in the front, that means the drapeline is off on the front pattern piece as well.
Note that just because a leg swings, it doesn’t mean both the front and back are off. If the back drapeline is off but the front is fine, the back leg will swing toward the inseam. This will make the shorts feel like they are twisting around your thighs. It’s an odd sensation, to say the least.
How to Fix the Issue
To fix this issue, you need to remove fabric along the inseam at the hem and add that exact same amount to the outseam at the hem. While this can be done on either the front or back pieces, always start with the back piece first, as it is usually the culprit. Only adjust the front piece if adjusting the back doesn’t fully solve the problem.
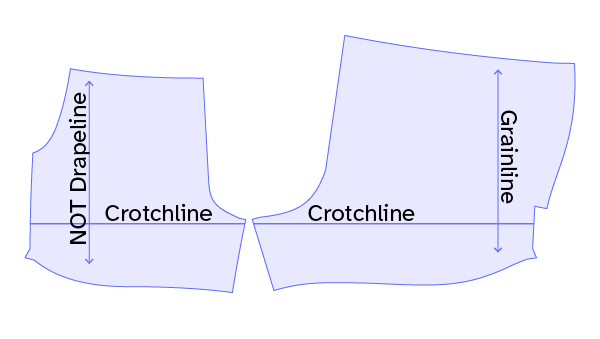
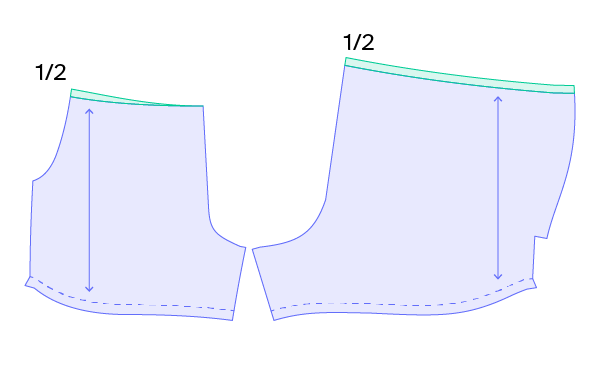
Start by drawing the crotchline on both the front and back pattern pieces. For more information about how to locate and draw the crotchline, please refer to my eBook. Notice that I am intentionally not trying to find the drapeline here. Because these are shorts, we lack the ankle and knee landmarks needed to plot it. I have left the pattern grainline on my illustrations, but do not confuse the grainline with the center drapeline.
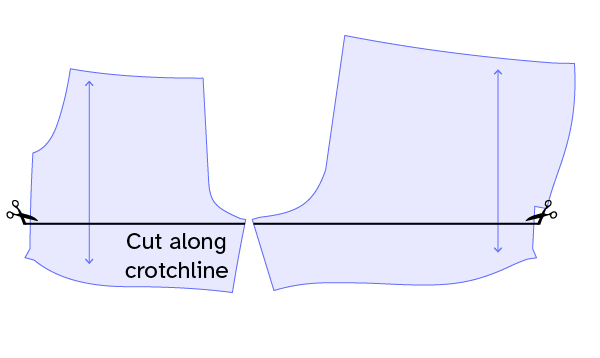
Using your scissors, cut your pattern along the crotchline from the outseam to the inseam.
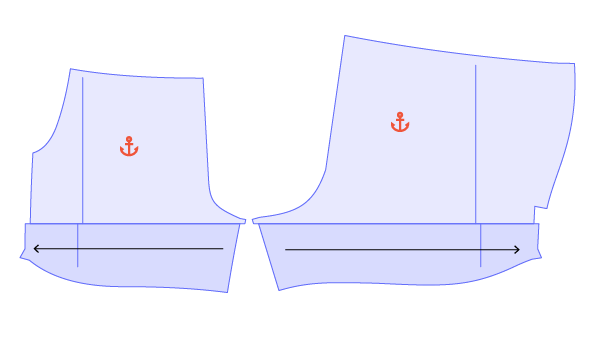
Leaving the top portion of the pattern anchored down, slide the lower leg portion toward the outseam. How do you determine the adjustment amount?
- Method A: Start with a standard 1/4 inch adjustment, increasing it by 1/4 inch increments over multiple muslins and iterations. Yes, this is the slow, plodding way to do it.
- Method B: Examine your original muslin and measure the excess fabric swinging toward your inseam. Conveniently, you will often see a distinct break or fold in the fabric where it pools; the inseam will almost look pleated. Measure that excess.
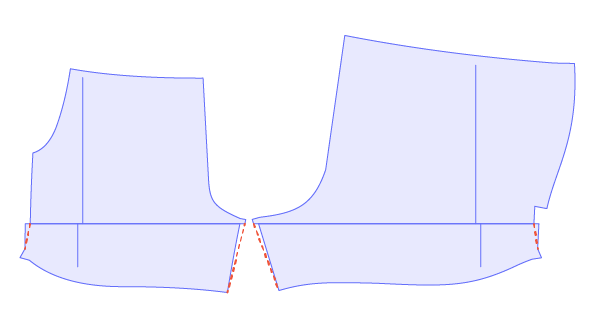
Finally, connect the upper portion of the pattern at the crotchline to the shifted lower portion hemline. It is easy to get confused here when trying to remember what gets connected to what. The principle behind this adjustment is that we do NOT want to change the hip circumference or total crotch length of the original pattern.
- Keep the hip circumference exact: The crotchline must stay the same width. True your side seam by drawing down from the top portion at the crotchline to meet the bottom portion at the hemline. If you draw up from the bottom portion of the crotchline up to the waistline, you will accidentally widen the hip circumference.
- Preserve the crotch curve length: Repeat the process with the inseam. True your inseam by drawing down from the top portion at the crotchline. If you draw up from the bottom portion of the crotchline up to the crotch curve, you will clip off crotch hook length.
Ultimately, you are removing a wedge from the inseam and adding that exact same amount of fabric to the outseam. If you remove 1/4 inch from the inseam at the hem, you must add 1/4 inch to the outseam at the hem, blending both lines smoothly back up to the crotchline.
The Opposite Problem: Swinging to the Outseam
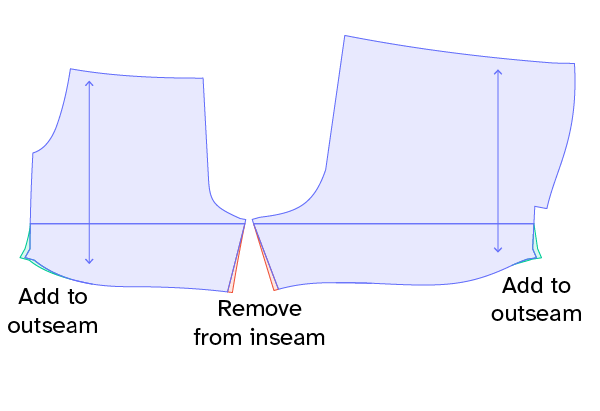
If you have the opposite problem, where the short legs are swinging toward your side seam, simply reverse the adjustment above. You will add to your inseam at the hem and remove from the outseam at the hem. In other words: slide the bottom portion of the leg toward the inseam, then redraw your lines starting from the top portion at the crotchline and connecting them down to the hemline of the shifted bottom portion.
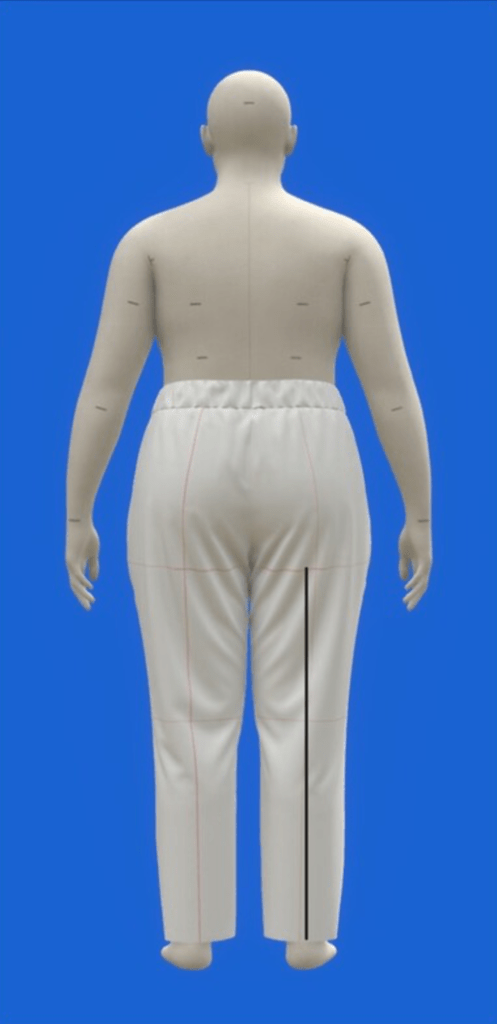
ℹ️ This adjustment may not work if the overall size of the shorts is too big. The excess fabric of an oversized short naturally wants to swing outward, so understand the limitations of this adjustment. The shorts above are too big and the legs are swinging to the side seam. I need to pick a smaller size before trying to address the drapeline displacement.
Revisiting the Principles of Pattern Balance
Let’s quickly review the standard principles of pattern balance so we understand why they really can’t be applied to shorts. Normally, you start by aligning the outseams at the hem. You want to check that the side seams match in shape from the hem to the knee, ensure the tops of the side seams align, and make sure the drapelines stay parallel.
However, we hit a few roadblocks here:
- We can’t check the shape from the hem to the knee, because these are shorts.
- Checking the tops of the side seams is also tough due to the wrapped pocket extension. (Though having made the pattern, I can tell you that the side seams are indeed the correct length!)
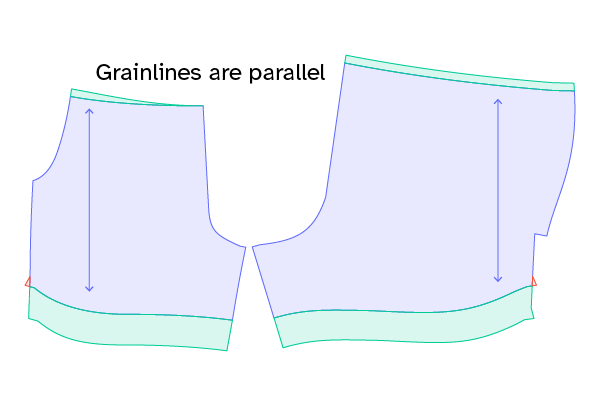
- Because we can’t accurately draw the drapelines, we have to assume they are parallel simply because the grainlines are parallel.
Next, you would typically align the inseams, ensuring they match from the hem to the knee and that the tops are nearly level (the back can sit up to 3/8 of an inch lower). Finally, you would compare the inseam lengths; they should be identical, though the back inseam can be up to 3/8 of an inch shorter.
Once again, there is nothing to check from the hem to the knee. What we can check, however, are the crotch curve heights and length, and both meet the criteria for a perfectly balanced pattern.
Bottom line: This pattern is incredibly well-drafted, meaning we get to bypass some of the common drafting pitfalls found in other indie patterns!
Adjustments
The adjustments on this pattern were minimal. I raised the waistline by adding 1/2 inch to the center back and side seams, grading back down to the original waistline at the center front. The pattern is drafted for someone who is 5 feet 6 inches tall, and I am 5 feet 11 inches. Although I have a short torso for my height, I felt I needed that extra 1/2 inch of rise, especially in the back.
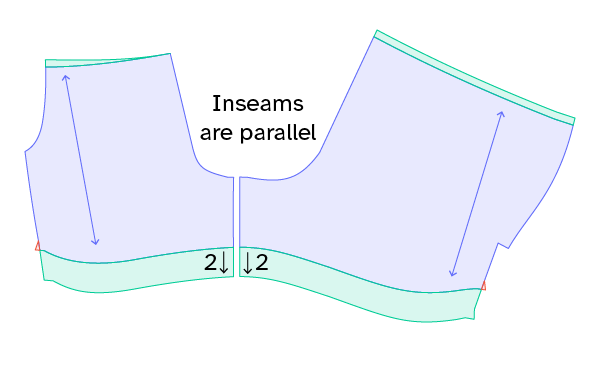
My other adjustment was to lengthen the inseam. I dislike inseams that disappear when I sit down; I prefer to have a little bit of fabric showing. Having long enough inseams also helps prevent the inevitable thigh stickage that happens on hot days. I lengthened the shorts by 2 inches according to the pattern instructions:
“To adjust the length of the shorts, align shorts front and shorts back so the inseams are parallel. [My aside: This means the grainlines or drapelines will not be parallel to one another.] Add or remove the same length to the hem allowance of both pattern pieces, re-tracing the angled shape of the hem allowance at the side seams.”
Here’s what my pattern looks like at the end. The blue is the original pattern. The green is where I added to the pattern. The red is where I removed from the pattern.
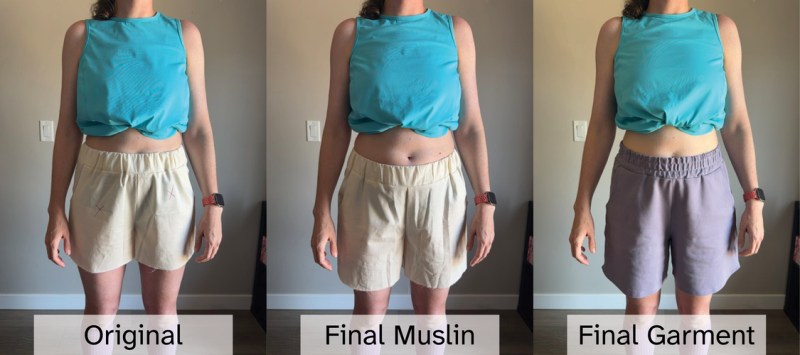
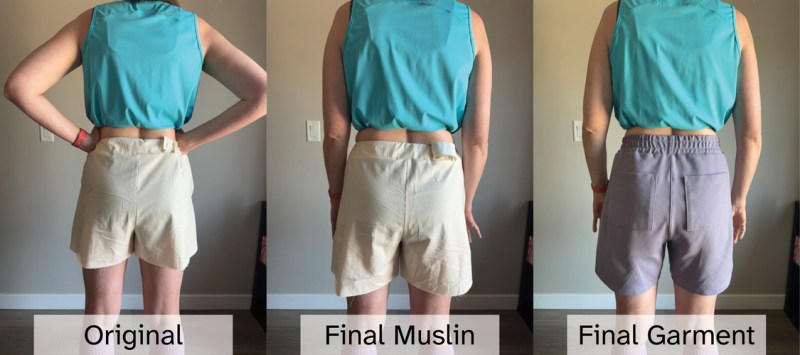
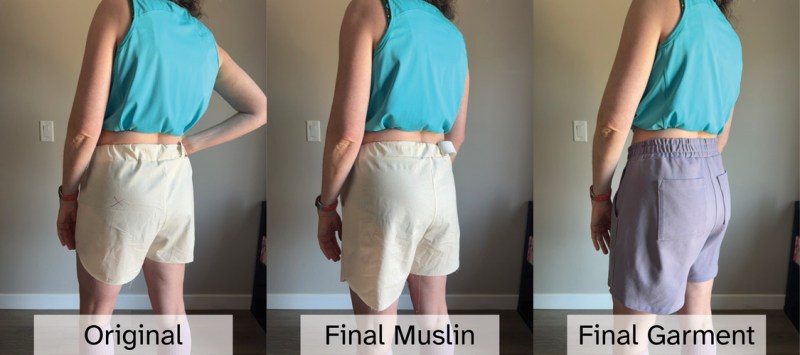
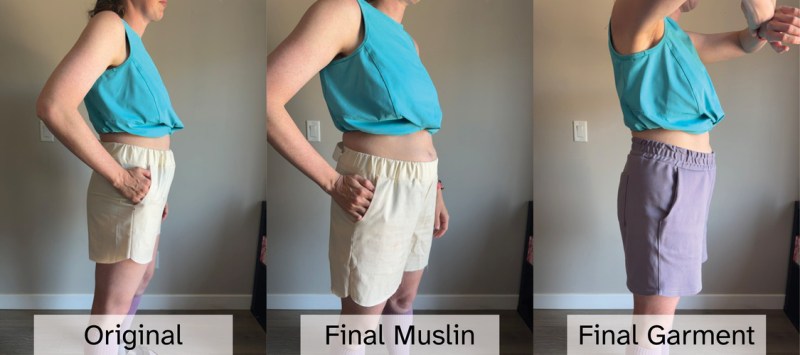
Fit
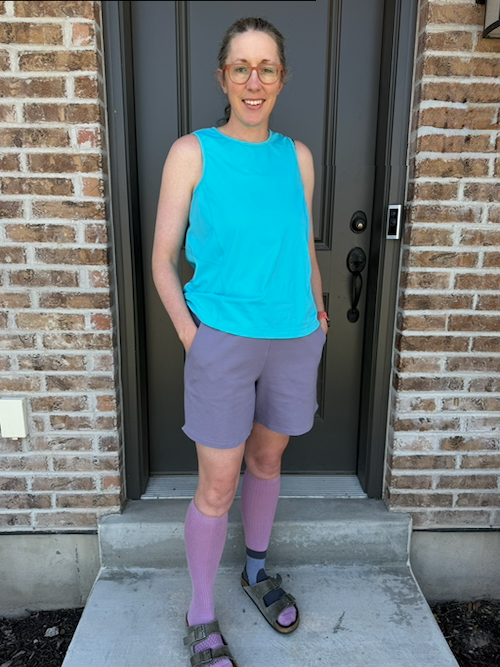
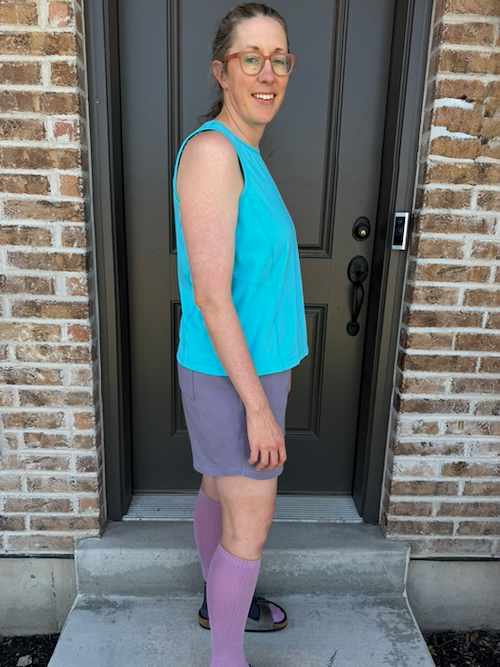
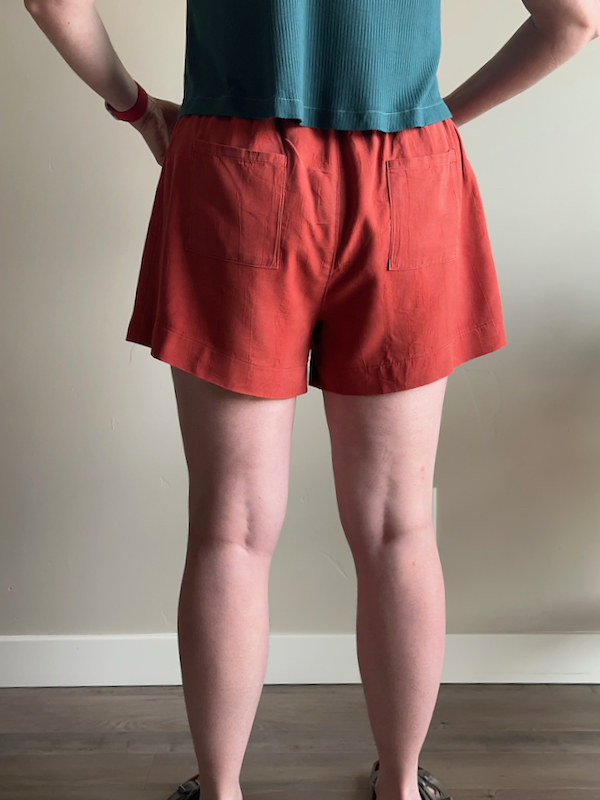
The original is size 16 from the 0-20 size range. The final muslin consists of the changes to the waistline placement and lengthening the leg by 2 inches. The final garment incorporates these changes and is made in the Minerva Core Heavy Ponte Roma fabric.
Personal Aside
Once again, if you’ve made it through this whole post, thank you for joining me down this rabbit hole about fitting shorts. Your enthusiasm and support mean the world to me. Along a similar vein, Reza from the International School of Tailoring has an update video about fitting the Pagoda Model jacket. The video is absolutely fire, as always.

IF YOU FOUND THIS POST HELPFUL, CONSIDER SUPPORTING MY WORK BY SIGNING UP FOR A PAID SUBSCRIPTION.
POSTS OLDER THAN 3 MONTHS ARE NOW FOR SUBSCRIBERS ONLY — YOUR SUPPORT KEEPS THIS SPACE GOING.
INTERESTED IN SUBSCRIBING TO RECEIVE NEW POSTS IN YOUR INBOX?


Each time I read one of your posts I learn at least one thing about fitting myself. This time I learned about the crotch length balance for regular patterns and curvy patterns. Awhile back I learned, from you, about finding the correct intersection point of the inseam and crotch seams. In this one I see I may have been buying the wrong patterns. I have a fuller tummy and a flatter butt. Just the opposite of what many curvy patterns have, at least for the joggers in this post. I’m always grateful for better understanding of the physics of sewing.
Thank you for sharing your experience!
This is so helpful! It addresses many of my fitting issues.
Fantastic!