
I read about this method first from Kennis Wong, “You’re doing it wrong: Why your hip measurements don’t work,” Itch to Stitch Blog, March 1, 2016. In her post, she quotes the Frabjous Couture blog and a textbook:
The Frabjous Couture blog is no longer available, but I was able to find the post on the web archive. Marina von Koenig, “SSDA 2: Hip Circumference and Fit”, Frabjous Couture, January 31, 2014.
Here’s the method from “Fundamentals of Garment Design,” 2009, English ed., Tokyo: Bunka Publishing Bureau, “Measure the position where the protrusion of the buttocks is greatest, but that position often tends to be below the abdominal protrusion at the front of the body. Because in garment design a measurement around the hips with some added room for the protrusion of the abdomen and the buttocks is required, when measuring apply a celluloid sheet to the abdominal area and measure around the hips including the abdomen.”
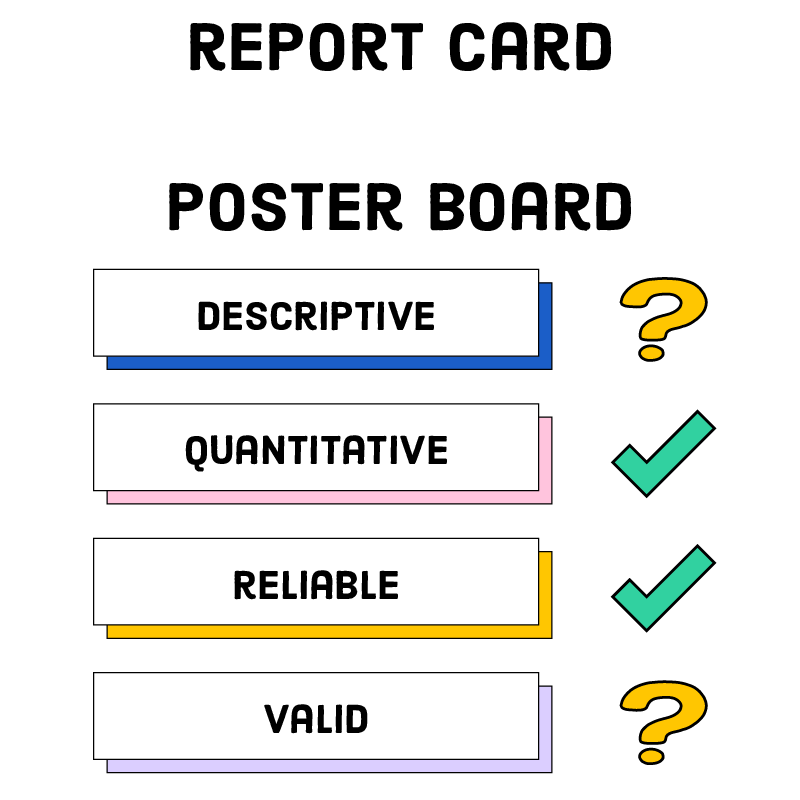
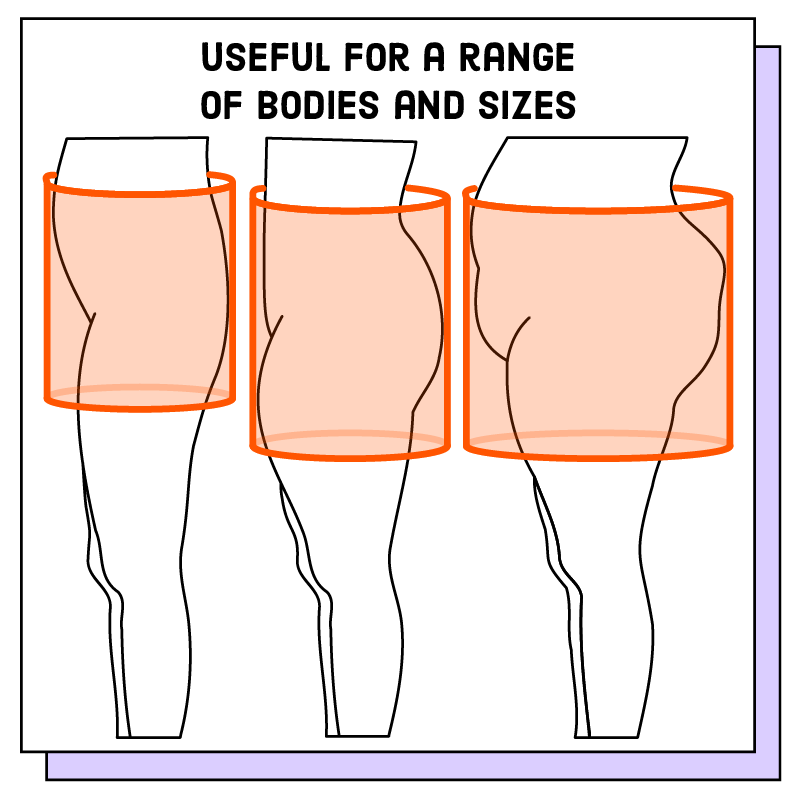
Because this method lacks any detailed instructions, I’m going to first provide a step-by-step guide on how to create the hip measuring band and how to use the band. I’m genuinely looking forward to discussing this last method because I believe this approach shows great potential and effectively meets the goals of being reliable, valid, and quantitative.
Creating a Custom Hip Measuring Band
Creating a custom hip measuring band requires the same level of care as using a traditional measuring technique. However, once the measuring band is created, the process of measuring your body is much easier and less tedious. Take your time when creating the measuring band, and don’t hesitate to double-check your work. It’s crucial that the measuring band is accurate.
Supplies Needed
The links provided are not affiliate links, I do not earn a commission or any type of compensation when you click or purchase anything from these sites. Instead, these are just the products I personally purchased and used for my hip measuring band.
- 1-3 poster boards measuring 22×28 inches
- Tape measure
- Duct tape
- Ruler
- Marker(s)
- VELCRO Brand 0.75-inches x 5-feet Sticky Back Fastener
Measure
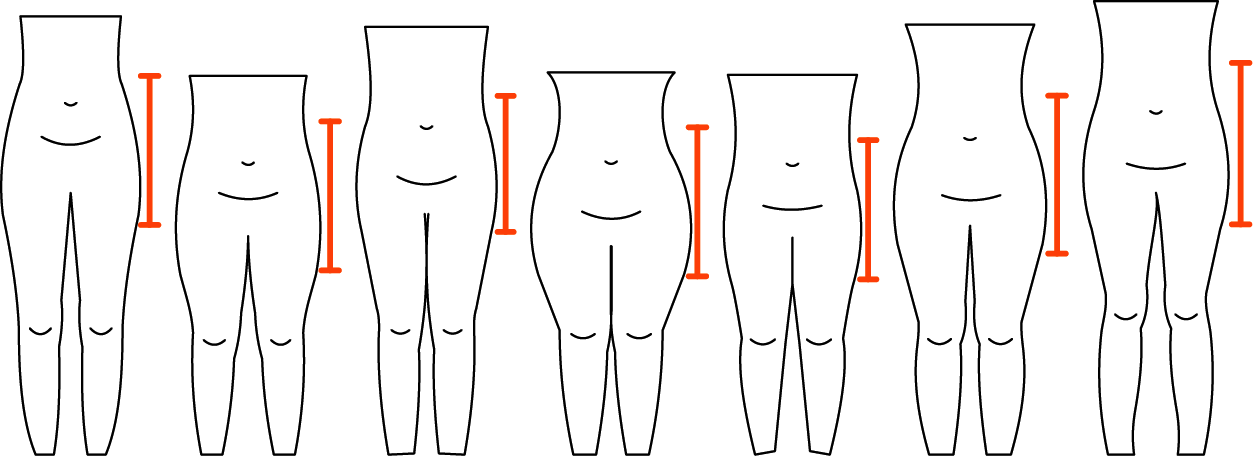
The first thing to determine is how much length and width are needed for your hip measuring band. Let’s start with the width, which should go from your natural waist level to 3+ inches past your crotch level. Your natural waistline will be near or slightly above your belly button. You want your poster board to start here. The crotch level is the bottom of your crotch. Make sure the poster board extends 3+ inches past the crotch level. This is to ensure you include the whole butt. This measurement is how wide the band needs to be.

The length needs to be long enough to wrap around your body, plus some extra. Using a tape measure, slide it up and down until you find the largest circumference. Next, multiply the circumference value by 1.2 to determine the minimum length of the band.
Prepare
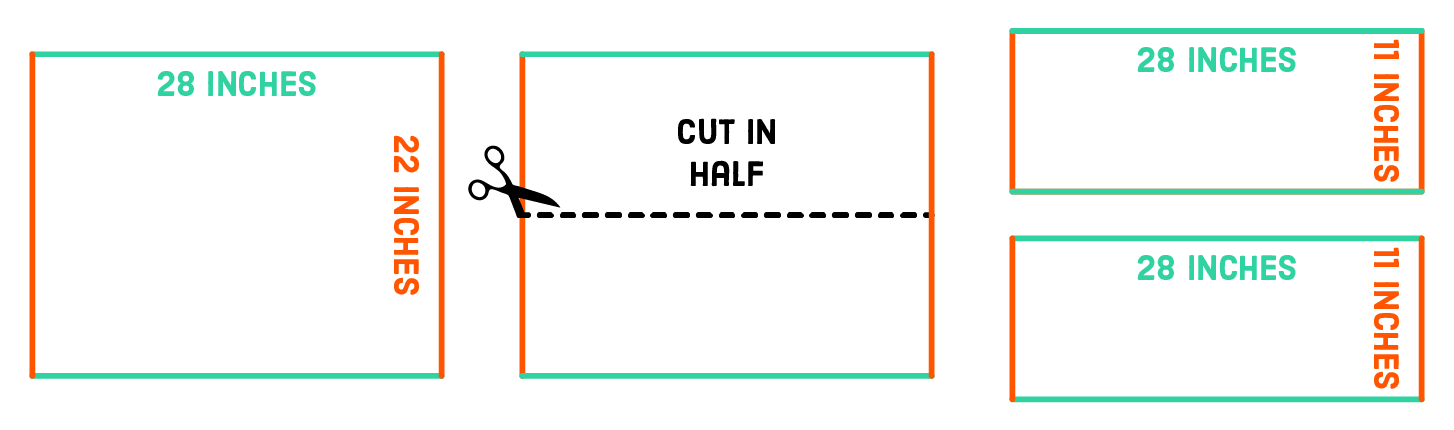
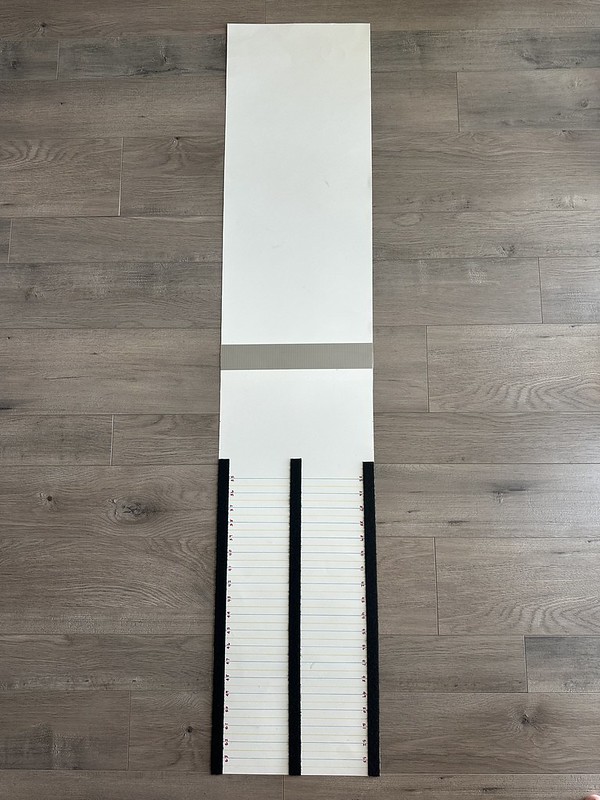
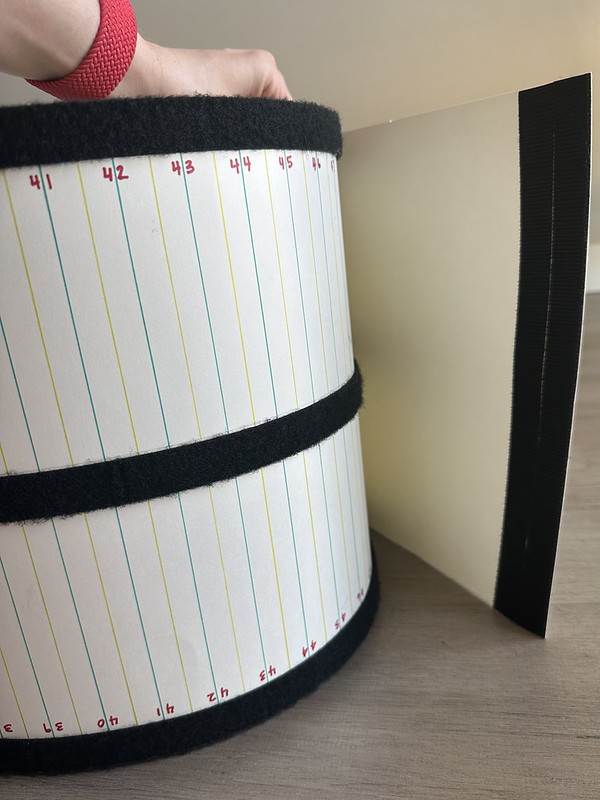
For myself, I needed a band 11 inches by 54 inches. Therefore, I could use 1 poster board (22 inches by 28 inches). First, I cut the poster board into two pieces, each 11 inches by 28 inches. If you need more height or length, you will need 2-3 poster boards.
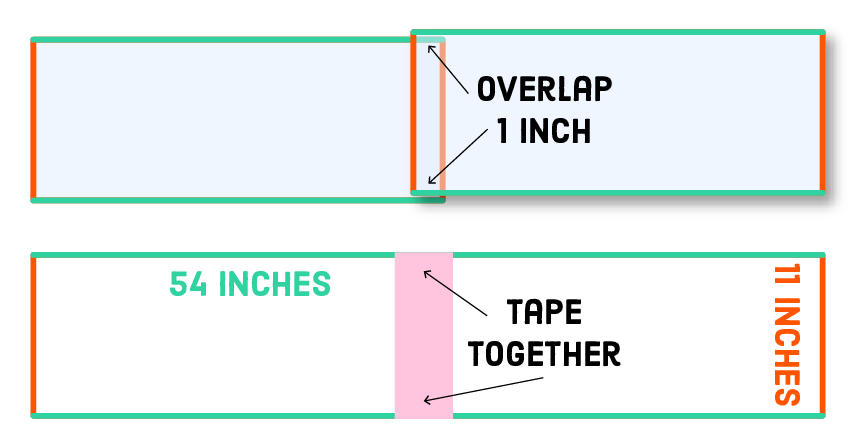
I overlapped the two pieces by 1 inch and duct taped the pieces together, giving me a final band of 11 inches by 54 inches.
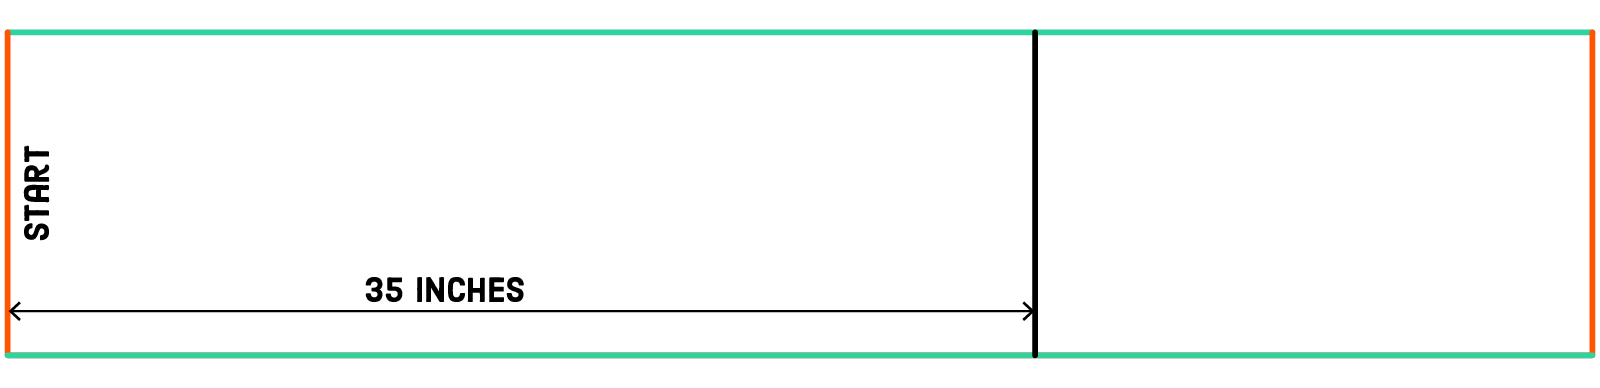
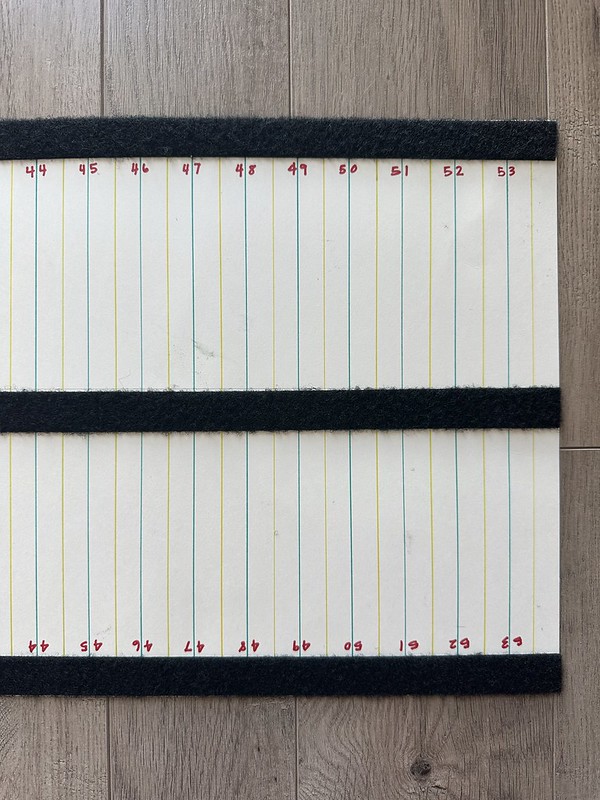
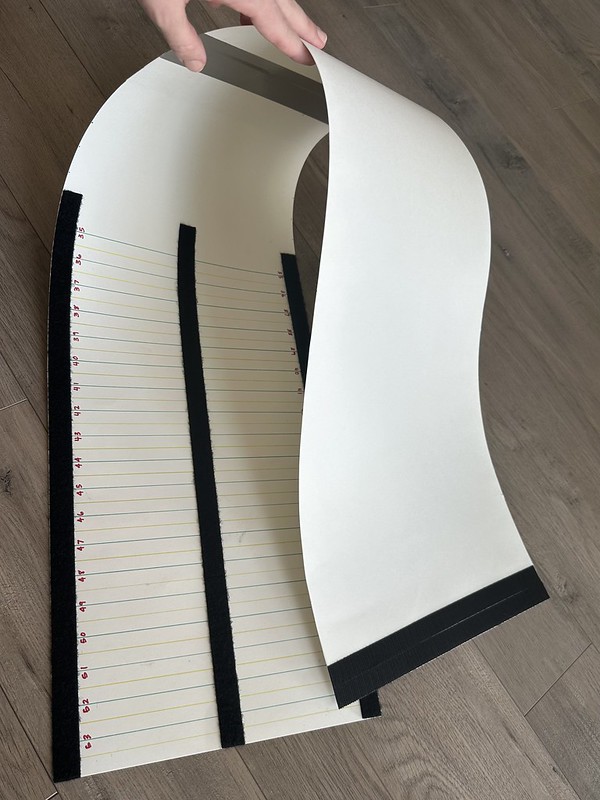
Next, from one end of the band, measure the smallest value you think you might need. Since I was making this band to be used by many people in my family, I started my mark at 35 inches and drew a vertical line.
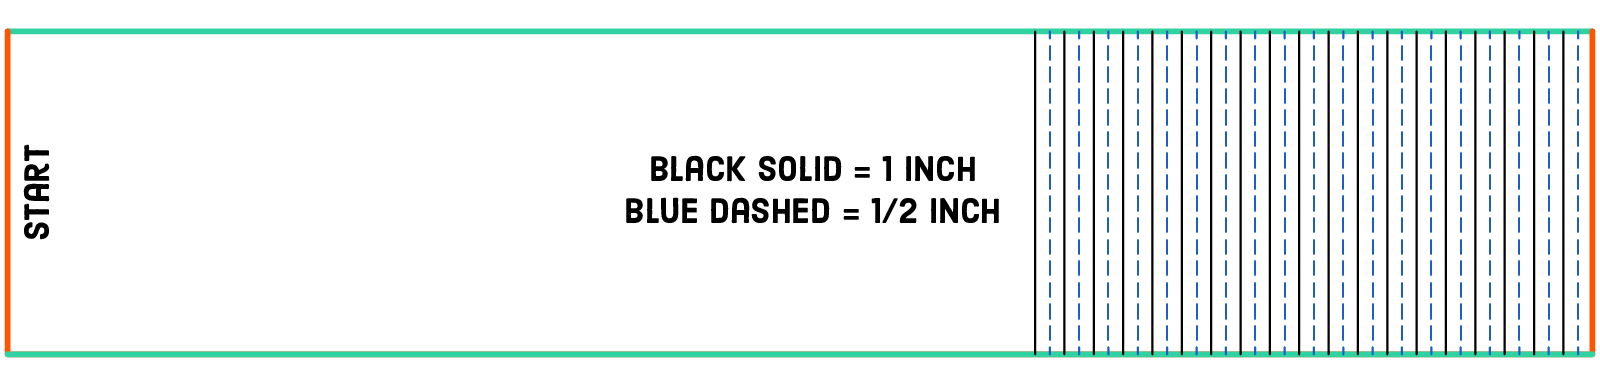
From there, working the rest of the way across the band, draw a vertical line every 1/2 inch. Take extra care to ensure your lines don’t start drifting apart and getting wider than 1/2 inch. I marked my 1-inch lines in a different color from my 1/2-inch lines. Take your time with this step. Being meticulous is crucial. You might find it helpful to begin with a pencil and then trace over your markings with a permanent marker once you’ve verified the accuracy of the measurements.
Add Velcro
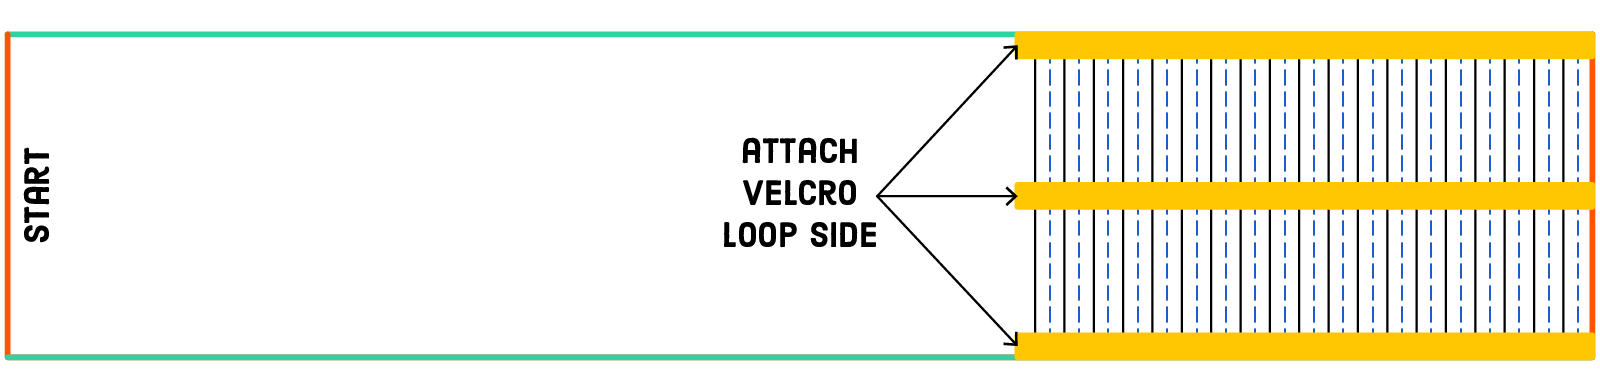
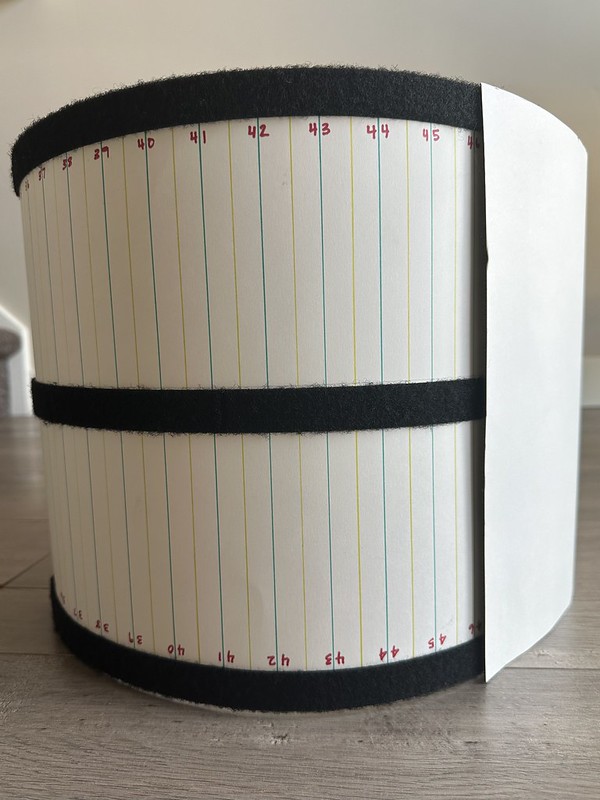
I applied the loop side of the velcro perpendicular to the measurement lines across the top, middle, and bottom. My velcro covers the lines. The loop side is the soft fluffy side. In my figure, the velcro was applied to the right side, which is the side facing you.
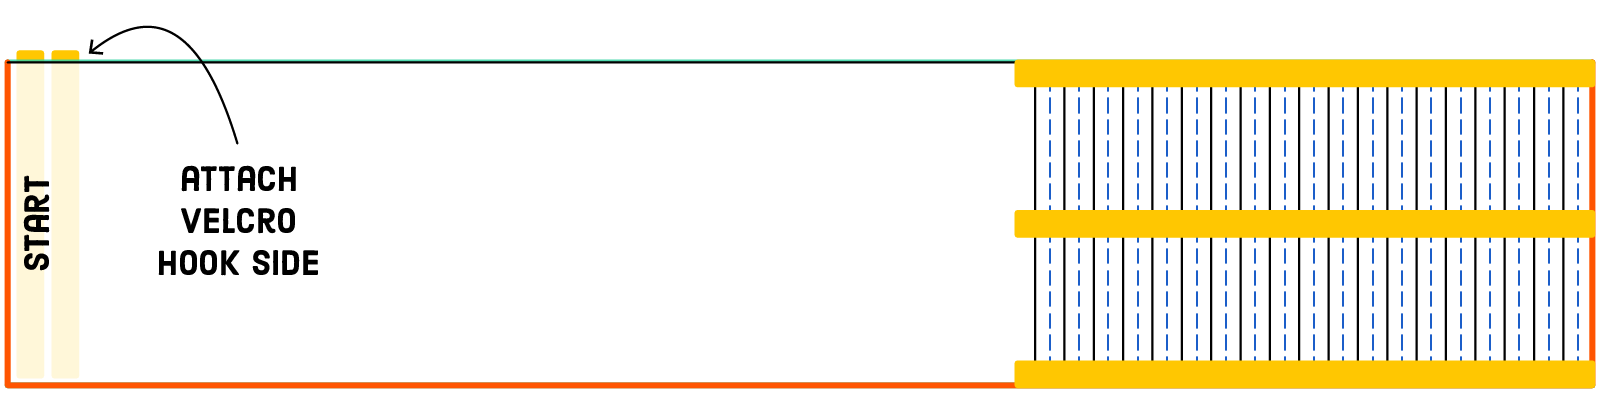
I applied the hook side of the velcro parallel to the starting edge and on the opposite side that my lines are drawn. This is to ensure that when I wrap the poster board around my body and overlap the two sides of the poster board, the velcro will meet together. In other words, apply the hook velcro to the wrong side of the poster board.
Mark Values
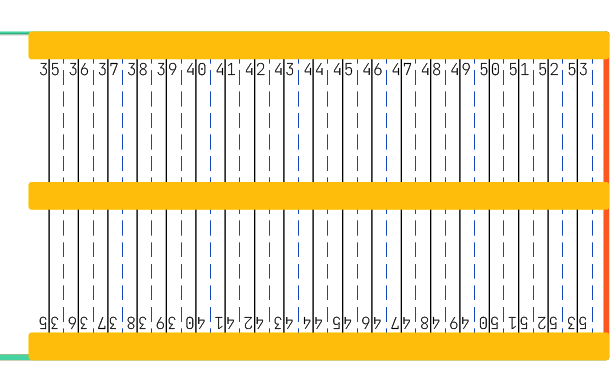
The last step is to mark the values. I just marked each inch. I marked the top and bottom to make using the band easier.
How to Measure Your Hips Using a Band
Use the following checklist to acquire reliable results each time you measure. Take these measurements wearing only the undergarments or clothes you intend to wear with the pants you are measuring for:
Top of the Band
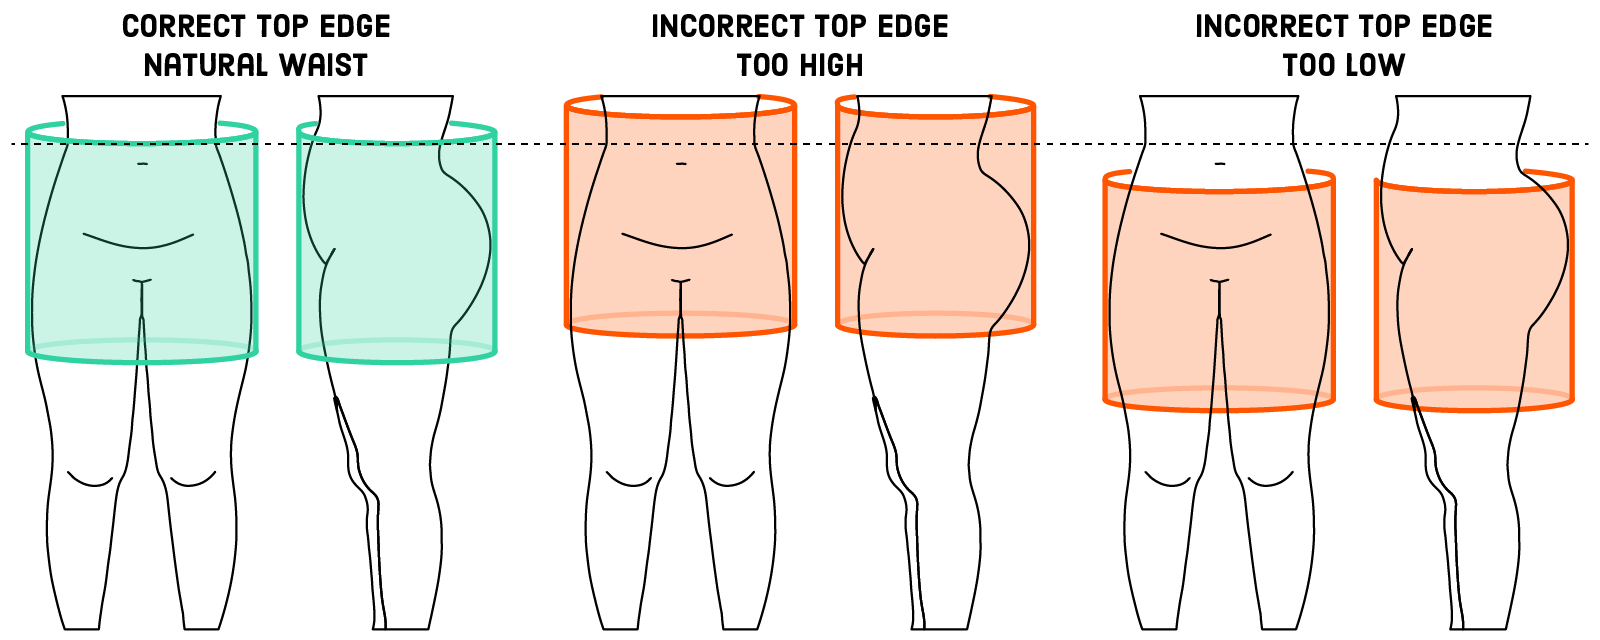
The top of the band should be at or slightly above your natural waistline. The band is too high if your chest is influencing the measurement. The band is too low if it is below your belly button.
Bottom of the Band
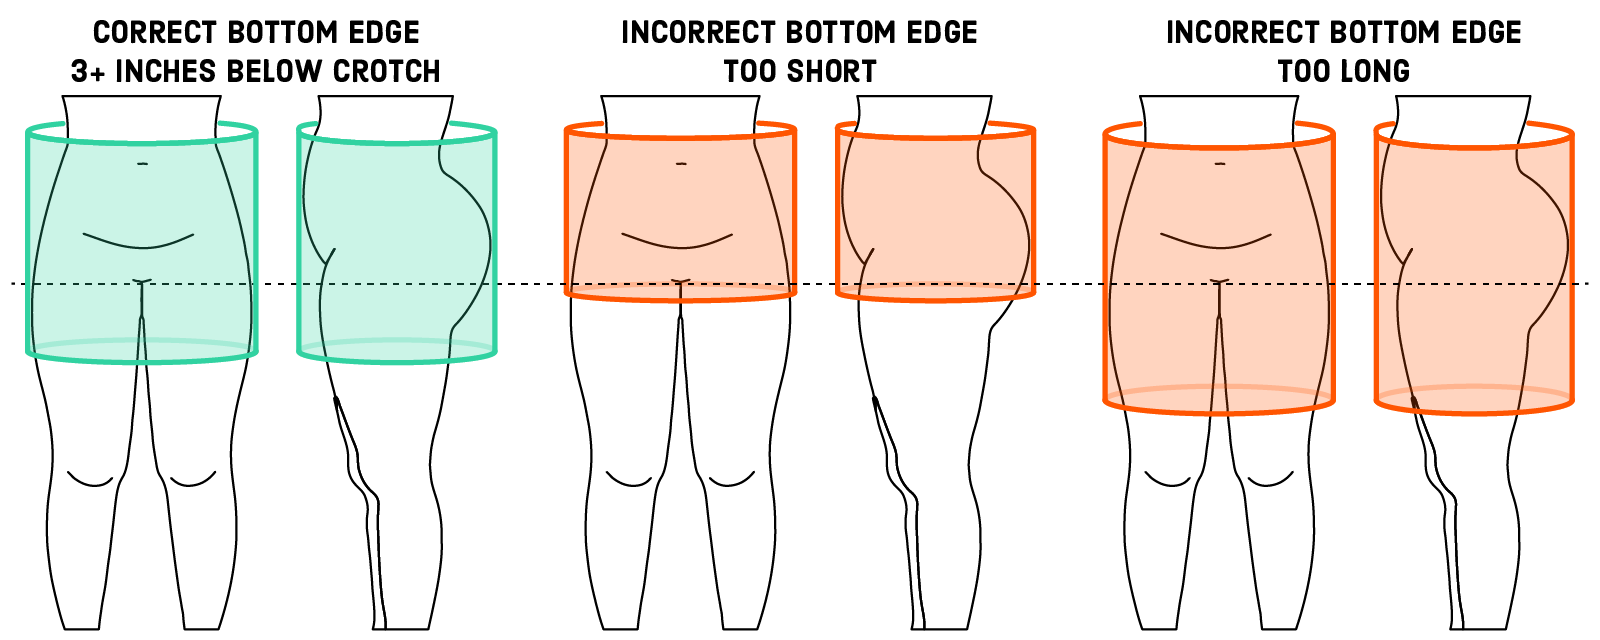
The bottom of the band should be 3+ inches below your crotch level. The band is too short if it does not entirely cover your butt. The band is too long if it extends past mid-thigh, the halfway point between your knee and crotch.
Band Hangs Straight
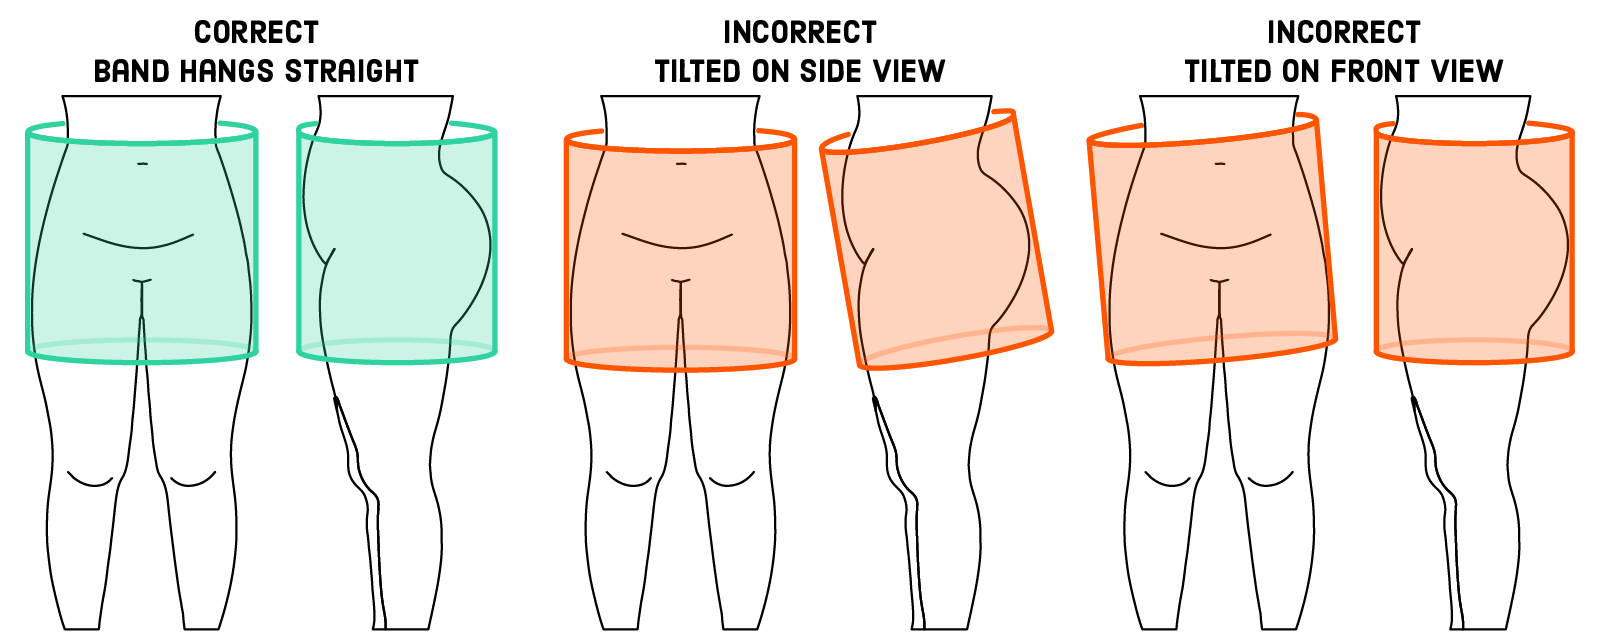
Use a laser level to confirm that the top and bottom of the band are parallel to the floor from the front, side, and back views.
Wrap Band Around Body
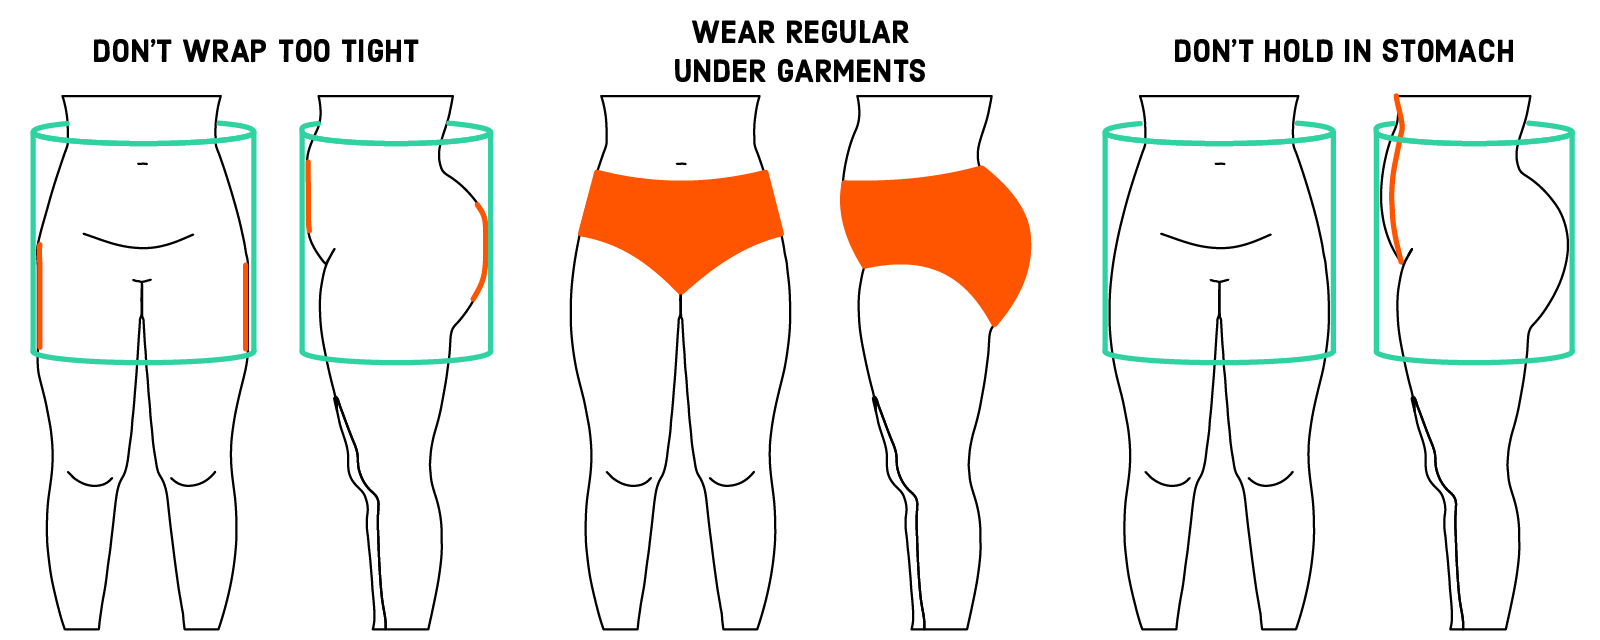
Like all other methods, do not wrap the band too tight. Wear undergarments that you intend to wear with your final pattern. And try to keep a relaxed body, don’t hold in your stomach.
Starting Edge Should Remain Parallel to Measuring Lines
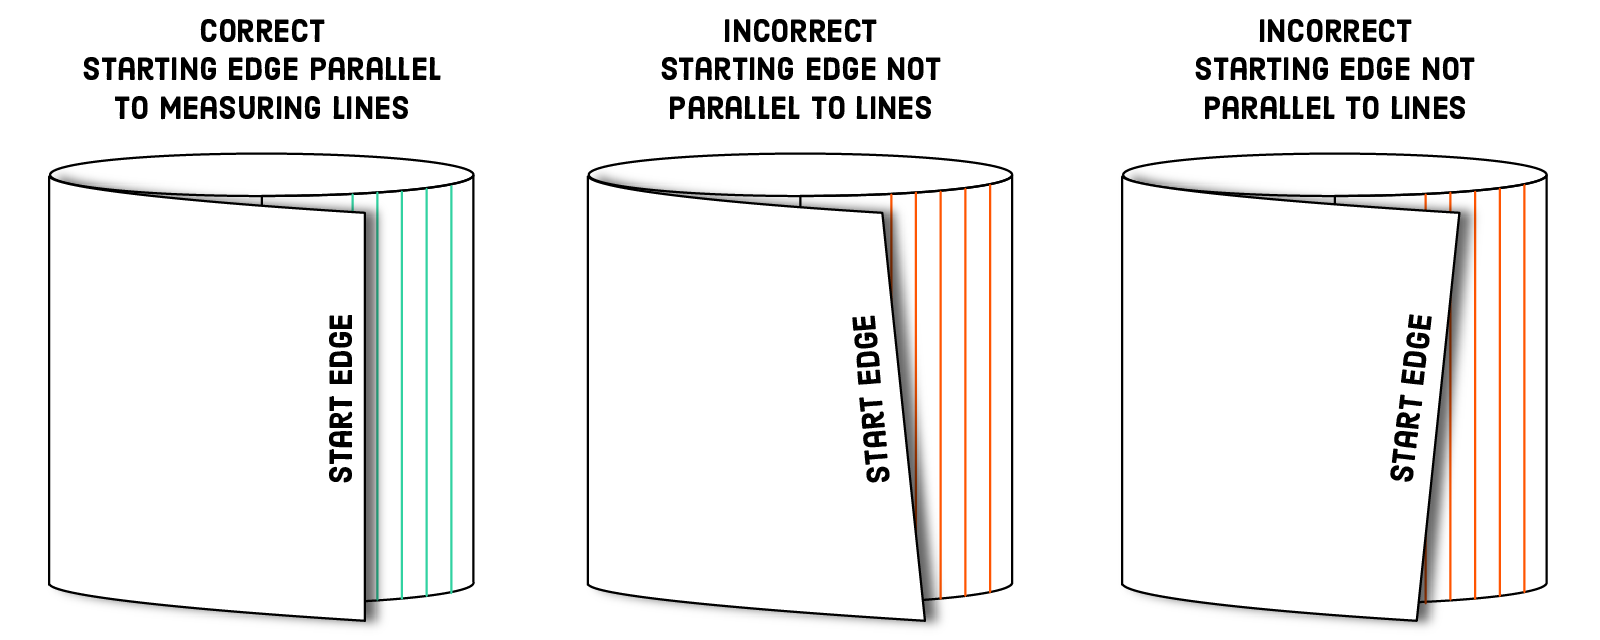
When securing the velcro along the start edge, ensure the edge lines up with a single measurement. The start edge should be parallel to the measurement lines. You don’t want the top of your band at 42 inches and the bottom at 43 inches.
Note your Measurement
The circumference of your torso is the measurement you should use to select your pant size. This measurement corresponds to the “hip measurement” in the pant pattern size chart.
Descriptive
Go ahead and give this method a try! Let me know if I missed a step or have not provided enough instruction.
Quantitative Measurement
The best part of this method is that it relies entirely on a single quantitative measurement. There is absolutely no guesswork needed or subjective judgments required.
Estimate your widest section? You don’t need to estimate that.
Where does my rear end protrude the most? You don’t need to make that judgment.
Does my stomach protrude too much? Not something you need to consider.
Do I have a pelvic tilt? Who cares!
Reliability
The next reason I love this method is that many of the previous factors that might contribute to unreliable results can easily be addressed:
You don’t need to guess where to take the measurement, and you don’t need to take numerous measurements to find the correct size. A single measurement is all that is needed.
So long as you avoid pulling the poster board too tight, wear the appropriate undergarments, and don’t try to hold in your stomach, you will get reliable results every time. These are the same factors for all measuring methods.
It shouldn’t matter if you are taking the measurement or if another person is taking it for you. You also don’t have to juggle multiple tools or feel like this method is inaccessible if you have limited mobility. I got the idea to add Velcro from J Stern Designs.
Validity
I have found that using measuring techniques that take my body shape into account has been invaluable in my pant-fitting journey (see Dani Shorts, Ponoma Shorts, Tula Shorts, Brassie Joggers). My size selection reflects both my body shape and size. If you decide to try this measurement method, please share your experience by leaving a comment below.
Conclusion
I will wrap up this series with a final post summarizing all the information I have presented and will take photos of myself using all three measuring techniques. Stay tuned!

IF YOU FOUND THIS POST HELPFUL, CONSIDER SUPPORTING MY WORK BY SIGNING UP FOR A PAID SUBSCRIPTION.
POSTS OLDER THAN 3 MONTHS ARE NOW FOR SUBSCRIBERS ONLY — YOUR SUPPORT KEEPS THIS SPACE GOING.
INTERESTED IN SUBSCRIBING TO RECEIVE NEW POSTS IN YOUR INBOX?


This is awesome! I am an engineer and was wondering how to make these measurements! I really appreciate all the work you do and share with us!
Thank you! I hope this method can be helpful for lots of people.
I recently found a something that I think will help me fit pants.
I lost 30 pounds earlier this year and I’m wearing my old clothes that are too big. Most of them are a size smaller than I was wearing, and they are still too big. :-)
I am long in the body with a bit of a belly and I my pants always bag under the seat. I have always had an hourglass figure. When I was younger my hips were always 12 inches larger than my waist. Now they are 10 inches smaller than my waist. One of my biggest challenges has been reducing the camel’s nose and the bags under the seat.
I found that if I don’t cinch the waist too much, with a belt, the camel’s nose goes away. It also shows that I need to add a couple of inches in length to the front crotch.
So, one of the things I will do when fitting for a new wardrobe is try muslin’s on and let them sit on my hips. Maybe letting them hang and figuring out where they drape best will help with my alterations.
Just thought I’d share this with you, in case it helps.
I read your blogs often and really appreciate the way you think about clothing construction “as a scientist”!!!
This is interesting but I have no gap between ribs and hip bones. In fact my hip bone is higher than my rib bones. This makes my waist slope up from under my ribs at the front in order to go over my hips at the side.
I can’t take a horizontal waist measurement measurement that is not influenced by either my ribs or my hips.
Do you think this method would work for you instead of trying to figure out waist and hip measurements separately?
I think it is a great tool for measuring the hip, it’s just identifying landmarks that meets the criteria listed for the waist won’t work, because my waist is not horizontal. I need alternative criteria for determining vertical distances.
I would be grateful to hear if you have any suggestions on rephrasing the section about measuring band height (i.e., vertical distance). I genuinely want to make these instructions user-friendly and helpful for everyone. You can email me (naomi@handmadephd.com) or comment on this post.