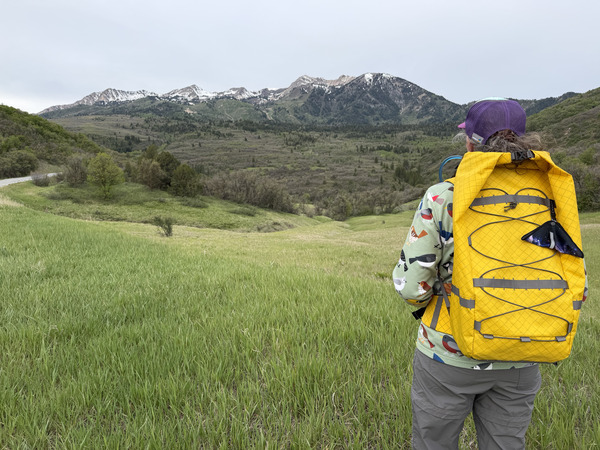
Stitchback Metamorph Pack: Prototyping and Materials

Disclaimer: This post will most likely be updated a number of times over the next few months as I remember items I’ve left off.

This is going to be a pretty boring post, only because I’m going to just run through all my materials and supplies plus give you resources on how to prototype a project like this. I won’t share my prototypes here just yet but will save those for later posts, but I thought I needed to just dump materials and ideas now and not at the end of this series. Hopefully, my personal aside about cute cats and dogs makes up for the lack of anything else in this post.

Prototyping

Tackling a project this extensive involves a lot of preparation and planning. If you’ve been making your own gear for awhile, you might have small bits of webbing, ribbon, and fabric around, but you may not. How do you test out a project like this then? It’s helpful to have some ideas how to test the fit and style using lower cost materials. It’s challenging to get your head around a pack without just building one. I also want to encourage people to get past the mental block about waste. The most wasteful thing you can do is build a whole pack or garment and then never use it or get halfway through your final project and never finish because you hit a hurdle too big to overcome. It’s better to slowly work your way into a project like this using random things you have on hand around you, so by the time you make your final product, you are able to complete it and will be something you can use and love.

Cardboard

Do not underestimate the usefulness of cardboard. Cardboard can be used to test out your hipbelt and the frame that sits against your body. Cardboard is super handy to have. It’s easy to cut, score, and reshape on the fly, so you can iterate the fit in minutes without committing to anything. Even a rough cardboard mockup of a framesheet will tell you a lot about sizing and body contact before you ever touch your real materials.

Muslin

From Roaming Wild Rosie’s Blog

What do you do about all the webbing and accoutrement that’s needed? Muslin works well in a pinch if you want to test ideas and see how things look. You don’t need all the gizmos and gadgets just yet. Use it to mock up pocket placement, strap routing, or any other element where you need to see something in three dimensions before you commit.

Tape

I thought I would throw in the tape example because it just shows you that you can really use anything. I have miles of this tape at home since it’s what I use to tape together PDF patterns. It’s a much better product than Scotch tape for that, so in a pinch I guess I could have tested my pattern with tape. Tape would be great for a webbing alternative, because it won’t stretch as much as fabric and can have roughly the same stiffness. It’s also great for temporarily joining mockup pieces together instead of trying to sew stuff together.

If you’ve seen some other creative prototyping methods, please let me know. I would love to include them on this post.

Materials

I’m sure I’ve forgetten something, but here’s a full list of materials I used for this project. Best part, I got to make my first ever McMaster-Carr purchase!

McMaster-Carr

  • Moisture-resistant HDPE sheet, 24 × 36 × 1/16 inch (frame)
  • Multipurpose 6061 Aluminum bar, 1/8 × 1 × 23 inch (frame)

The Foamary

  • High Density EVA Foam, 6mm, white (shoulder straps, hipbelt)
  • High Density EVA Foam, 3mm, white (shoulder straps, hipbelt)

Mozet Supplies

Z-Buckle and 1-1/2 inch Webbing
Sternum Strap Adjuster

Ripstop by the Roll

Kross Buckle, Shock Cord, and MIL-SPEC Webbing
UL Kitty Clip and 3/8 inch Webbing
Dragon Tension Lock and MIL-SPEC Webbing

Sailrite

YKK Heavy Duty Adjustable Strap Buckle

Hook and Loop

Hook and Loop Tape

Salt Lake Sewciety

EPX 200 (pink)
1/8 inch Spacer Mesh (main back fabric)
210D (brown at shoulders)

Tools

BIC Lighter
  • BIC lighter (melt the edges of ribbon and webbing)
  • Work gloves (bending the aluminum bar)
Utility Knife / Box Cutter
  • Box cutter (cutting the HDPE plastic and cardboard)
  • Heavy-duty office scissors (cutting the HDPE plastic corners)
  • Permanent marker (marking the pattern on HDPE plastic and high density foam)
Cement
  • Barge All Purpose Cement (glueing foam together)
  • Foam Brushes, 1″ (applying cement)
J-Roller
  • J-roller (pressing glued surfaces together)

Machine, Needle, and Thread

I played a lot of “Thread Chicken”

I used my Sailrite Ultrafeed LSZ for this project. My Babylock Jane never sewed the same after I made my first pack in 2023. That project marked the beginning of the end for her life. I’m glad I now have a heavy-duty machine that can handle tough projects like this without breaking a sweat. I made both bags and didn’t break a single needle. We’ve gotten to know each other really well.

My machine can handle up to a size 22 needle, but I used size 16 Schmetz Serv 7 needles with Mara 70 thread. The Serv 7 is an industrial needle designed to be more heavy-duty than a standard needle, which means fewer skipped stitches and less risk of breakage. The two problems I couldn’t seem to avoid with my original bags.

I used a lot of thread on this project! Way more than I anticipated, and I was constantly having to play yarn chicken before getting more. That’s a lot of odds and ends. I kept everything in a big plastic bin for the months it took me to complete these bags. It was nice to have everything stay together, so I always knew where to find stuff. You definitely need to stay organized for a project like this.

Personal Aside

Nearly every time I have a personal trainer session, I get to play hide-and-seek with the black cat.

He’s in a perfect 10 out of 10 loaf by the refrigerator
Snoozing on the bench

As with all black cats, he hates everyone except me. If someone else comes to the gym, the cat runs into the backyard and hides. The black cat knows deep down I’m a goth who hates warm weather and sunlight (Happy Belated World Goth Day, May 22nd).

Naps!
Snuggles when I’m trying to do step-ups

When it’s just me and my trainer, the cat will do figure 8s around my feet at the most inconvenient moments. Last week, he tried to go for snuggles while I was slowly doing lateral banded walks. Silly cat!

And just so you don’t think I only get attention from the cats…my gym comes with many cute animals!

And now for something completely different. I’m always trying to find purpose and meaning in making, creating, and sewing that separates it from the toxic sludge of social media and late stage capitalism. And no, I haven’t missed being on Instagram since deactivating my account. I’d rather text message people to build friendships rather than deal with online nonsense. I recently enjoyed listening to Serj Tankian from System of a Down talk about the spiritual aspect of creating, making, and art on the Soul Boom podcast with Rainn Wilson. It’s a genuinely profound conversation and worth a listen whether or not you’re a System of a Down fan.

IF YOU FOUND THIS POST HELPFUL, CONSIDER SUPPORTING MY WORK BY SIGNING UP FOR A PAID SUBSCRIPTION.

POSTS OLDER THAN 3 MONTHS ARE NOW FOR SUBSCRIBERS ONLY — YOUR SUPPORT KEEPS THIS SPACE GOING.

Cancel anytime. Instant access.

INTERESTED IN SUBSCRIBING TO RECEIVE NEW POSTS IN YOUR INBOX?

Leave a comment

Website Powered by WordPress.com.

Up ↑