
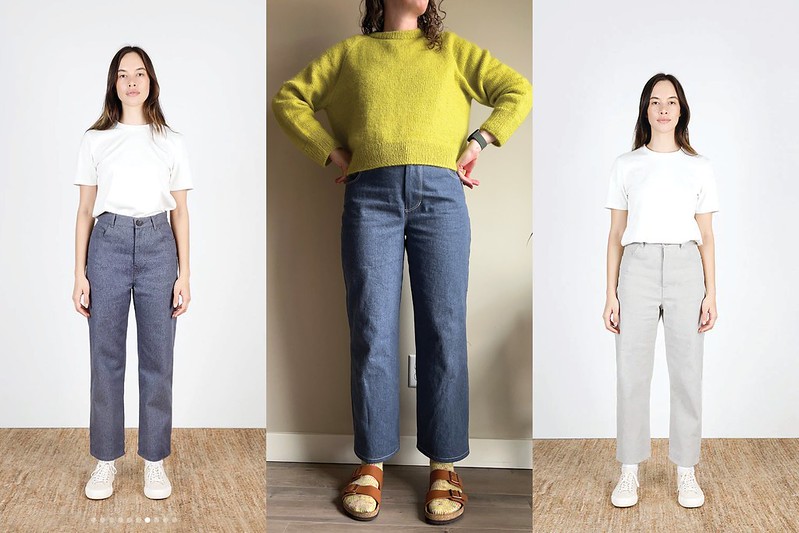
Over the past few years, I’ve been pretty unsuccessful in making myself a pair of hard slacks that I liked selecting styles that don’t spark joy. The Cass Pants from Make by TFS? I do NOT like pleats on my body. Before that, self-drafted trousers with pleats. What was I thinking! Persephone? I do NOT like wide-leg pants, either, it turns out. Every winter, I try and tackle the issue of comfortable hard slacks that I want to wear. And each winter, I get to rediscover my body. The process is always exhausting and tedious, but in the end, I always learn something new. So far, this year has been more successes than failures. Although, I had a bit of a wobble with this pattern and almost gave up.
This post contains the details of my fitting process from start to finish. It usually takes me several days and over a half-dozen muslins to get to my final fit. I tried a new method that I had been thinking about for months, using a laser level to find my body’s center grainline. In my arrogance, I unnecessarily spent a whole day guessing and trying to alter the pattern to only feel wholly exhausted and defeated. Because I don’t like unsolved problems, I woke up the next day ready to tackle the issue with data. I bought a self-leveling laser level and figured out, through empirical evidence, how to adjust my pants. I still had to go through 3 muslins, but I knew I was getting closer to the correct fit each time. I definitely experienced the Goldilocks principle. My first attempt with the laser level made an adjustment that wasn’t enough. My second attempt made an adjustment that was too much. My third attempt was just right.
Analyzing Style

I will spend some time on social media and the internet (Instagram/Pinterest/Google Images), viewing as many bodies wearing the pattern as I can. You can view the May Jeans on multiple bodies here. I’m interested in assessing common fit issues and general style. Admittedly, the May Jeans don’t have a ton of examples to study, and suspiciously, not many photos are taken of the backside. This is a small red flag because it suggests people might feel insecure about how their butts look in the jeans and there may be something problematic with the drafting. From my analysis:
- Classic high-waist jeans featuring a zip fly closure and five pockets.
- Has a long crotch depth and should sit high on the waist.
- The torso and crotch curve sits close to the body.
- There is minimal ease at the bottom of the crotch curve.
- There may be grainline issues to consider.
- All leg options have a relaxed fit, even View A – Straight Leg.
- Drafted for someone 5’7,” and the hem should hit the ankle bone.
Materials and Notions
The fabric I used is 10oz upcycled denim in wave from TFS. The material is part of the New Denim Project from Iris Textiles, located in Guatemala City, Guatemala. I think 10oz is the perfect weight for jeans. Denim can be daunting to sew, so here’s what I used for construction and topstitching. I used a denim needle 90/14 with Gutermann Mara 100 thread for construction. For topstitching, I used a denim needle 110/18 with Gutermann Mara 30 Poly Wrapped Poly Core Thread.
I’ve always liked the YKK #5 Antique Brass Jean Zippers from Wawak. I usually just buy a whole bunch of zippers 7″ long and shorten them as needed. I hate shortening metal zippers, but I’m slowly getting the hang of it.
Wawak also carries reliable buttons in a variety of finishes. The jean buttons I get are Plain Jean Tack Buttons – 27L / 17mm.
The other place with reliable denim hardware is Taylor Tailor. I used some old rivets I had from Taylor Tailor on my jeans.
I still have my handy 2 lbs anvil from Tandy Leather Goods and have no issues installing buttons or rivets. If this is something you struggle with, I highly recommend the anvil.
Determining the Correct Size
The May Jeans fit waists 22.4-51 inches and hips 34.3-62 inches. I used a straight size 18 for the May Jeans, and here’s how I made that decision.
Body Measurements
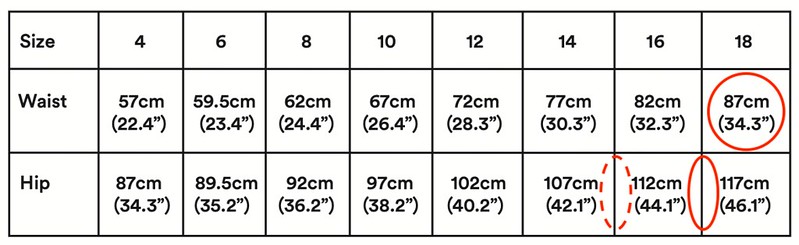
I usually ignore waist measurements, which I know is a bad habit. But my waist is proportional to my hip measurement in >90% of patterns, so I’m usually a straight size. For this pattern, do not ignore the waist measurement. Currently, my natural waist measures 34.5 inches, and my hips measure 43 inches. That puts me at a size 18 based on my waist and between a size 14 and 16 based on my hips, but wait…
Adjusting Hip Circumference
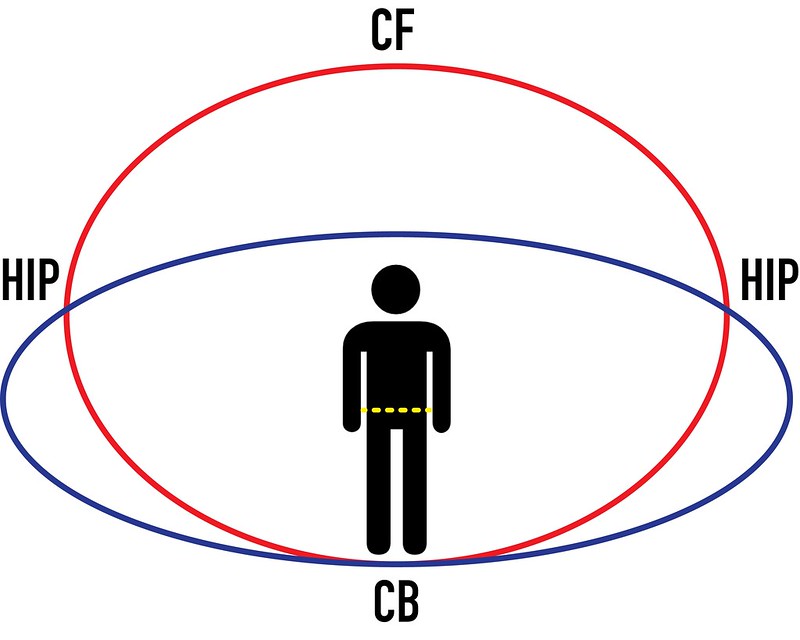
Imagine that I can take a a cross-section at your hips (yellow dotted line). Both of these ellipses have a 44-inch circumference, but obviously, the ellipses are very different shapes. The long axis goes from hip to hip, and the short axis goes from the center front to the back. Patterns are designed with a short axis length based on a particular body shape. However, there are situations where your body shape and posture may need more room from the center front to back: anterior tilting pelvis, protruding lower abdominals, and/or protruding upper thighs. When measuring the hip circumference, it is essential to include these, but why?

Your long axis length is fixed, blue ellipse, but you need more length in your short axis, red ellipse. What do you do? You’ll have to draw a new circumference, the green dotted line, which maintains the blue ellipse’s long axis and incorporates the red ellipse’s short axis.
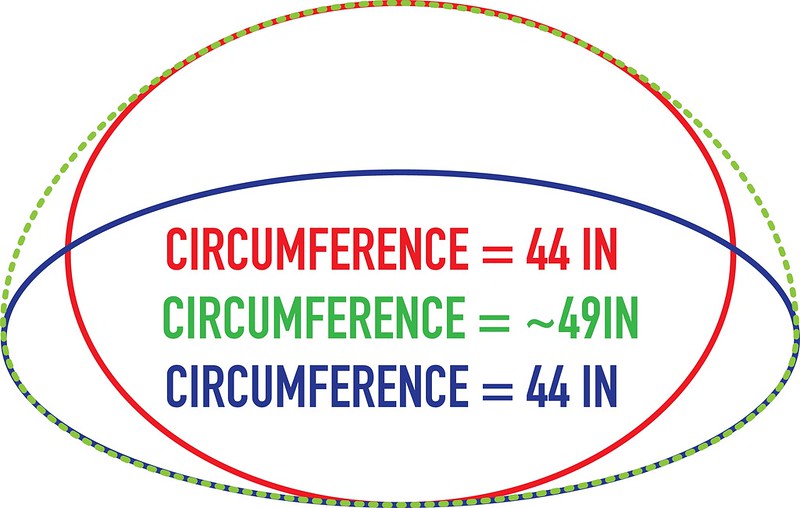
The new circumference is larger, and it is important to figure out how much your shape contributes to the increased circumference.
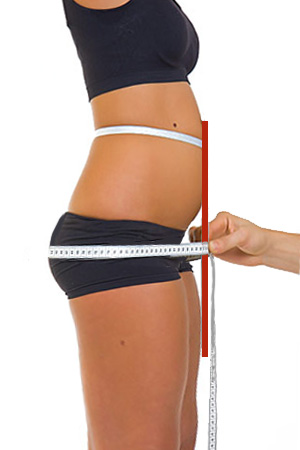
This photo shows how to measure the hips, including the protruding stomach, to determine the new hip measurement. When I re-measure my hips and include my protruding stomach, I measure 45 inches, which puts me between a size 16 and 18 for this pattern. Is size 18 the correct size for me though?
Finished Garment Measurements
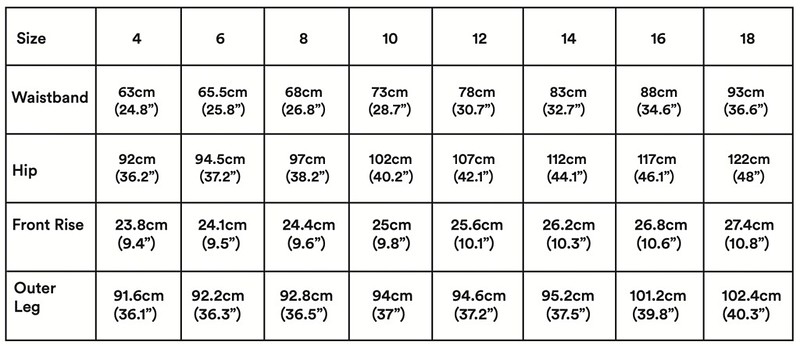
It is helpful to double-check the waistband measurement and hip measurement on the finished garment. If my natural waist is 34.5″, the size 16 waistband (34.6″) is going to be too small regardless of where on my body the waistband sits. This is why I urge everyone to pay attention to the waist measurement on this pattern. The size 18 waistband is 36.6″ and that gives me some room to adjust.
The second thing to check is the final hip measurement of the garment. When you sit, measure your hips and ensure the final garment hip measurement gives you space to sit. Our hip measurement will always be larger when seated. For example, if your hips measure 47 inches when seated, you’ll want to make sure the final garment measurement is at least 47 inches. If the final garment at the hips is smaller than your seated hip circumference, your pants will be too tight. You do not need to try and include protruding body parts when taking a seated hip measurement. My seated hip measurement is 47″, so size 16 would be too small for me (46.1″). Based on my waistline, adjusted hip girth, and final garment measurements, I should use a straight size 18.
Fit the Waistband
Fit the waistband first! I recently started doing this, which has transformed my whole fitting process. I usually waited until the last step to adjust the waistband but was always disappointed with the final fit. I also find it extremely helpful to use the same fabric as your final garment because:
- You know exactly where on your body you want the waistband to sit, regardless of what the pattern suggests.
- You will know if you need to adjust the curvature of the waistband.
- You will know if you need to tighten or loosen the waistband.
- You will know if you need to add or remove interfacing.
For this pattern, I did not have to make a single adjustment. I thought a straight waistband wouldn’t work and would be too loose. I was wrong on both assumptions. The size 18 waistband is a perfect fit for me, and no curvature is needed. It helps, too, that your first step is successful. Fitting trousers is scary and intimidating, but if you know the waistband is perfect, that’s one less thing to worry about.
Adjustments
Crotch Depth
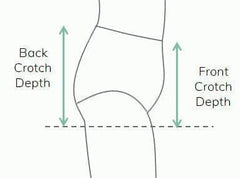
The crotch depth is the distance from the floor or bottom of your crotch curve to where you want the waistband to sit. This measurement will change depending on the style and desired fit. With your waistband already figured out, it is just a matter of determining how high or low you want the crotch curve to sit. Look at how the pattern fits on multiple bodies to understand the intended style. Do wearers have a lot of vertical ease in the crotch or little ease? The bottom of the crotch curve for the May jeans should sit pretty close and tight to the body, so it doesn’t appear the jeans have a lot of vertical ease.
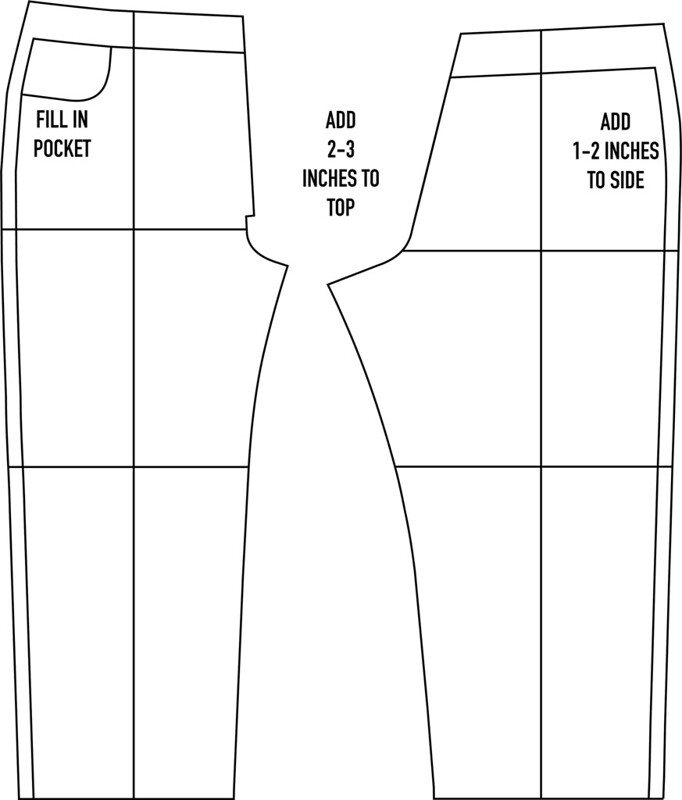
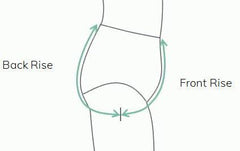
I cut out one front piece and one back piece and added some wiggle room to the side seam and top to give me space to adjust the slacks vertically and room to fit the side seam to my waistband. Check out Stacey’s YouTube channel if you need more information about this process. The goal is to adjust the front and back crotch depth and pin the pants to your waistband once satisfied. The waistband DOES NOT MOVE. I particularly like to pay attention to the side seam to ensure it is hanging straight up and down. If the front and back are off balance, the pant legs will want to swing forward or backward.

I determined I needed to remove 1.875 inches from the top of the pants at the center front and back and 1.5 inches from the side. Let’s take a look at the before and after photos.

The front crotch depth is too long on the original pattern. The extra length is causing the center front seam to billow outward. After the adjustment, the center front sits neatly against my body.

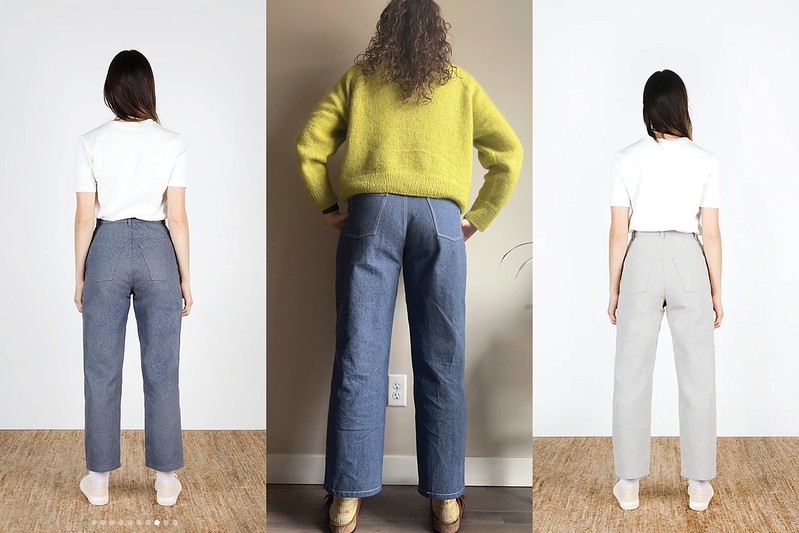
The back crotch depth is also too long. The center back seam bulges out horribly. After the adjustment, the back crotch curve is flat and smooth.
Now is also a good time to determine if you need to lengthen the leg.
Can you see how I would have had this conundrum if I didn’t fit the waistband first? Either I would have had to wear the waistband ~2 inches higher, or I would have had weirdly low-slung jeans. I wouldn’t have been able to make productive alterations whilst the waist and crotch depth remained wrong.
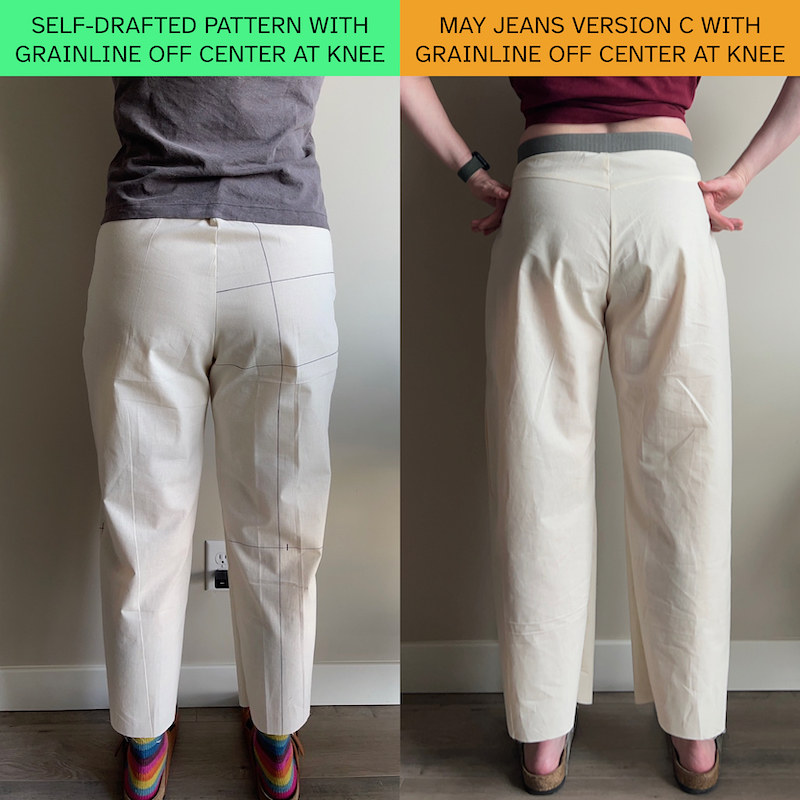
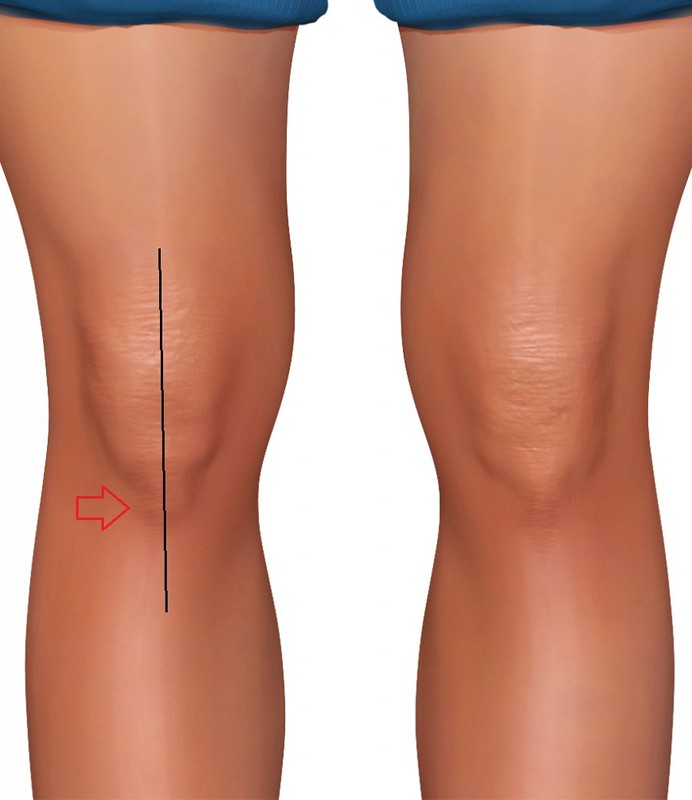
Does the Center Grainline Bisect the Knee?

At the bottom of the pant leg, excluding the hem allowance, find the middle point, and draw a vertical line. That vertical line is the pattern’s center grainline. Most patterns will provide a horizontal knee reference line. If not, do your best to find where on the pant leg your knee will be. Does the center grainline bisect the knee reference line?
For the May jeans, the answer is nope! I have a long post about why I need the center grainline to bisect the knee when fitting to my body. In the image above, the actual center of the knee reference line is the small red tick mark. The front is not too far off, but the back piece is over an inch off-center.
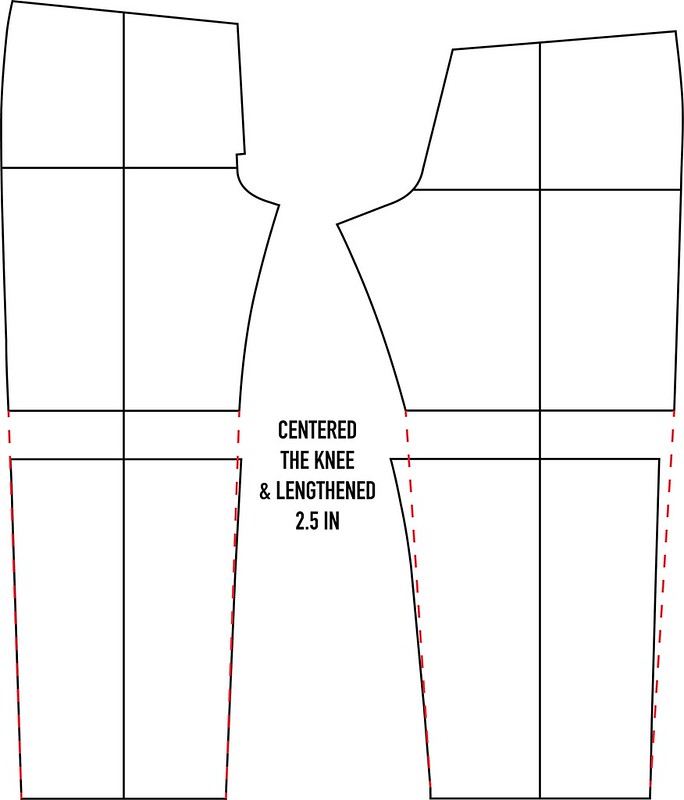
Since I was already going to cut across the knee reference line, I took this opportunity to lengthen the jeans. I knew once I adjusted the rise in the previous step, I would need to lengthen the pant leg. The pattern was drafted for someone 5’7″, and I am 5’11”. I added 2.5 inches.
Before I moved to version A with the straight legs, I tried version C with the shaped legs. If I compare fit with my previous blog post about the center grainline at the knee, you can see similarities.

An off-center grainline at the knee results in fit issues around the torso. In the past, I have easily mistaken the problem as not having enough length in the crotch curve because the jeans/trousers will feel tight either in the front or back. This is why I urge everyone to stop trying to read draglines. Draglines on pants are like will-o’-the-wisp, mystical lights that seemingly help guide travelers to some final destination but tend to lead people astray. Draglines suggest something might be amiss but don’t tell you anything helpful. You will have to use other tools to diagnose the issue(s), like checking grainline placement.
Center Grainline At Your Hips
Fixing the grainline placement at the knee will not solve all fit issues, but you need to change the grainline at the knee first before you adjust the grainline at the hip. Here are my new and improved steps for finding grainline at your hips.

Luckily the May Jeans come with a hip reference line already drawn on the pattern pieces. If a hip reference line is not provided on a pattern, use the top of the crotch curve. Finding the exact location of your hips on the pattern is not essential. When you cut out your muslin, mark the hip reference line on the pattern pieces. If the line is the same on the pattern and your muslin, that is all that matters. The top of the crotch curve will be different from front to back, so the hip reference line does not need to line up at the side seam. For the next step, we will use a laser level to mark your body’s center grainline. The laser level I used is Bosch GLL 30 Self-Leveling Cross-Line Laser.
How do you find your body’s center grainline? Did you know that your body has a preferred location for the center grainline? I tried using makeshift plumb bobs in the past, but keeping the plumb bob still was always challenging. It was even harder to transfer the information to my body. Let’s dive into body alignment first.
Foot Alignment
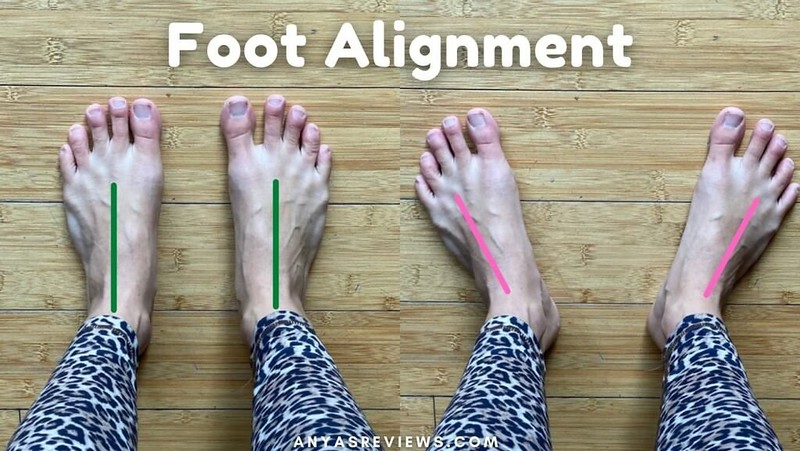
Stand with your feet approximately hip-width apart to be balanced and comfortable. You may have to adjust slightly, but the general rule is that your second toe should line up with the center of your ankle. The center of my ankle actually lines up with the space between my first and second toes. If you are measuring the grainline for the back of your leg, you will want the same alignment of your feet. Start with the front, so you have an idea of posture before attempting the back.
Ankle / Heel
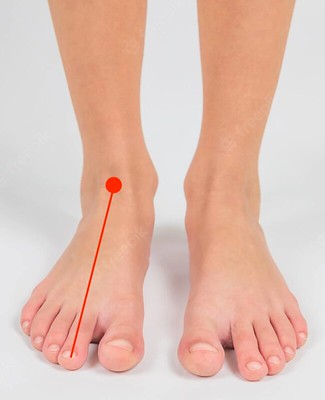
Finding the center of the ankle may feel tricky, but if you get your feet aligned first, the laser level can help refine the placement.
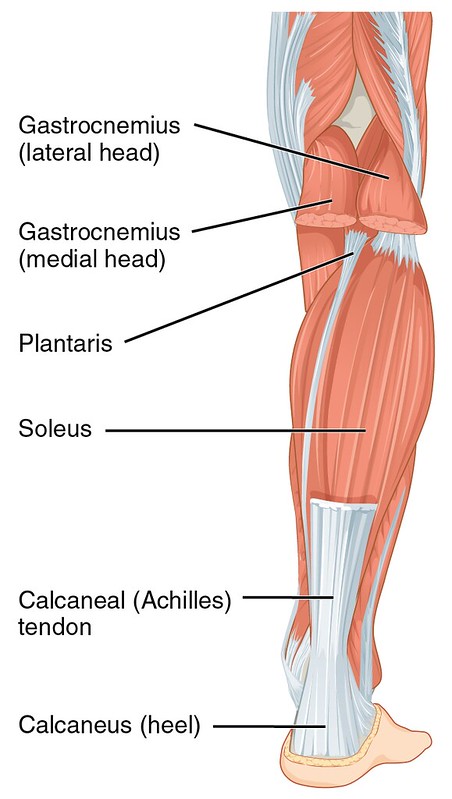
The back of the foot is slightly easier because you can use your Achilles tendon. That should be fairly straightforward. When standing, you want the foot and ankle to line up with the laser level.
Knee
For the front, you are trying to identify the center of the kneecap (AKA patella). Hint, if the pants aren’t too tight anywhere, the center grainline of the pants will actually be at the center of your knee. Just mark the location of your knee along the center grainline. More on this later.
The middle of the back of your knee may seem impossible to identify too, but again the center grainline of your pants will actually be at the center of your knee. Just mark the horizontal reference line of where your knee crease is.
When standing, you will want the foot, ankle, and knee to all line up with the laser level. The limitation to my whole process is that I haven’t been able to evaluate this protocol on someone with ankle pronation or knee deflection that would restrict their ability to stand with everything aligned.
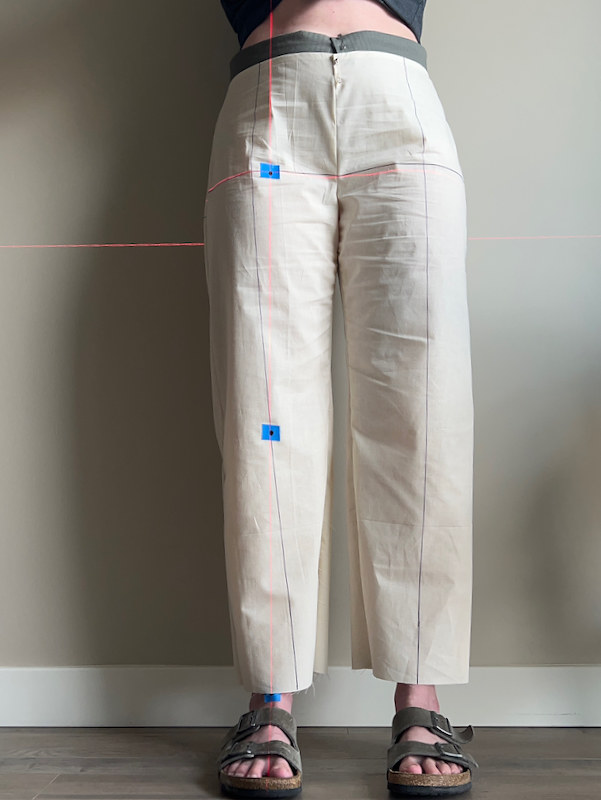
Stand comfortably and aligned as described above. The laser should be lined up with your second toe, the middle of your ankle, and the center of your kneecap. Mark where the laser crosses at your hip reference line. You have now found the center grainline of your front body. Notice that the center grainline of the pant is at the center of my kneecap.
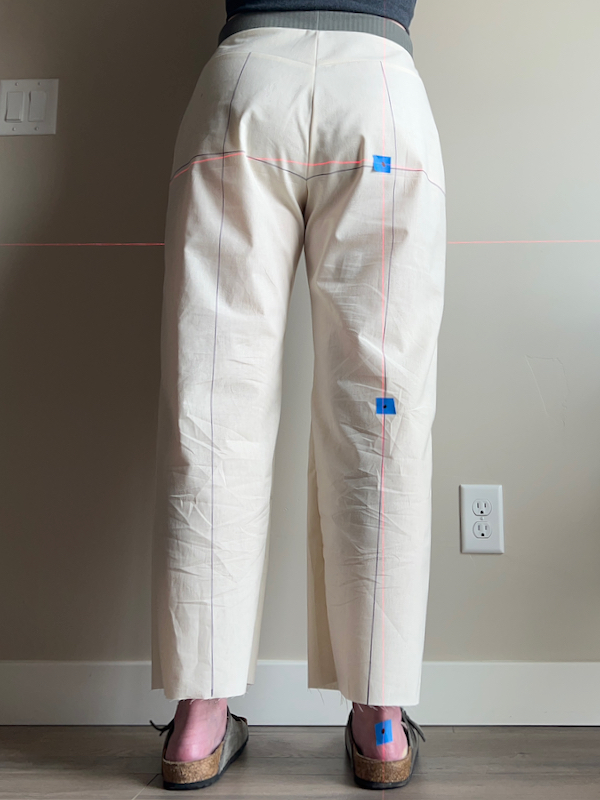
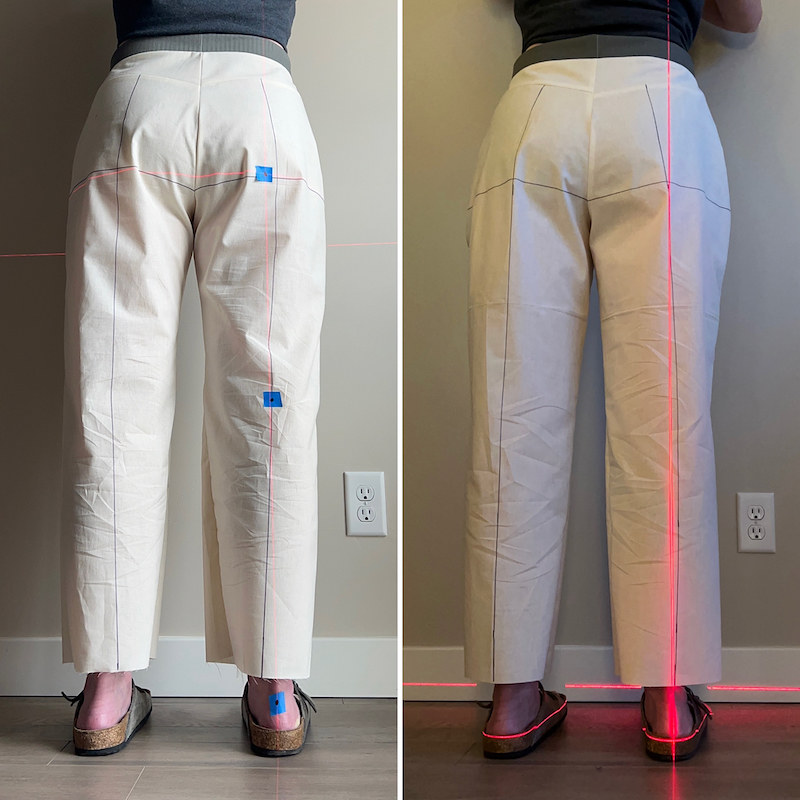
For the back, the laser should be lined up with your heel, Achilles tendon, and the center of your knee. Mark where the laser crosses at your hip reference line. You have now found the center grainline of your back body. Observe again that the center grainline of the pattern is at the center of my knee.
With this new method, you can immediately see if your body’s center grainline (i.e., the laser) is off from the pants center grainline, marked in black on my muslin.
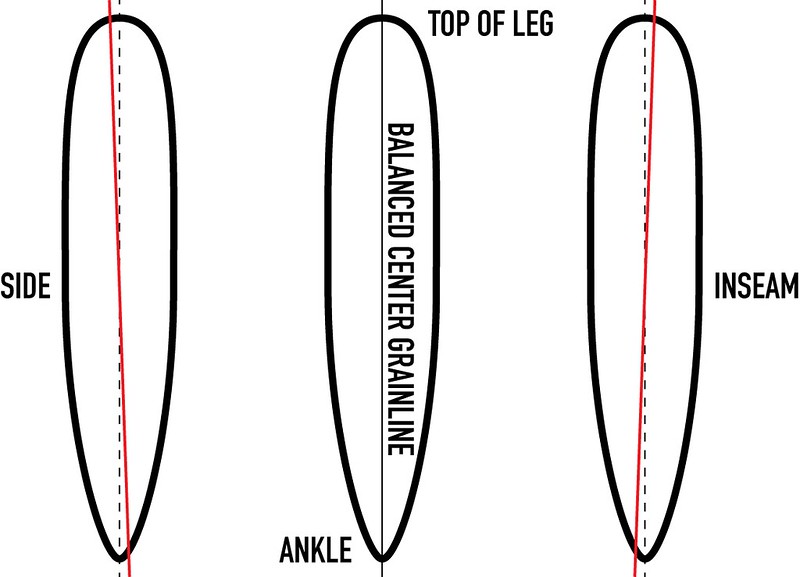
I’ve written a long post about what happens when the center grainline is unbalanced. Briefly, if the center grainline is too far toward the side seam (left panel above), the legs of the pants will want to swing inward. If the center grainline is too far toward the center seam (right panel above), the legs of the pants will want to swing outward. In the diagram above, your knee is the point at which the grainline pivots. This is why if your pant legs are loose enough to not cling to your body, the center of your knee will also be on the center grainline of your pattern.
On the front and back pieces of the May Jeans, the center grainline is lateral to or wider than my body’s center grainline. Therefore, the pant legs swing inward.

Measure the distance between the jeans’ center grainline (black line) and your body’s center grainline (red dot). For the front, the grainline was 1.5 inches too wide. For the back, the grainline was 0.75 inches too wide.
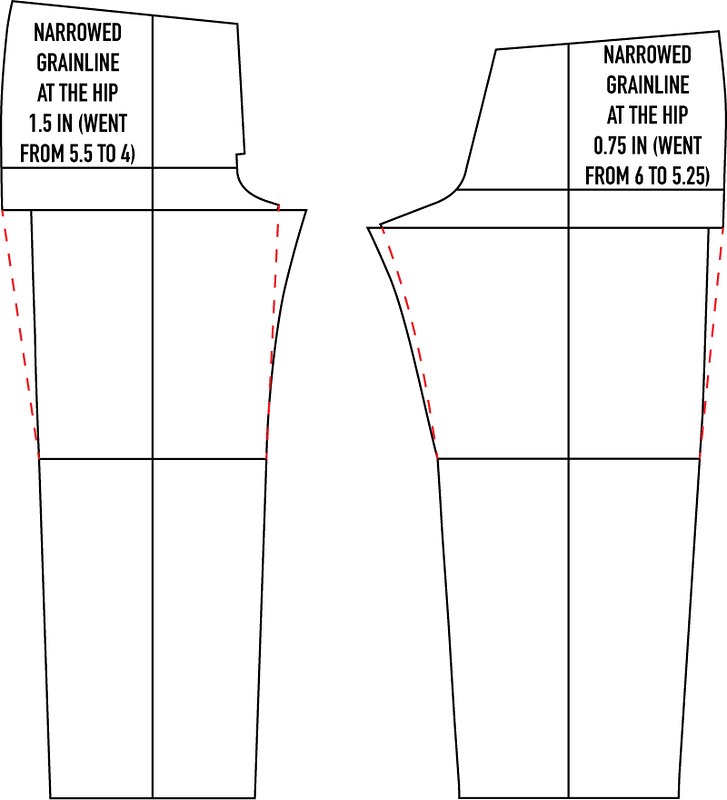
You can make the adjustment at the hip reference line, but that destroys the crotch length and shape. Moving things at the crotch level is slightly more straightforward because the crotch hook is preserved. For the front, I moved the torso lateral 1.5 inches. For the back, I moved the torso lateral 0.75 inches. If you measure from the center front, excluding the seam allowance, to the center grainline, it measures 5.5 inches originally and 4 inches after the alteration. If you measure from the center back, excluding the seam allowance, to the center grainline, it measures 6 inches originally and 5.25 inches after the alteration. Double-check that the inseam and side seam length matches after making this alteration. You will likely have to adjust the length a little.
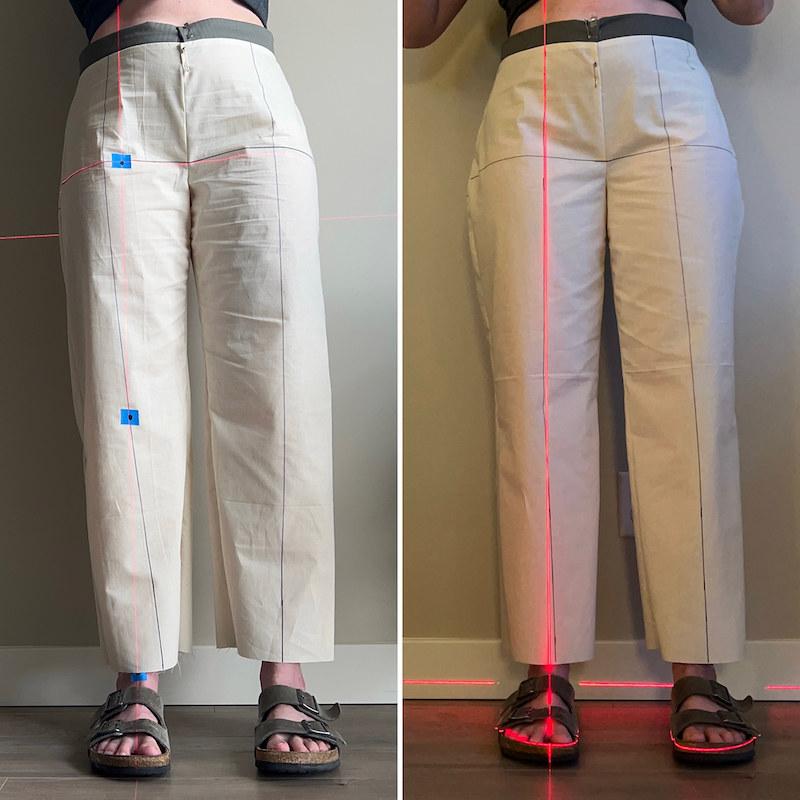
When the adjustment is made correctly, your body’s center grainline, the laser level, should match the jeans’ center grainline, the black line drawn on the muslin. The legs will no longer swing or twist when the two grainlines match.
Years ago, I posted about how to measure your body for pants and showed a clunky method for figuring out the center grainline. The technique was hard to get accurate and didn’t easily translate to pattern pieces. This updated process is way better because you can mark on your muslin exactly how far off the grainline is or isn’t at the hip level. Every pattern will be different, and this method is easy enough to use each time you work on a new pattern.
Crotch Length
If you choose the correct size, including any adjustments needed because of body shape, the crotch length should be close. I came into this pattern with all sorts of assumptions, and each one was disproven. I was convinced that my crotch length wouldn’t be long enough. Convinced! But here I am proven wrong yet again. The crotch length for the front and back is just fine. I did not make any changes.
Side Seam
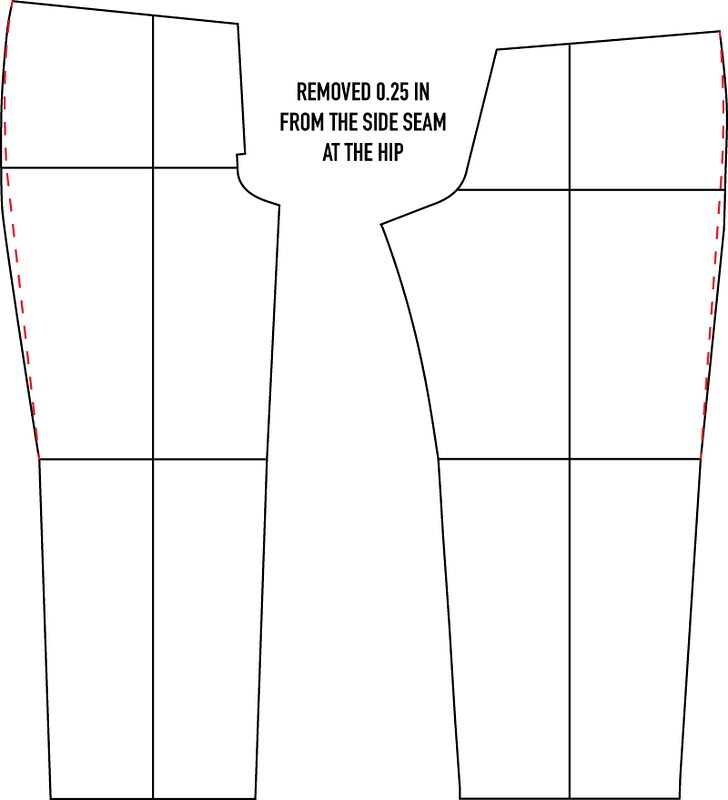
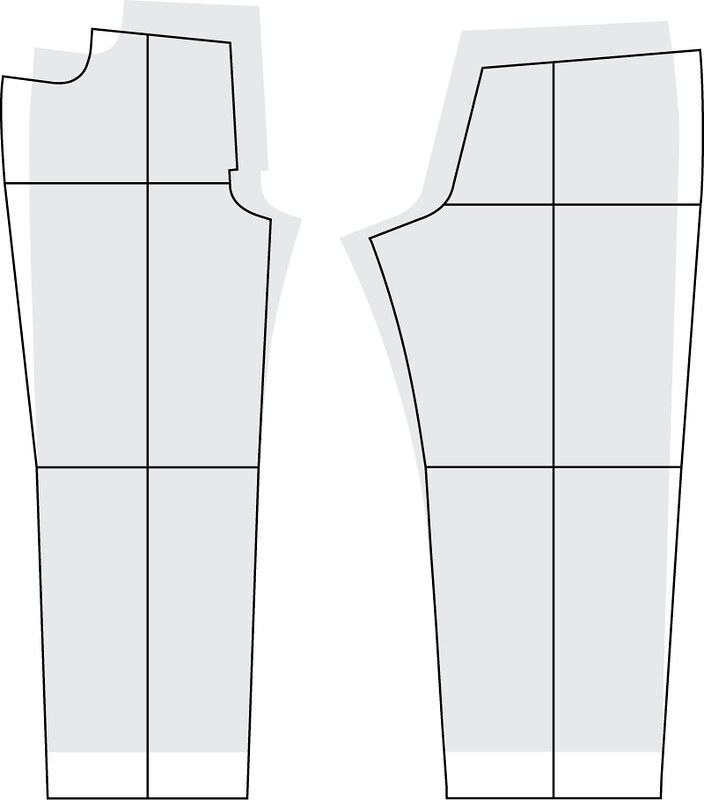
The final thing to do is make any small adjustments you want along the side seam. I removed 0.25 inches at the hip and graded it back to the waist and knee.
Toile
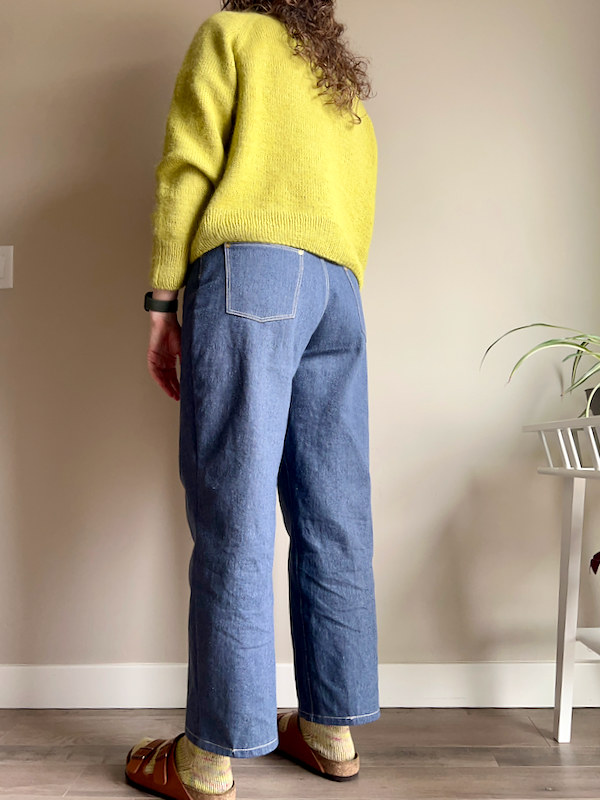
Calico or muslin fabric is not always suitable for toiling all garment types, and you should choose a fabric that represents the weight and handle of your final fabric. I decided to make a final toile in 13oz denim. I would’ve made these a wearable toile if I had enough fabric. Here’s how the jeans look after wearing and sitting in the toile for hours.
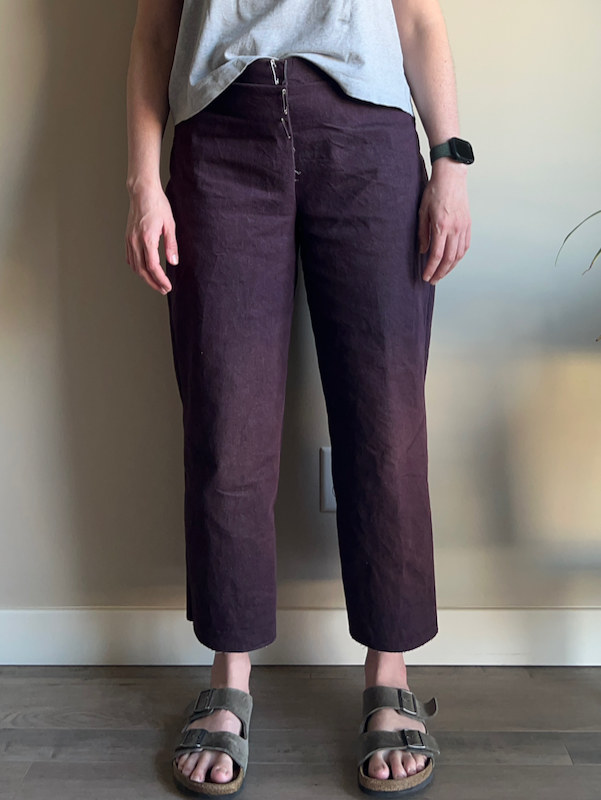
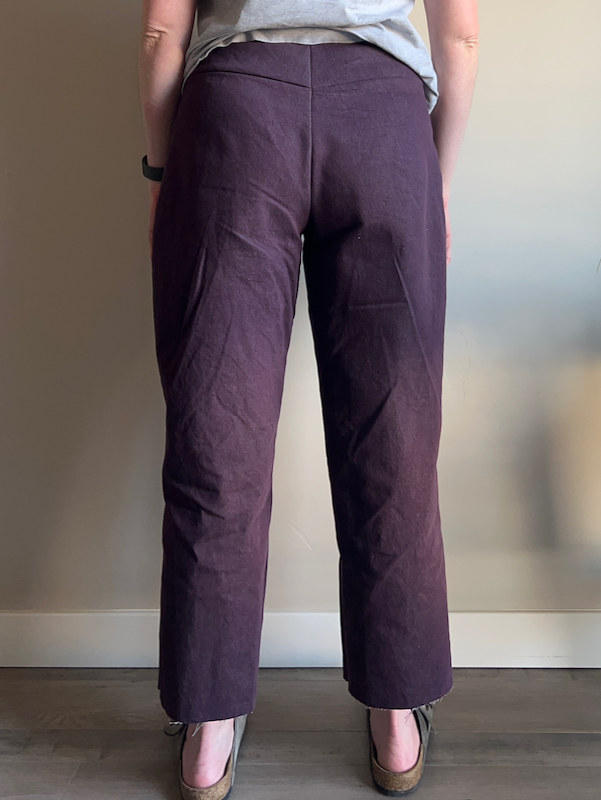
Final Fit
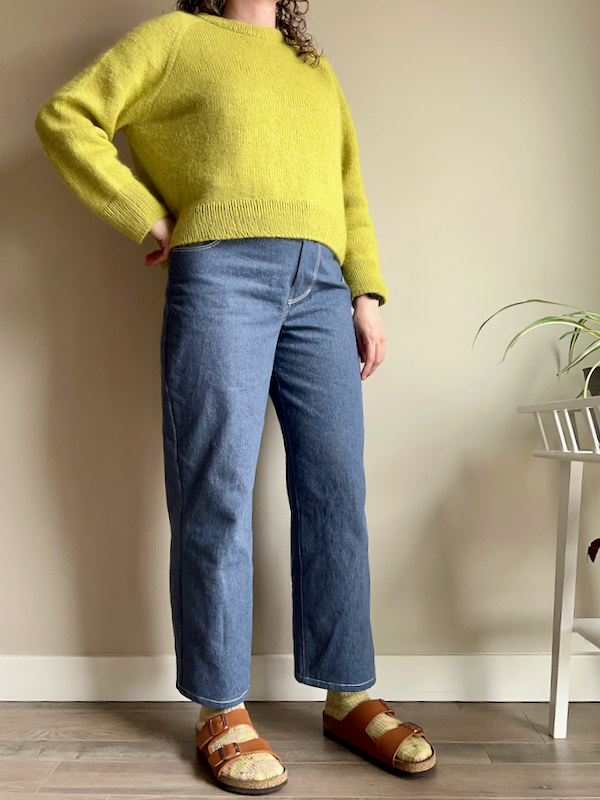
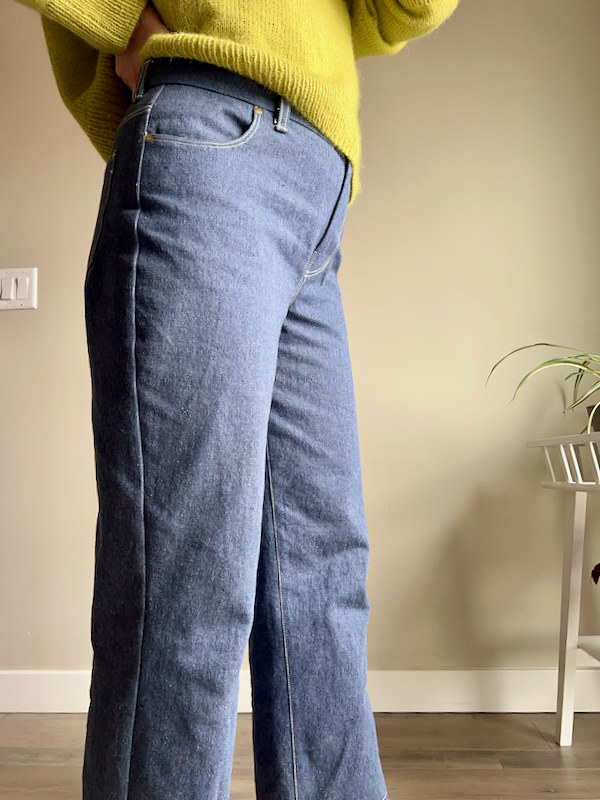
Although it appears I completely destroyed the style/fit of these jeans, I actually didn’t. By adjusting the pattern to fit my body shape, I got the intended look shown by the model.
Conclusions
Fitting pants always takes time and patience, and you may feel like you don’t have the confidence to try something challenging like jeans. You don’t need the confidence to pursue a challenging goal; you’ll build your confidence through pursuing challenging goals. I’m constantly improving and perfecting my method each time I try a new pattern. I’m a traveler on this journey, so things I’m sure about today may not hold true in the future. I’m learning, trying new things, and always curious.
Things I Like About the Pattern
I love the expanded size range, clear and detailed instructions, online sew-along, and certain aspects of drafting (i.e., waistband and crotch curve shape). These jeans do a great job making your butt look its best.
Things I Don’t Like About the Pattern
I was a bit frustrated with how much I had to adjust the pattern, but I’m also thrilled to have tried a new technique for fitting, so I’m not entirely upset. Compared to my previous pants, this was a lot. I was frustrated by nearly everything about the Worker Trousers except the drafting.
A Research Aside
I recently discovered some fantastic research being done with 3D scanners to survey the general population. The work is fantastic, and I’m so excited to see the new technologies implemented in clothing design and production. I’m also thinking I work in the wrong research lab. I should be analyzing bodies and not brains!
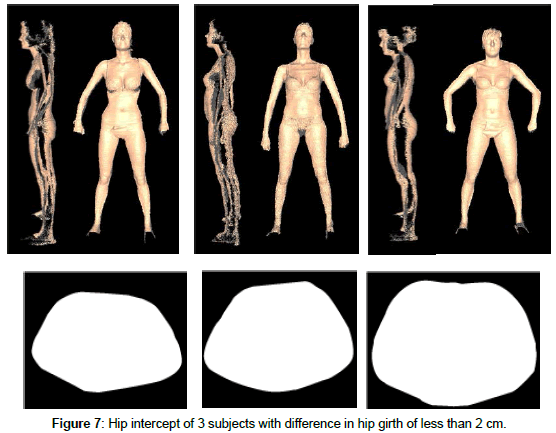
De Raeve et al. (2018) studied cross-sections of approximately 2500 participants in Belgium. I particularly found Figure 7 interesting because it reveals the extreme variation in hip shape even when all three participants have the same bust, waist, and hip girths. In terms of RTW sizing, they would all wear the same size. However, bodies come in all shapes, even when dimensions are the same. Garments will not fit the same way on these three bodies, and with LIDAR technology fit can also be evaluated on 3D bodies.
I also stumbled upon research being done at Cornell. They have loads of good ideas coming from their labs and are applying their research in really creative ways.
I’m so excited to see this research. As a home sewer, it may not be long before we can scan our bodies through an app, check fit and style, and automate alterations on the pattern pieces! That would be living the dream. I know that apps are already available that can do most of this, but they are expensive, require lots of expertise and training, and are not user-friendly for the home sewer. I would love to become an expert with Clo or a similar program.

IF YOU FOUND THIS POST HELPFUL, CONSIDER SUPPORTING MY WORK BY SIGNING UP FOR A PAID SUBSCRIPTION.
POSTS OLDER THAN 3 MONTHS ARE NOW FOR SUBSCRIBERS ONLY — YOUR SUPPORT KEEPS THIS SPACE GOING.
INTERESTED IN SUBSCRIBING TO RECEIVE NEW POSTS IN YOUR INBOX?


HI,
I really admire your interesting research!
I purchased a laser level and I am experimenting with your system but I have some questions:
– in a relaxed position, my feet are rotated outwards as in the example on the right of your “foot alignment” photo; I can’t get them straight like you or Ryan effortlessly:
– can this somehow influence the search for my GRAINLINE CENTER?
– is it enough for the vertical laser line to pass through the center of the ankle and knee even if my feet are rotated outwards?
– does it matter if the laser line does not pass through the second toe?
– Is there any other advice to make the process more precise?
Excuse all these questions and my English…
I thank you !
Thank you for your questions! When I originally wrote this post, I thought foot alignment had to be precise, but with further study on this issue, I’ve found that your foot alignment doesn’t have to be so exact. If it is more natural to have your toes pointed outward, that is okay. The critical point is that the laser level hits the middle of your ankle.
Thanks for your reply:
now I’m ready to experiment!
I’m also interested in whether you’ve ever tried a selvedge jeans pattern like the Anna Allen Helene Jeans? I noticed your grainline adjustments take the pattern away from the intended straight seam (which is very similar to my block – the grainline at the hip for me is 9cm front and 7cm back, along with needing more on the outseam side of the grainline at the crotch – I’m wondering whether I should just avoid the Helene because I’m already seeing it fit awful leaving the side seam straight! :D
I started investigating this with the Pomona pants since the fit will be somewhat similar, i.e., a straight side seam with no curvature or shaping. My assumption, although uncertain, is that the Helene jeans could work if the leg is kept wide enough to accommodate your body shape. If you look up my post, “BROWZWEAR: POMONA FROM ANNA ALLEN” it’ll show you what happens with pants and the width of the leg. I do plan on looking at the Helene jeans here this Fall/Winter. I hope this information is helpful, and if you do end up trying out the Helene jean, I’d love to hear about your experience with them.
I will absolutely take a look at that – thanks so much for the prompt replies and all the very useful information! Sophie.
Been musing around the shift towards the outseam, and some questions that have got my brain going as on the front leg, my altered May jean draft has a pretty much vertical inseam.
The shift makes the outseam more bias-y rather than the inseam, does this influence/limit movement or comfort? Is the squat test harder?
The shift also makes the amount of negative body space smaller that is generated by putting the first few inches of the inseams together due to the modified inseam angle between the crotch and knee. Are we giving ourselves less comfort/less ease front to back by making it fit better elsewhere?
Assuming you didnt change crotch width, I recreated your overlapped image of the two finished patterns and overlaid them – the green is the original: https://www.pinterest.co.uk/pin/264164334385483636
This article here was mind opening for me when thinking about negative body space as I need a good 20cm front to back! https://web.archive.org/web/20150907045214/http:/www.cutterandtailor.com/forum/index.php?showtopic=3587
Thanks for sharing. For the May Jeans, I did not change the crotch width. Interesting, looking at the two images. I’ll have to consider how these incorporate into my understanding of fitting pants.
Your blog has been absolutely indispensable for me on my trouser block making journey – so thank you so kindly!
I have been working with this May Jean pattern for a while now, not being able to get it to fit. I’m getting there now I understand my own block but my main qualm with it is the 2.4 inches of ease in the waistband for the size 12. (28.3 body -> 30.7 in) – it’s also 2.3in at your chosen size.
Given you’ve made them, do you have any thoughts on why a designer would put so much ease at the waist? I find an inch is far too much on the best of days without needing to wear a belt?
I’ve read somewhere that in general jeans have a more ease in the waistband because there is zero ease elsewhere, but these have a good 2 inches at the hip so seems odd.
Sophie
Here’s my guess and this is what I assumed when I made the pattern, the difference in measurements is due to the fact that the body measurement is taken from a different spot than where the waistband is intended to be worn. I assume the waistband should be worn slightly lower on your torso. You are right that 2 inches of ease at the waistband is too much. Typically, I aim for no more than 1/2 to 1 inch of ease.
Of course, that could absolutely be the case – looking at the imagery on the website and the inclusion of a straight waistband I thought I’d be looking at something hitting the natural waist. I will try again with that in mind! :) thank you!
Oh! So you shift the torso bit outward to align your center/crease point with the one on the pattern. I don’t know why I kept thinking it would be the other way around. This is amazing. Thank you so much! I am going to try this!
Thank you for this. You’ve done an excellent job describing the fitting process – both the why and the how. I’ve struggled to make pants that feel and look good, and following the guides based on drag lines has been only marginally helpful. I’m excited to dive into the TDCO method and make pants that I love to wear.
Thanks. I still love my May jeans. They’re the first thing I’ll grab for in my closet. I truly hope you get to a point that you love the pants you make!
This is amazing. Thank you so much for describing your method in all this detail. Now I need a laser level!
It’s really interesting to see your fit issues and the resultant pattern changes. I love that you use non-sewing tools to help you solve a swing problem. During the first year of covid, I spent the summer trying to understand pants fit and drafting though drafting my own pattern. It was incredibly frustrating using a formula with my measurements to draft a pants block. I had a ton of fabric at the out seam abs a diaper butt. It took me four drafts to figure out a change that I had never seen anywhere, that made a significant difference. And that was cutting the leg off just under the crotch and shifting it toward the inseam several inches. Your fitting posts have helped me visualize why this works. I still had issues with what I thought was the crotch curve but I am now thinking I really need to examine the leg balance line, on my body, and how it lines up with the patten above the crotch. Thanks for the awesome fitting post!
Thank you for sharing your experience!
Thank you so much for sharing your experiences with us! Such good info. I am so tempted to get a laser level now!!
I feel like a lightbulb has switched on for me. Especially using the laser level and checking the knee area. Thanks for posting all this info!
Sent from my iPad
>