
After trying pant patterns from several new companies (e.g., Open Studio Patterns, The Modern Sewing Co.), I’ve learned how important it is to be a better consumer. Yes, I am comfortable sewing pants and often ignore the nitty gritty details in the instructions because I have my preferred methods. However, suppose I speak only positively about a pattern riddled with typos, mistakes, and errors. What impact does that have on sewers who are less confident or familiar with pant construction? I’ve heard over and over again sewers blame themselves when something goes wrong or doesn’t work. Sewers often don’t realize it’s a mistake in the pattern and not a mistake with them. I just recently read Brave, Not Perfect. Saujani found that in the Girls Who Code classes, girls were more likely to erase their codes entirely and show none of their work at all than risk imperfection. In other words, when girls struggle with computer coding, they say, “There’s something wrong with me.” and not “There’s something wrong with the code.” When I post about a sewing pattern, I think sharing my mistakes, experiences, and perceptions is helpful and shows other sewers that struggling doesn’t mean outright failure. And it’s OK to critique a pattern; just because I point out issues or flaws doesn’t mean I dislike the pattern. As you will see in this post, I like how the Shop Pant was drafted, but there are some issues with the pattern pieces and instruction that, along with the sizing oddities, make this a tricky pattern.
Analyzing Style and Fit

There are some really unique features to the Shop Pant. First is the geometric front pocket. It isn’t like the traditional trousers slash pocket, but it isn’t a jeans curved pocket either. The front pocket is also really roomy! The next cool feature is the lower hem. Adding a piece to visually raise the hem gives the pants a chunky hem look. I’ve seen a version of this pant where the front hem and pocket facing were a different color. As a result, these pants have a lot of color-blocking potential. Or, if you use striped fabric, you could turn the fabric 90º. The final unique style is that the side seam is moved forward on the body. This visually creates a straighter profile when viewed from the front. Besides the unique features, the pants have a high waistband that’s slightly contoured, a barrel leg shape, the hem should fall at the ankle, and all the pockets are big and roomy.

The pants should be fitted from the waistband to the hip but not super tight. From the hip (AKA top of the crotch curve) down to the hem, the pants are roomy but should follow the shape of your body. Finally, the leg should taper at the ankle. There’s a decent amount of room through the bottom of the crotch curve, so the pants shouldn’t be clingy or tight. Some wrinkles under the butt are expected, given the generous length of the crotch hooks.
Materials and Notions
The fabric I used is 10.5oz upcycled denim in pale blue fleck from Blackbird Fabrics. The material is part of the New Denim Project from Iris Textiles, located in Guatemala City, Guatemala. I think 10-11oz is a perfect weight. Denim can be daunting to sew, so here’s what I used for construction and topstitching. I used a denim needle 90/14 with Gutermann Mara 100 thread for construction. For topstitching, I used a denim needle 110/18 with Gutermann Mara 30 Poly Wrapped Poly Core Thread.
I’ve always liked the YKK #5 Antique Brass Jean Zippers from Wawak. I usually just buy a whole bunch of zippers 7″ long and shorten them as needed.
Wawak also carries reliable buttons in a variety of finishes. The jean buttons are Plain Jean Tack Buttons – 27L / 17mm.
Determining the Correct Size

Check out my last post for more information about the previous sizing issues. I had a hard time determining my correct size. My waist measures 35 inches, and my hips measure almost 44 inches. That puts me smack dab in the middle of the size 5 range. However, if I consider my forward tilt, my hips measure closer to 45.5. I like to use the final garment measurements to confirm my size. I knew size 5 might be tight, but even with the TDCO method, the pants were unwearable. The table says the final hip measurement for size 5 is 46.625, but I haven’t figured out where that measurement is taken. I could only measure up to 45 inches at the widest part of the pants. The next size, size 6, is a big jump. For all the pants I’ve made recently, there’s been a size in between.

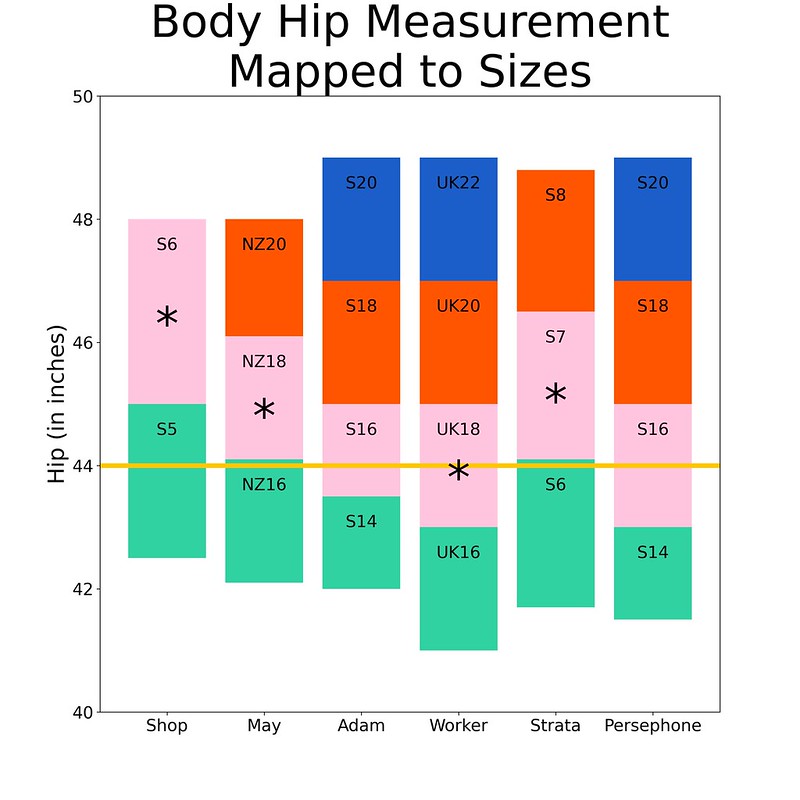
I pulled some numbers from other companies/patterns. I’m comparing the Shop Pant to May from Make by TFS, Adam from Daughter Judy, Worker from Modern Sewing Co., Strata from Papercut, and Persephone from Anna Allen. In the graph above, the different patterns are along the x-axis. The recommended hip measurement in inches is along the y-axis. I’ve color-coded each size separately. The yellow horizontal line represents my current hip measurement. I’ve placed a star on the pattern/sizes that I’ve made recently and fit. The May Jeans and Strata patterns have that extra size, so it made sense to go up a size since I was on the edge and knew I needed a bit more wiggle room to accommodate my forward-tilted pelvis. The Worker Trousers have a very generous fit, and I conveniently fit in the middle of their UK18 size. In the end, I just had a hard time wrapping my head around the fact that with the Shop Pant, Size 5 was too small, and Size 6 was too big.
Alterations
Fit the Waistband

Borrowing from the Top-Down Center-Out method, I fit my waistband first. Given the sizing issues with these pants, fitting the waistband is extra important. The waist runs big on this pattern, and nearly everyone I’ve seen has had to remove several inches. With a waistband that fits your body, it will be easier to adjust the pants. I took in the pants at the side seam, but maybe you’ll find out that you need to remove some fabric at the center back, or you might need to add a second dart to the back. I removed 5.5 inches in total from my waistband circumference! I took 2.75 inches off from the left and right center front of the waistband pieces.
Crotch Depth

The next step was to pin the muslin to the waistband. This allowed me to do a couple of things:
- Adjust the crotch depth so that I had the right amount of vertical ease.
- Take in the top of the pants to fit the narrower waistband.
- Determine my horizontal knee level since the notches on the pattern did not correspond to my body.
The Shop Pant are high-waisted and should not have a dropped or baggy, saggy crotch area. I determined I needed to lower the center front waistline by 0.75 inches, the side seam waistline by 0.75 inches, and the center back waistline by 1.25 inches.
To match my narrower waistband, I remove 1 inch from the front side seam and 2 inches from the back side seam. My back dart is smaller, so although I remove 3 inches from the side seam, it only turns out to be about 2.75 inches on each side. I did my best to keep the side seam pushed toward the front of the body, and I paid close attention to make sure the side seam didn’t become distorted.

Finally, I determined where my horizontal knee level was on these pants. There’s a notch along the inseam. My knee level is 3.5 inches lower than that notch.
Does the Center Grainline Bisect the Knee?

At my knee level, the center grainline does not bisect the knee. Finding the center grainline was a bit more complicated with this pattern since the bottom of the leg is on a separate piece. I followed the same procedure I always do. At the bottom of the pant leg, excluding the hem allowance, find the middle point, and draw a vertical line. That vertical line is the pattern’s center grainline. I did my best to continue that vertical line from the hem piece to the leg piece. Based on my horizontal knee level, does the center grainline bisect the knee reference line? For the Shop Pant, the answer is probably not. In the image above, the actual center of the knee reference line is the small red tick mark. I can’t say for sure because I’m not entirely confident about the lower hem piece alignment. I’ll talk about this more, but the notches on this pattern often do not align. The front piece is only off by 1/8 inches, and the back is off by 1/4 inches.

When I fixed the pattern, I matched the notches on the two separate pieces and then drew my line from the knee down to the bottom of the hem. It’s a small change, but it greatly affects how the legs hang on my body. Fixing the center grainline at the knee level also removed some wrinkles around the crotch area.
Does the Center Grainline Hang Straight?

The next step was to look at the center grainline placement. I drew my normal crotch level (bottom red line) and used the notches on the pattern to signify the top of the crotch curve, AKA hip level (top red line). Check out my May Jeans post to read more about using the laser level. Briefly, when I line up my body, the laser level acts as my body’s center grainline. I can then compare the laser to the center grainline of the pant to see if they match. If the center grainline of the pant is off, the legs will swing inward or outward, and the laser will not line up with the center grainline I drew on the muslin.

Usually, I use the top of the crotch curve as my horizontal reference line to determine how much I need to adjust the center grainline placement. However, in this pattern, that level is too high. So I used the bottom of the crotch curve instead. On the front piece, you can see that the laser is lined up with the center of my ankle when I’m standing with my feet hip-distance apart. Now I can compare the laser to the center grainline of the pant. The laser lines up perfectly with the pant’s center grainline at the hem, knee, and bottom of the crotch curve. No adjustments are needed to the front center grainline placement.

Looking at the back piece, it’s obvious that I can’t use the top of the crotch curve. Once the center grainline bends as it goes to your waist, you don’t want to use it as a reference with the laser level. So I used the bottom of the crotch curve level instead. The laser lines up perfectly with the pant’s center grainline at the hem, knee, and bottom of the crotch curve. No adjustments are needed to the back center grainline placement either!
Lengthen

The pant is drafted for someone 5’8,” and I am 5’11”. I wanted my pants to hit the bottom of my ankle, not the top, so I lengthened the leg 4 inches.
Side Seam

At the crotch level, I took in the side seam 3/8 inches on the front and back. I didn’t need quite all that room. I graded it back to the waistline and knee level.
Final Fit

The original pattern is grey and outlined in black. My final altered version is outlined in red. The most significant changes were done to the waistline and top of the side seam. Realistically, centering the grainline at the knee is very minor. Lengthening the pants was the next most significant change.


One of the ways I dealt with the waistband bulk was to bias bind the raw edge instead of trying to fold it under and stitch. I also added an extra belt loop in the back, so instead of trying to stitch a single belt loop over the super bulky center back seam, I put two loops and moved them so they weren’t over the bulk. I’ve been enjoying making the inside of my pants just as pretty as the outside.
Errors and Discrepancies
The pattern contains some errors and discrepancies. Don’t let these ruin your experience with this pattern:
Hem is not perpendicular to grainline

The lengthen/shorten lines on the pattern pieces are not perpendicular to the grainline on the pattern, and neither is the hem. On the left are the bottom of the front pant and the front hem piece. These are small numbers, but the top of the front hem is not perpendicular. On the right are the bottom of the back pant and the back hem piece. The back hem piece is clearly not perfectly horizontal. I never got feedback from the company when I emailed them about this issue.
Pocket Seam Allowance

In their YouTube sew-along, the narrator states to use a 1/2-inch SA at the pocket, but the PDF instructions say to use a 3/8-inch SA. It also appears that they used a 3/8-inch SA if you look closely at the seam gauge on their machine.
Fly Extension Seam Allowance

They don’t state the seam allowance for the fly extension in the video. However, the seam gauge on their machine shows them sewing it slightly over 1/4 inches but not quite 3/8 inches. The PDF states to sew this with a 1/2-inch SA. I believe the correct seam allowance is 1/4 inches.
Pressing Center Front Seam

The instructions don’t tell you which way to press the center front seam. In the video, they press the seam open. This instruction is confusing because the center back seam is pressed towards the left.

I don’t like that there’s no top stitching along the center seam. I ignored the instructions, pressed everything to the left, and added top stitching to hold the seam down.
Left Fly Front

The instructions state to stitch all the way to the end of the fly front. However, in the video, they say to sew only down to the notch, which is 1/2 inch from the bottom of the left fly. I followed the PDF and stitched to the end of the fly. It was tight and hard to reach, so maybe that’s why they state to sew to the notch in the video?
More Missing Instructions

The YouTube video provides significantly more instructions for pressing. They press the fly front before stitching the fly front to the front left. The PDF instructions do not contain anything about pressing.

Again, the YouTube video shows them pressing the inseam toward the front. Unfortunately, the PDF instructions don’t give any direction about pressing. I prefer my inseam to be stitched down, so I did this seam before the side seam, pressed it toward the front, and topstitched it.
Waistband Notches Don’t Match
Several people have reported that the notches along the waistband don’t match the notches along the pants. Because I removed so much from my waistline, I ignored the notches altogether and just made sure my pants matched my waistband circumference.
Conclusions

The main thing I’ve learned with this pattern is to measure the PDF before printing and cutting. Adobe has a lot of really helpful tools that you can use to measure large format patterns. After that, I’m thankful every time I get a tricky pattern finished. I’m super relieved to have this project done. Finally, I’d like to share Stacey’s review of this pattern. Her reviews are always worth reading.
I enjoyed reading another detailed review. Your teaching me new fitting skills with each new challenge you tackle. I especially liked your chart of patterns you have made and the sizing range of different pattern companies. I find that with pattern testing I am a XL with one group and a 3X with another. Life long learning is real!
LikeLiked by 1 person
I really found that chart insightful too! Thanks, as always, for reading my blog and commenting.
LikeLike