
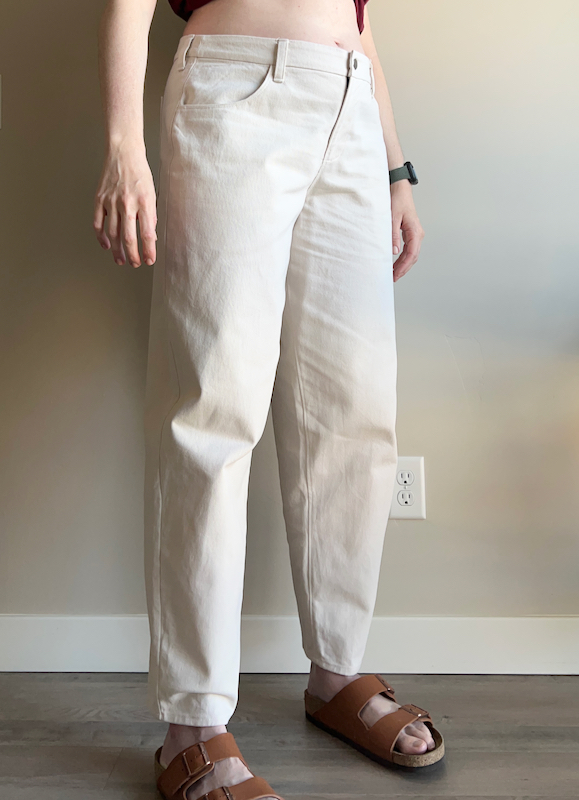
I had a mixed experience with the Worker Trousers by Modern Sewing Co., so let’s get into it!
TL;DR
The good: I like my trousers, and they fit well. The bad: Don’t expect to be able to follow the provided pattern instructions. The ugly: Whatever you do, don’t waste your money on the workshop videos since they lack critical features (i.e., closed captions and high contrast samples) to make them accessible, are missing instructions for various pattern versions (i.e., zipper fly), and demonstrate techniques differently than what’s provided in the pattern.
I wanted to talk about the Top-Down Center-Out (TDCO) method with these trousers, but this post has turned into something completely different. So Stacey’s incredible work didn’t get lost in this post, I’ve already written another post highlighting the parts of the TDCO method that I find helpful when fitting pants. The pattern has a ton of ease, so I knew it would be an excellent pattern for the TDCO method. Adjusting the pattern was straightforward and easy, as you will see when we get to the alterations section. If you aren’t familiar with the TDCO method, go check out my previous post or head over to YouTube and watch The Crooked Hem series. I’ll have to show the TDCO method later.
Analyzing Fit
Here’s my take on the style and fit for the Worker Trousers:
- The rise is medium to medium-high.
- The pants are fitted through the torso, hips, and butt.
- Wrinkles are expected at the center back waistline because there are no darts and under the butt because it is fitted.
- The center seam is tight against the body.
- The bottom of the crotch curve is also tight against the body.
- The legs are relaxed from the crotch level down and should be tapered.
- The hem should hit around the ankles.
You can view tons of examples on their site: https://modernsewingco.com/pages/sewn-by-you. When using the TDCO method, it is important to understand the intended style of the pants you are trying to fit to your body so as wrinkles appear, you know if they’re intentional.
Size Chart and Picking a Size
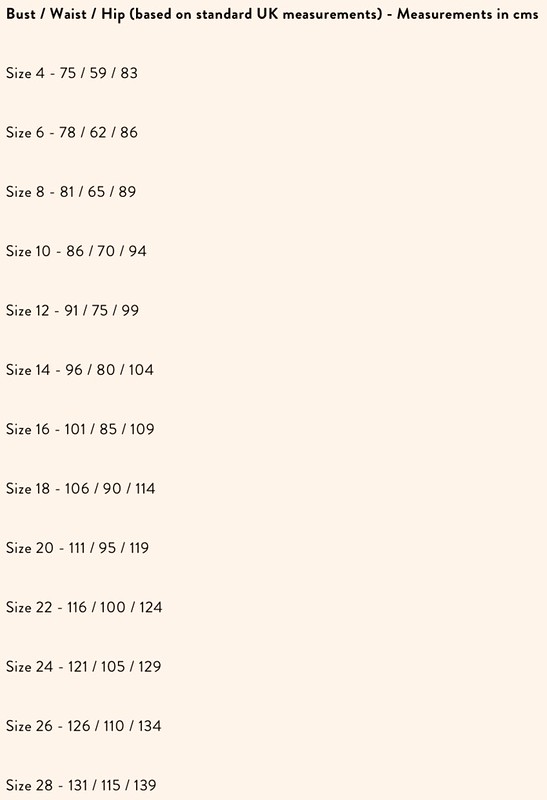
The size range is not nearly as inclusive as I think it should be. The hip range is from 83-139cm (32.68-54.72 in). Most patterns now are drafted at least to 152.5cm / 60 in.
As far as selecting a size, my hips measure 109cm. That means I’m a size 16 on the chart. However, based on the TDCO method, I need to go up a size because “strong thighs save lives!” :-) For this pattern, I cut out a straight size 18.
Fabric and Notions
The main fabric for this project is Brush Bull Denim Twill 9oz. from SellFabric.com in fiber. I’m so in love with this brushed bull denim. It is so soft and makes the perfect “secret pajamas” pants. I have a pair of overalls in the rust color that I wear all the time. For my zipper fly front, I used zippers and a jeans button from Wawak.
Pattern Adjustments
Waistband
Starting with the waistband, I sewed together a toile using the same fabric as my final garment. I wanted a good sense of heft, stability, and fit. This aspect of the TDCO method has been so helpful.
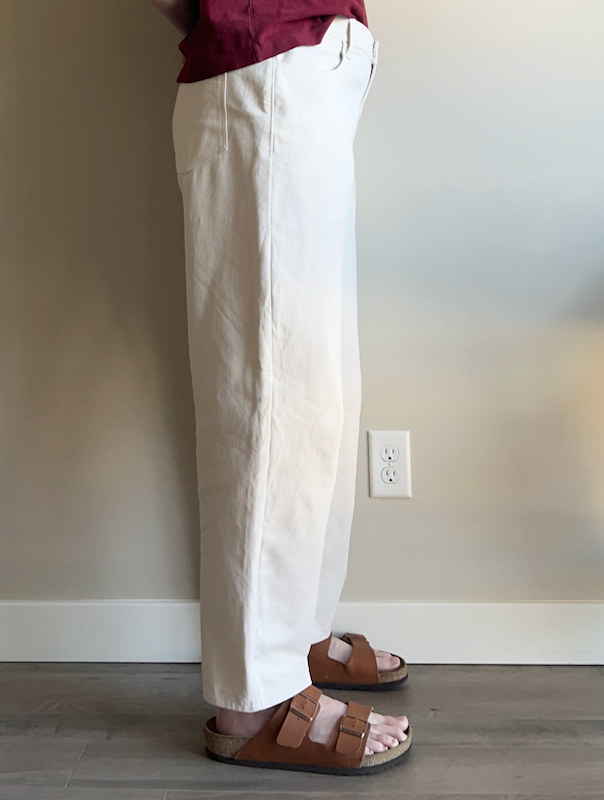
The pattern describes the rise, “These trousers are slightly lower on the high waisted spectrum, sitting comfortably above the hip but not too high up the waist.” You can see that my rise fits the description. It doesn’t completely cover my betty button, which would make it fully high-waisted, but it sits ever so slightly below my belly button. Some examples I saw on the internet had the same rise, just below the belly button.
Center Grainline
I first checked that the center grainline bisected the knee level for the front and back pieces. Yay, it does! I didn’t bother measuring anything else and got straight to making my toile and fitting it to the waistband. I didn’t fuss over the rest of the measurements because the trousers clearly had enough room everywhere, and I was sure things would fit without too much hassle.
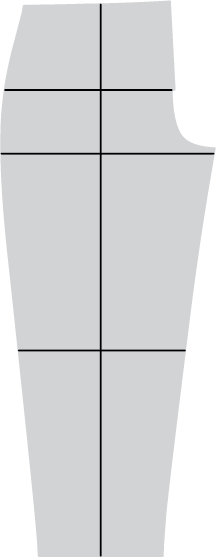
Front
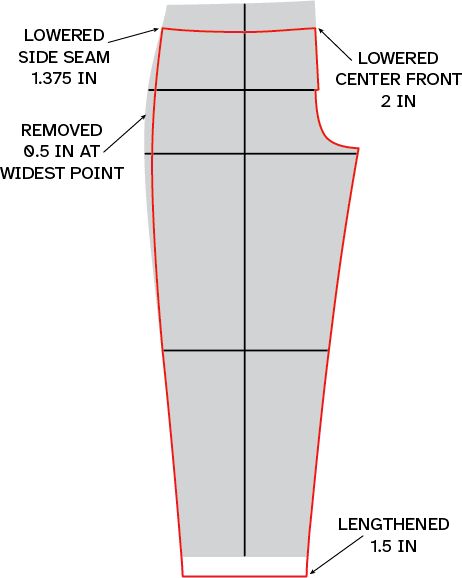
After analyzing fit, I knew the crotch curve needed to sit close to my body. Starting at the top of the center front, I removed 2 inches. At the top of the side seam, I only needed to remove 1.375 inches.
I also removed some of the shaping along the side seam. The trousers should be fitted from the waistline down to the crotch level, the horizontal line at the bottom of the crotch curve. I removed 0.5 inches from the widest part and graded that back to the knee level and waistline.
The trousers are supposed to hit around the middle of the ankle. I needed to lengthen my pants 1.5 inches. The pattern is drafted for someone 5’8″. I’m 5’11”, so the extra length makes sense.
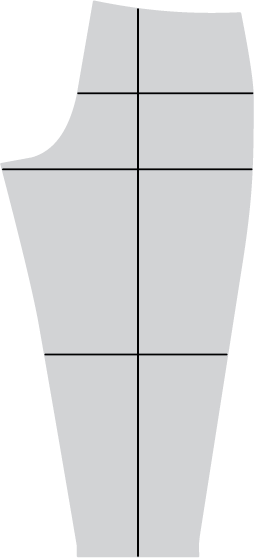
Back
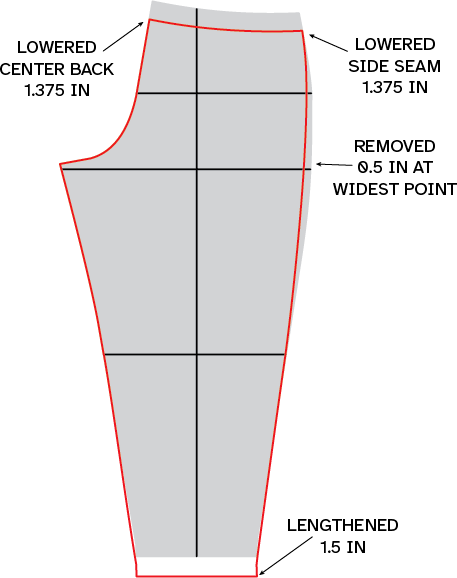
I made nearly the same alterations for the back piece. Like the front, I needed to lower the waistline by 1.375 inches. I removed the same amount, 0.5 inches from the widest part of the hips, to get the intended look. Finally, I lengthened the pant leg by 1.5 inches. In general, the adjustments were manageable and easy with the TDCO method.
Sewer Beware
I don’t usually discuss anything else at this point with a pattern because I typically don’t hit any problems along the way. The situation is different. I did not have a good experience with other aspects of the pattern, information on the website, and much more.
Instructions
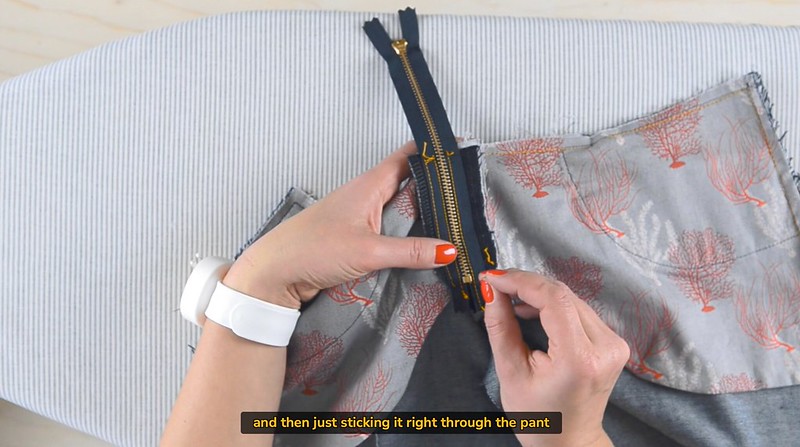
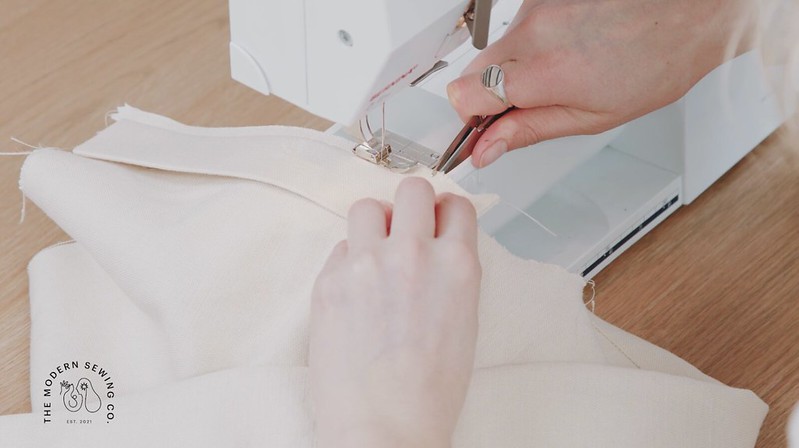
The zipper fly was installed using a new-to-me method. At this point, I have seen about 6 different ways to install a zipper fly, so I was shocked to find yet another way to do it. However, the instructions included with the pattern lack sufficient clarity, so I never figured out how to install the zipper fly according to the provided method. I ended up using the instructions from my Green Pepper Sunset cargo pants instead, because the seam allowance was the same, 1 cm, and all I needed was a zipper guard, fly facing, and no extensions on either front pieces.
I typically try to follow instructions because sometimes I learn something helpful with the new process, or, more importantly, I don’t mess up the construction by skipping necessary steps. In the end, if you get this pattern, just ignore everything about the front fly, whether you choose to use a zipper or buttons. Hopefully, you have another trusty pattern you like (AKA Ginger Jeans) and use those pieces and instructions instead. Here are the Worker Trousers instructions for the zipper fly:
Panels A – C

Panel A. First you’ll need your fused zip guard. Press this piece in half lengthways and bag out the bottom of the square with a 1cm stitch. Fold it in half RIGHT SIDES TOGETHER and stitch a 1cm line all the way across the bottom. Mitre the corner, turn out and press flat.
Ok, that makes sense.
Panel B. Next you’ll need your zipper foot attached to your sewing machine. Lay your right leg the RIGHT SIDE UP on the sewing machine. Lay your zip RIGHT SIDE DOWN with the edge of the tape lined against the step seam allowance. The bottom of your zip should be lined just above the bottom of the little step. Stitch your zip down using the zipper foot to get up close to the zip teeth.
The bottom of the zip is an unclear term. Does this mean the zipper stop at the bottom or the bottom of the zipper tape? The figure shows (admittedly poorly) the bottom of the zipper tape, I think? But in fact, as I found out later, the instructions meant the zipper stop. This means the zipper tape will extend past the small step extension, which isn’t being shown in the diagram.
The instructions don’t explicitly tell you what side of the zipper to stitch, and again, the figure is a bit blurry and unclear. I would assume the right side of the zipper tape needs to be stitched down.
The phrase “lined against the step seam allowance” muddies things worse. What’s the seam allowance for the step? Is it different from the rest of the trousers? What part of the zipper tape lines up at the seam allowance?
Panel C. Lay your zip guard on top of the line you’ve just stitched with the raw edges flush against each other. Stitch this down at 1cm, stopping right where the lower notch is.
If I extrapolate backward, in Panel B, the zipper should be stitched to the right pant with a 1cm seam allowance. Here’s the issue, that seam allowance would mean I’m stitching through the zipper teeth. My zipper tape is much narrower than what’s used in the pattern. I needed to adjust the placement of my zipper so I could stitch at a 1cm seam allowance. It would have been helpful to state the seam allowance is 1cm in Panel B when the zipper is first sewn.

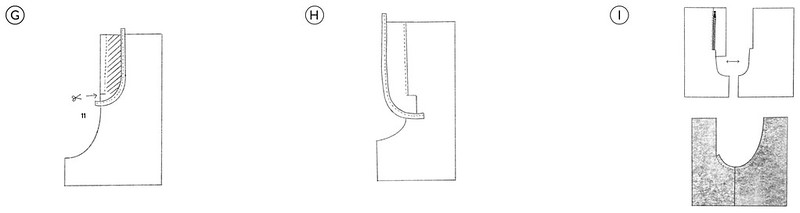
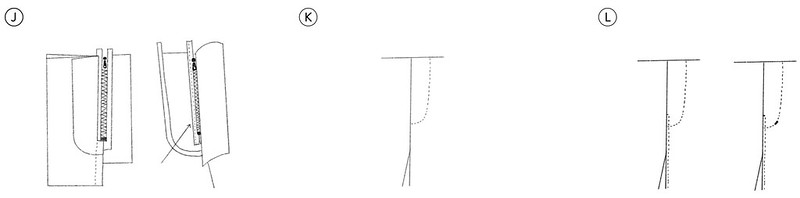
For comparison, look at these instructions and the diagram, which clearly describes how to sew the zipper. The diagram is also very clear about the zipper placement and, the difference between notch and extension. The other thing I find interesting is the seam allowance, 6mm. I want to know what type of zipper the Worker Trousers uses when the seam allowance is 1cm? The patterns call for the same kind of zipper.
Panels D – F
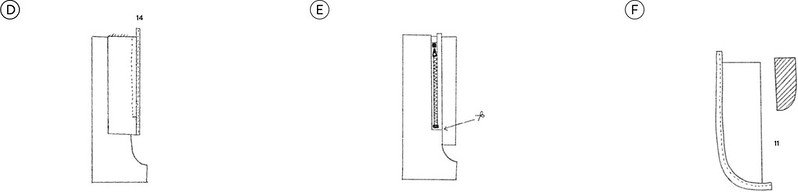
Panel D. You can now either overlock or bind this layer of raw edges. If you choose to bind, start on the lower side and then flip the binding over to the top side and finish the square at the bottom nicely by folding the binding in to catch itself.
I didn’t even attempt bias binding. However, these are all the instructions you get for bias binding the raw edge. I know this is not nearly sufficient.
Panel E. Snip in about 0.5cm at the bottom of the seam step, just under where the zip stops. Flip this little free step out to lay flat then add a 1mm edge stitch down the side of the zip, stopping just before the step.
First, the edge stitch is not provided in the diagram. Do you edge stitch on the left or right side of the zipper? The answer is to edge stitch on the left side. Second, that little 0.5cm flap is in no way EVER going to reach across the entire zipper tape like it is shown in the diagram. Third, if you lined the bottom of the zipper tape with the small step like I did, you’ll never figure out how to get a flap to appear at the zipper stop. This entire panel needs to be redrawn and rewritten along with Panel B.
Panel F. Next you’ll need your fly facing. This piece should be fused as shown in the diagram (with the curve on the right when looking at the fusing side). Once fused you can overlock or bind the curved edge.
Feels like an instruction Prue Leith would give during a technical challenge on GBBO, “Make a lemon meringue pie.”

If you are following the instructions, this is exactly how the zipper looks. That mysterious step flap only covers maybe the zipper tape under the zipper stop and definitely doesn’t reach all the way to the other side of the zipper tape.
Panels G – I
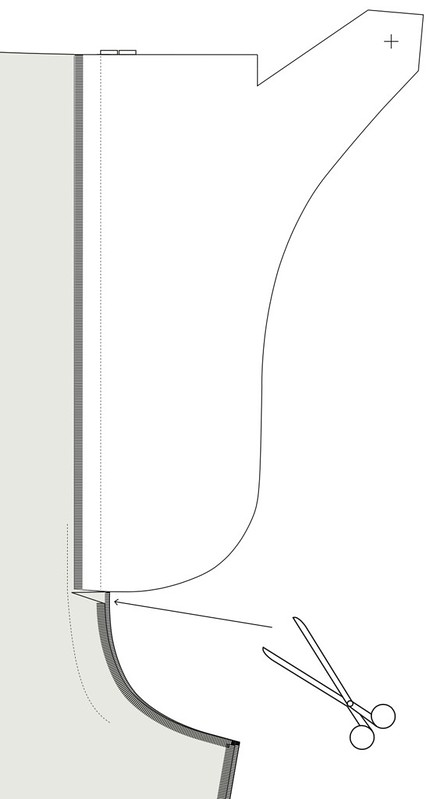
Panel G. You’ll need your front left leg in front of you, RIGHT SIDE UP. Now lay the fly facing against this raw edge, RIGHT SIDES TOGETHER. Stitch down this front edge at 1cm stopping exactly at the notch. Do a good backstitch here.
After giving up on the right side, I still attempted to complete the left side. This instruction is clear. However, the diagram shows a snip icon, and those instructions are written under the next panel.
Panel H. Snip into the seam allowance by 1cm at the notch to where the stitch line is and lay the facing open with the seam allowance folded to the facing side. Add a stay stitch down the edge, stopping where the seam step starts.
The stay stitch line is shown for this step, thankfully. I find flipping between the notch and seam step confusing. Are they the same thing? Do they reference two different things? I Google searched “seam step” and came up with nothing. The seam step is also not defined in the instructions.
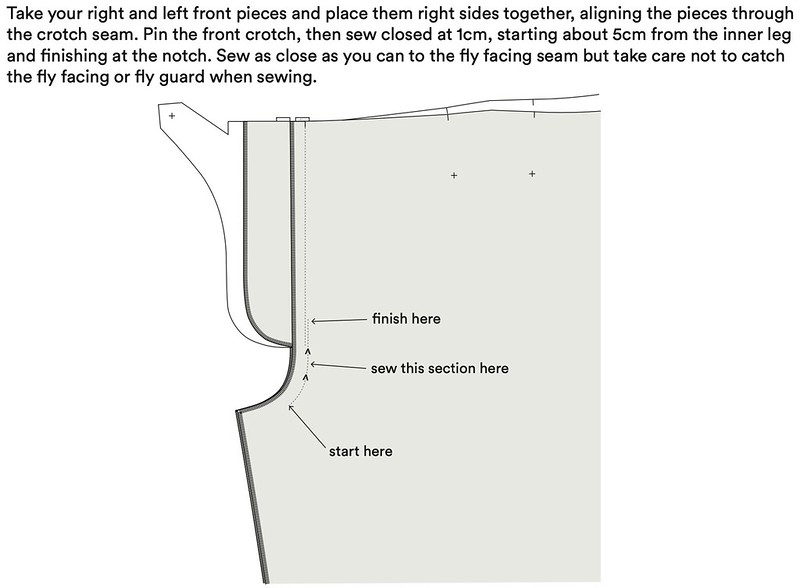
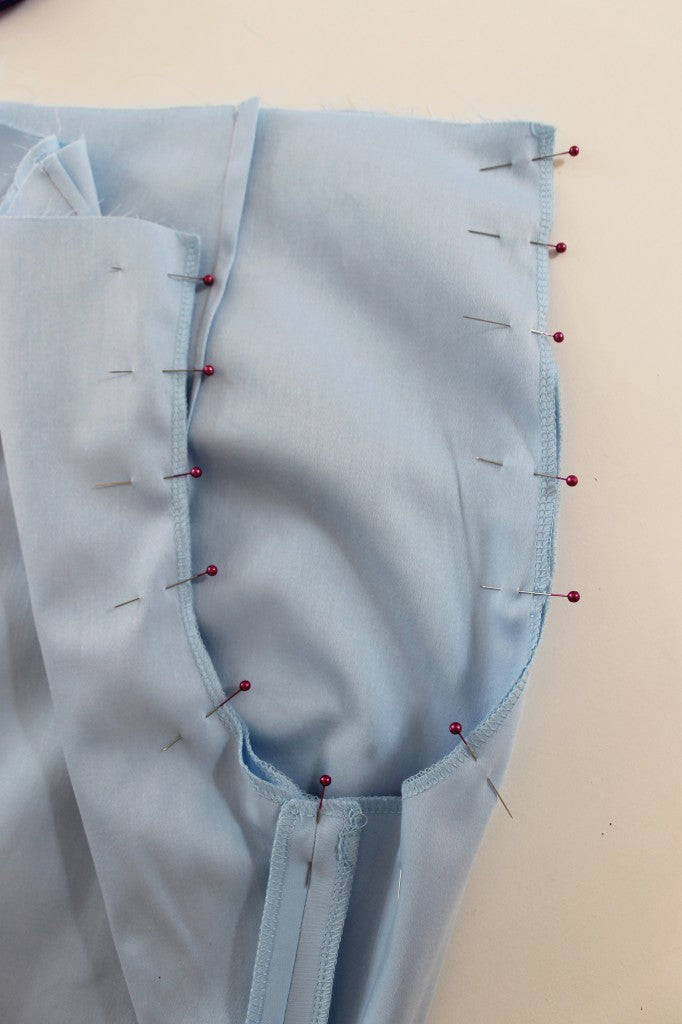
Panel I. Place both crotch seams together RIGHT SIDES TOGETHER. You’ll need to put one leg inside the other for this part. Match the front steps together and pin from the start all the way around to the back. Stitch the crotch together from the back right up to the crotch step with a 1cm seam allowance and then immediately overlock this seam.
Time out. “Match the front steps together”? The step section was removed on the left front pattern piece. The vague terminology is throwing me off. The notch? The bottom of the zipper? The top of the center front? I’m confused. Do you include any part of the zip guard or fly facing when pinning? The shaded part of Panel I shows everything pulled away from the stitch line, but Panel J shows stitching through the fly facing. Moreover, if the front steps being referred to are the bottom of the zipper stop, the right side is only 0.5cm and the left side is 1cm. I find the figure for this panel completely unhelpful.
Again, here’s a much better example showing a similar process. The precision is exquisite. You know exactly how to join the front pieces, what should be lined up, and what not to accidentally include in your stitches.
I appreciate the unambiguousness of where to clip the fabric.
Panels J – L
Panel J. To secure the second half of the zip, lay the fly area flat with the left front overlapping the sewn zip side by at least 0.5cm. Reach inside and while holding the fly facing down, peel back the rest of the trouser and then pin the loose side of the zip to the fly facing. Once you’ve pinned it lay everything flat again to check the position before sewing. Once the position is confirmed you can then stitch the zip to the facing using the zipper foot to get close to the teeth. At this stage, you can also add an optional row of flat binding to conceal the zip tape for a high quality finish.
WHAT? If you made it to Panel K or L, then congratulations. I’ve already given up. Moving on…
Workshop
To solve my zipper fly problem, I turned to their workshops. Unfortunately, the Modern Sewing Co. does not have any type of blog / sew-along with pictures, so there’s no other way to get help. I even tried looking for tutorials on their Instagram page. The only way to get additional help is through the workshop, which shows how inadequate their instructions are. I shouldn’t have to purchase extra products to understand a pattern.
The first thing stated on the workshop page is, “This pre-recorded online workshop will take you through the step-by-step process of sewing your Worker Trousers.” However, the online workshop does NOT include instructions on how to complete the zippered fly. I know; that’s a significant oversight. Before I jump into all the reasons I found the videos problematic, I wanted to highlight two classes I love that involve patterns with the same difficulty level.
Pam Howard and The Classic Tailored Shirt
The first-ever class I took was from Pam Howard on how to sew the classic tailored shirt. Pam Howard is an amazing instructor. She walks slowly through all the steps. She uses high-contrast fabric and thread (i.e., light-colored fabric and dark-colored thread). Any time she does anything, it is zoomed in clearly enough that you know EXACTLY what she is cutting, trimming, stitching, etc. There isn’t anything she does with her hands that she doesn’t explain with words simultaneously. At one point in the video, she stitched a pucker in her neckband and wasn’t afraid to show it close up and how she fixed it. She trimmed too close to the stitch line at another point and showed how she fixed that.
Closet Core Patterns and Sew Your Dream Jeans Sewing Class
The second class I took was from Closet Core Patterns on how to sew jeans. Again, excellent, excellent class. Each step was carefully and meticulously documented. Sewing the front fly zipper was easy since the class zoomed in and was conscientious of making sure the viewer could see the detail.
I would gladly take a sewing class from either of these instructors in the future. They take the time to ensure you can see what is being sewn. If there were notches in the pattern, those were used in the video and clearly demarcated. The list of positives goes on and on. I know how much time and effort goes into providing instruction, and I appreciate the care they’ve taken.
These video classes are not cheap and I know the biggest concern as a consumer is whether they are worth the cost. Pam’s class consists of 12 videos for a total of 6h14m. Her class costs $40. Closet Core’s class consists of 16 videos for a total of 7h54m. Closet Core’s class costs $59 and comes with a pattern. The Worker Trousers consist of 1 video for a total of 2h19m. The Worker Trousers workshop costs £50 (about $56) and comes with a pattern. Pam’s class costs approximately $6.42 / hour. Closet Core’s class, after subtracting the pattern cost of $16, is about $5.44 / hour. The Worker Trouser’s class, after subtracting the pattern price of $15.75, costs about $17.37 / hour. And remember that the Worker Trousers’ workshop does NOT include instruction on how to sew all versions of the pattern.
Here are some of my specific complaints about the Worker Trousers workshop. First and probably the biggest issue, the videos do not have closed captions. Second and just as important for accessibility, the sample Worker Trousers sewn were navy, and contrasting thread was not used. It was next to impossible to see stitch lines whether zoomed in or not. I was eventually given access to another video, and again light fabric with light thread was used, so the contrast was low and hard to see.
The best way I can describe the video is that it wasn’t so much a class or workshop with full instruction but more like a vlog where you watched someone from a distance sew trousers. There was a lot of excess hand gestures that didn’t always make sense with what was being said. Things were trimmed or pinned off-camera. If something detailed had to be stitched, the camera wasn’t always zoomed in or something like a hand or bulky fabric was blocking the view. If something needed to be pointed out, it was often done carelessly and without clarity. Methods like sewing the center front seam were done in a very clunky and frustrating way and didn’t actually follow how they were describe in the pattern instructions. Notches from the pattern were ignored and new notches were added only a few millimeters away so that in the end, you never knew what notch should being used. Finally, and I realize this is small in the grand scheme, but thread-snips were being used to trim fabric and not scissors. The reason I love the sewing classes that I do, is that throughout the class, the instructor makes sure to demonstrate and reiterate good sewing techniques and practices like not sewing over needles or holding thread taut when starting to stitch. This wasn’t being done in the Worker Trousers workshop.


If you are going to sew full legs together, you typically nest one inside the other, as shown below, so you have a clean flat edge to sew along. The pattern instructions even say to nest the legs, but Hetty did not demonstrate the leg-nesting technique in either video. The method used in the workshops were chaotic, and you could tell Hetty struggled to keep the fabric neat for sewing.
Website Reviews
I decided to write a review on the Modern Sewing Co. website since I was frustrated by the lack of information in the instructions and the missing zipper fly in the workshop. I left a review on the pattern page and on the workshop page. Both of my reviews were deleted, so I looked closely at other reviews on the site. If you look at other reviews, they are all 4- or 5-stars out of 5-stars total. I think I found one 3-star review. Unfortunately, I cannot support a company that scrubs legit reviews to boost its ratings.
At this point, I reached out to Modern Sewing Co. and sent them an email. I asked them why they deleted my reviews, and I obviously reiterated my frustrations. Thankfully, they refunded me for the workshop, £36, and I was given access to the Daphine trousers workshop because that includes instructions for the zipper fly. Unfortunately, because of the poor quality of the teaching, the video didn’t help clarify my confusion. I also received no explanation of why my reviews were deleted. In general, I’ve not had a great experience.
Conclusions
I only hope that this post will be helpful for any beginner sewer wanting to make trousers. I realize the Worker Trousers are trendy right now, and the last thing I want is to have someone attempt sewing trousers for the first time and get completely turned off because they’ve had a poor experience.
If you’ve tried similar style trousers and have liked the pattern, please leave a comment below, so other sewers might know where else to turn for a similar style. This was the first pattern I’ve tried with this fit, but I was considering other patterns like the Adam Pant from Daughter Judy Patterns and May Jean, View C with the Shaped Leg by Make by TFS.

IF YOU FOUND THIS POST HELPFUL, CONSIDER SUPPORTING MY WORK BY SIGNING UP FOR A PAID SUBSCRIPTION.
POSTS OLDER THAN 3 MONTHS ARE NOW FOR SUBSCRIBERS ONLY — YOUR SUPPORT KEEPS THIS SPACE GOING.
INTERESTED IN SUBSCRIBING TO RECEIVE NEW POSTS IN YOUR INBOX?


Shoot – I love the Worker silhouette so much and have had my heart set on making a pair this year. You think I could swap out another zip install from a TNT like you eventually did? I’ve made a bunch of pants so I think I can swing it. Thanks for your thorough review.
Absolutely, you can swap out fly fronts. I’ve got my method down pat, and I’m never going to follow the instructions from a pattern again. I highly recommend Sandra Betzina’s method: https://www.threadsmagazine.com/2008/11/04/video-easy-to-sew-flat-fly-front-zipper
If you need further instructions, Saremy of Sew Sew Live also prefers this zipper fly method. Her most recent YT video uses this method: https://youtu.be/Nt2GNcbI8d8?feature=shared
If you need further instructions about drafting the fly extension, just send me an email at naomi @ handmadephd.com. Best of luck!
Thanks! I did see your review on their website and it appears they’ve updated their instructions?
Hi Toni. I had similar problems with the Worker trousers instructions for the fly zip. I eventually used the instructions from the Tilly And The Buttons Jessa pants. Worked really well.
Thanks – I thought I was the only one having problems understanding the modern sewing instructions. I also bought the video but it didn’t help and had problems with instructions on another pattern, contacted Hetty and didn’t get any practical help. All for supporting women starting their own business and think she has some really good designs but yes needs better, clearer instructions, easier to read cutting layouts and probably should get more testers involved in the initial process.
I’ve heard from many sewers that they had difficulty with the instructions, so it is not just you. I completely agree with your suggested changes, and I hope Hetty does a better job moving forward with her patterns.
Hi, I just found your review today. I recently purchased this pattern and was looking for information before starting my muslin. I’ll think hard about it now, maybe sub in a different fly front.
As far as another work pant pattern, I’m having a great time with the Open Studio Shop Pants pattern. It’s clear, well-written, and the fly directions are good. Downside is that the size range could be bigger. I’m an advanced beginner at this point, and I am almost finished with my first pair made with the “final” fabric. I did make a muslin and a half for fitting though! The pants are turning out really well, and will be my best pants yet (I’ve made 3 other pants patterns in my learn to sew pants journey). I can highly recommend the pattern.
If you are comfortable subbing for a different fly front, I would highly recommend that—also, thanks for recommending Open Studio’s pattern. I also considered trying their pattern, but I wouldn’t say I like their limited sizing. I’m not sure I want to support a company that doesn’t support size inclusivity.
I will probably sub in the Open Studio fly. It should be easy enough to do. As for their sizing, web site says they are working to include more sizes, but there’s no time line for it. I hope they do!
This is an excellent incredible amount of good work! Thank you. The worker trousers were in my cart. I am going to wait in that one. The Ginger jeans class was also on my list. There is a sale going on over there. Will spend my money on the latter then.
The Closet Core jeans class is worth it, especially since everything is 25% off right now!
Thanks for the great review. It was nice to know that I wasn’t alone in my confusion over the zipper installation. I also like to try new ways of zipper installation and have tried may different ways however it frustrated me that I couldn’t figure out this zipper installation. The end result was far from perfect. I used the Top Down Centre Out method for fitting as I have found this to be a very successful way for me to fit pants. Overall the fit was good however the volume in the legs was way to big and I wont be wearing them. If I decide to make them again I will change the way the fly zipper is installed and take out some of the volume in the legs.
Thank you so much for your feedback.
Merchant and Mills have a pattern called The Heroine that looks very similar to this, a high-waisted tapered mom jean. Their instructions are very clear and suitable for beginners.
I haven’t heard of this Modern Sewing company before, but it’s a good illustration of how difficult it is to do clear technical writing and to produce good teaching materials for sewing. Closet Core is amazingly good at this, and they make it look effortless… but it isn’t. It takes a lot of work to explain something as well as they do.
Thank you for suggesting the Heroine pattern!
Really appreciate the time you took to write this! Was considering this pattern but I’m thinking twice now. Yours do look great – fantastic you made them work despite the instructions.
Thank you for sharing! I have made the Daughter Judy Adams pant twice now. The instructions are minimal, and would not recommend this pattern for someone who hasn’t sewn a fly before. The first time (button fly) I made them I used the True Bias Landers pants instructions as a reference, and the second time I made them (zip fly) it was much easier and I was able to make do with just the Adams pant instructions. A very enjoyable sew, but not for a beginner.
Thank you for your feedback on the Adams pant.
I really appreciate the review for this patten. I consider myself a fairly advanced sewer and an excellent problem solver, but a recent experience with a bomber jacket’s absolutely horrendous in-seam pocket pattern pieces and instructions has made me wary. I spent hours rereading the instructions, watching the online video and manipulating fabric. I got there in the end but I don’t want to waste my time like that. I wouldn’t even call that exercise experience building. I remember nothing of how I made it work. I doubt I’ll even try to adjust the pattern pieces to make construction more straight forward because the pattern has other issues and I was so fed up by the time I was done. I will pay for a quality product because I don’t want to have to guess how/where things should be sewn, if I choose to follow their directions. That isn’t to say I won’t try a pattern from a new brand at a lower price point. I’ll buy Heather’s patterns every time (if i want to sew the garment) because, it was clear from the very first pattern I bought from her, that there is such care in developing the pattern and the instructions. No respect for people who can’t take constructive feedback. We can’t all be perfect. We can, though, respect people’s experiences and try to be better. I can’t believe Closet Core’s products got that way by ignoring the feedback of the people making the pattern.
Thank you so much for your thoughts about this.
I appreciate veru much the time and effort you put into writing this post in such a detailed way, so as to give the sewing community well-documented feedback on this pattern! Your writing is clear, precise and careful. Thank you! I have been considering bying a similar pants pattern for some time now – after this review I will examine the other ptions you mention in your post.
I would love to hear if you do find other options. I will likely try the May Jeans by Make by TFS with the shaped legs in a few weeks.
Thank you so much for taking the time to write this post. I have been wanting to buy the pattern for a while but I was still on the fence since I heard the zipper instructions were challenging and while I am not new to sewing I haven’t tackled a zipper fly yet. Your experience sounds very frustrating and you seem to have more patience than I would in the same situation. It’s concerning that your reviews disappeared from the site. Thanks again for taking the time to provide your review and I appreciate it.
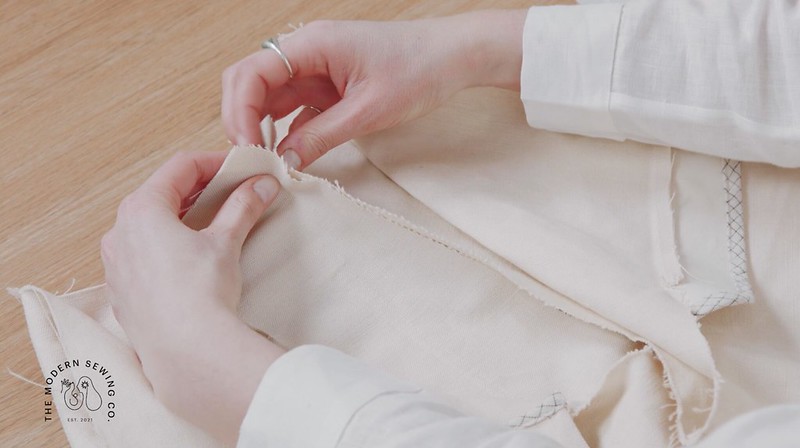
I don’t like being defeated by a problem, but I did almost throw my pants away and buy more fabric to start over. The real win was finishing the front fly after annihilating everything since I tried sewing that area multiple times. The twill was frayed like CRAZY.
Thank you SO much for all your work on this. I really appreciate everything you do, but you may have saved me a ton of grief on the Worker Trousers. I hope you will repost your website review on PatternReview.com – I am sure many others would feel the same way. So many of us beginner and intermediate sewers really are dependent on the website resources. Looking forward to your next post on a similar fit …
I’ve sent an email requesting that PatternReview.com add The Modern Sewing Co. to their list of pattern designers that can be reviewed. Once it’s available, I will post something there.
OK, I’ve posted a summary of my review on PatternReview.com. They added Modern Sewing Co. to their list.