
As fall and winter approaches, I need to sew pants with wider legs. I’ve done a lot of hiking this year, and it shows. I got thinking about how to widen pant legs and what happens to the grain line. How do I add width to pant legs and maintain the placement of the grain line (or grainline)? Do I add width at the thigh, knee, and / or ankle? Do I add an equal amount for the whole leg? Do I add the same amount to the side seam and inside seam? Do I add more to the side seam?
My understanding is that the grain line should be perpendicular to the floor and located at the center of the ankle and knee so that my leg will be centered in the pant leg. If the grain line is not centered at the knee and ankle and not perpendicular to the floor, then the pant leg will swing inward or outward and fit issues will arise. If I wanted to widen my pant leg and maintain grain line placement, I reason I should add width evenly on both the side seam and inside seam. Adding more to the side seam and less to the inside seam would unbalance the leg and shift the grain line away from the center, so my reasoning goes.
I also reasoned that if I wanted more room in my thigh area, I needed to make the pant leg wider at the knee and ankle level. In other words, if I widen the knee and ankle and trace back up to the crotch level, I will have sufficiently widen the thigh area of my pants as well. This is what I have spent the last 2.5 weeks figuring out.
What happens to the grain line at the crotch level or even the hip level then? Is it balanced equally left to right? Shifted medially towards the center front or center back seam? Shifted lateral to side seam? For me, the answer is that my grain line is shifted medially towards my center front and center back, but not by the same amount for the front and back pieces! The placement of the grain line at the hip level is going to be vastly different for everyone. I think the grain line at the hip will be similar to my posts about wide hip alterations; I’m just solving the problem another way.
I have been obsessed with the grain line on pants since I realized it has everything to do with how pants drape when worn. Most fit issues relate back to the grain line not being perpendicular to the floor and centered correctly on your body! If you want to watch the process of someone fitting pants to themselves while maintaining a perpendicular grain line, then go watch Michele’s highlighted stories here. It’s totally worth it!
For this post, I’m just going to walk you through my body measurements and how that translates to measurements on my self-drafted woven pant pattern. This post is not about how to draft pants or how to alter pants, and I’m not covering all possible measurements like waist to hip length or crotch curve length. I’m only focusing on grain line placement and how it is balanced on my pattern pieces. To make things easier, my pattern pieces and pattern measurements do NOT include seam allowance.
Waist vs. Waistband
I never wear pants at my natural waistline. My waist measures 33 inches. However, I wear my pants much lower than this.
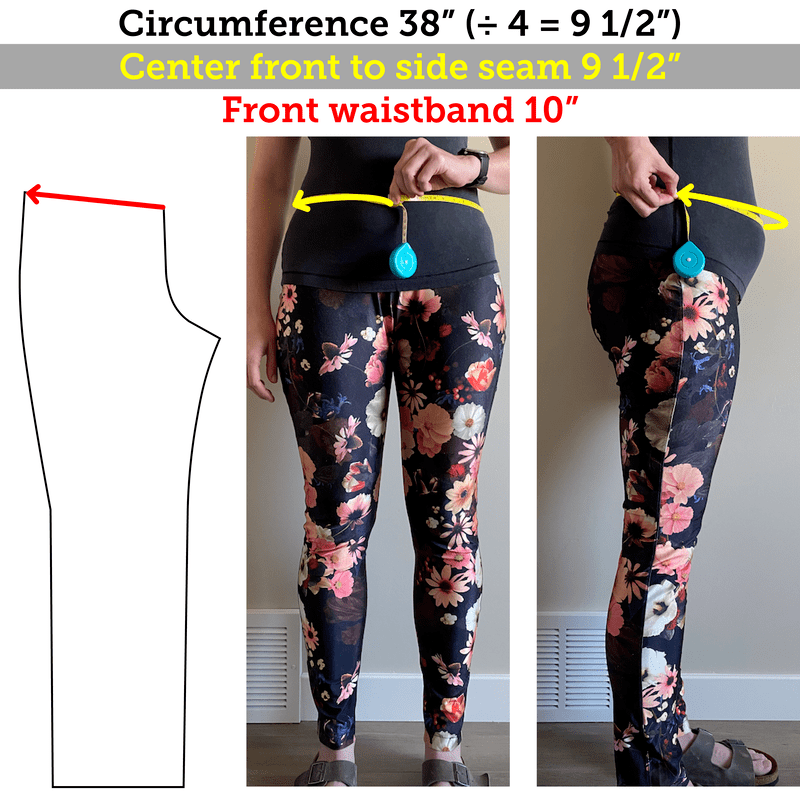
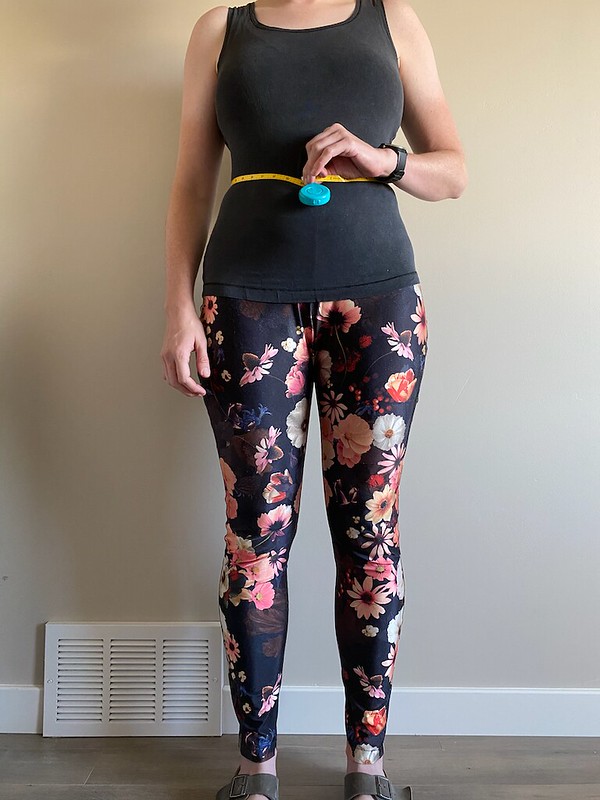
My waistband measurement is very different from my waist measurement. My waistband is 38 inches, which is a big difference from my 33-inch waist measurement. If I divide by four for right front, left front, right back, and left back, that gives me 9 ½ inches. It’s not always the case that you can evenly divide your waistband circumference by four. I double-checked my measurement by measuring from the center front to my side seam as well.
I don’t have a great answer for the amount of ease that is needed, but from what research I did, you only want ½ to 1 inch of ease at the waistband. Given that it took me 2.5 weeks to work on my pant pattern, I did go through some bloating and waist changes during that time and noticed that the ease is better placed on the front pieces instead of the back pieces. My front waistband on my pants measures 10 inches, 9 ½ inches plus ½ inch of ease. The ease was added to the side seam only, not to center front.
I repeated the same process for the back waistband. I measure 9 ½ inches, and my pattern piece also measures 9 ½ inches.
Where do you measure for the hip?
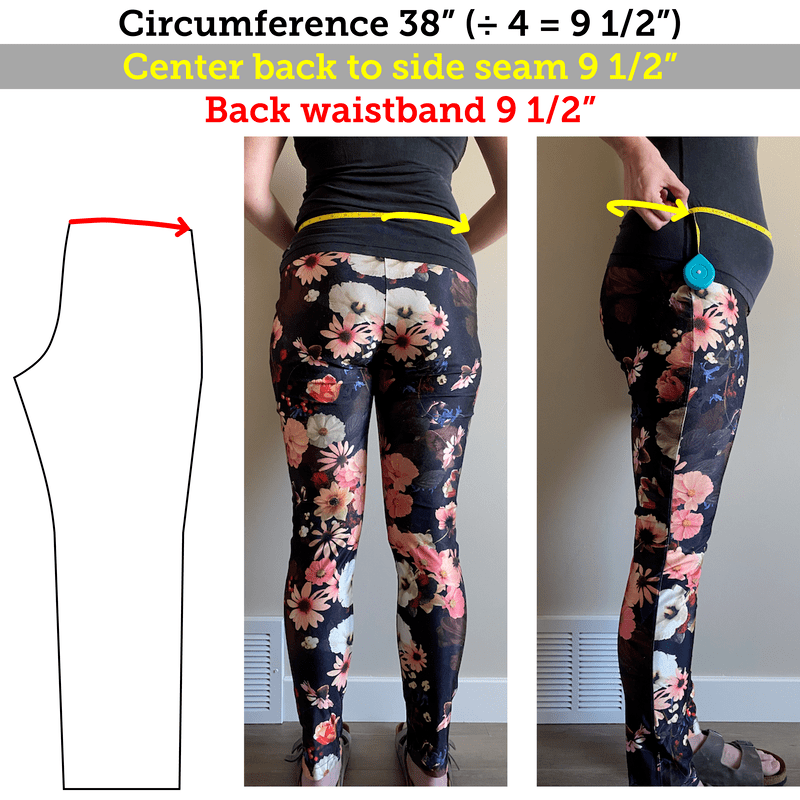
I measured my hip, not at my widest part, but actually slightly higher. I wanted to know my circumference at the top of the crotch curve since that’s an easy landmark to identify on the pattern pieces. Going from top-down, its at the point of where the crotch curve begins. What I call my hip level is taken at the top of my front crotch and at the top of my intergluteal cleft (aka butt crack). In other words, the top of my front crotch curve is where my pubic bone is located. The top of my back crotch curve is where my coccyx (aka butt bone) is located. For some people, this may be the widest part of their hip as well. Not for me. Just like my waistband, I was able to divide 41 inches evenly by 4.
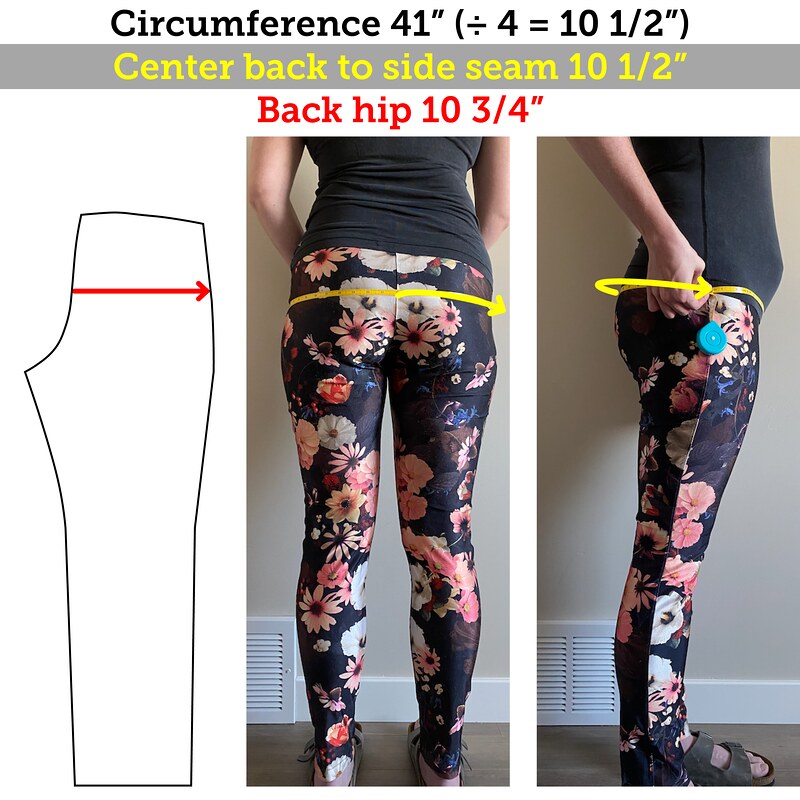
For both the front and back, I measure 10 ½ inches. I added ¼ inches of ease to the side seam of both my front and back pieces. That means, in total, I added 1 inch of ease at the hip. This may not be enough ease, but who knows?
The Grain Line
The grain line, which is often ignored and not well understood, is probably the most vital aspect to achieve well-fitting pants. The grain line on pants should be perpendicular to the floor and is critical for creating a balanced fit on any body type. As stated above and here, the grain line on pants should be centered at the ankle and knee. However, as you get to the level of the crotch and above, the grain line may no longer be centered. I wanted a way to determine where the grain line needed to be placed, and I chose my hip level. If you remember, I measured my hip not at the widest part but at the top of my front and back crotch curves; incidentally, this is also the top of my leg.
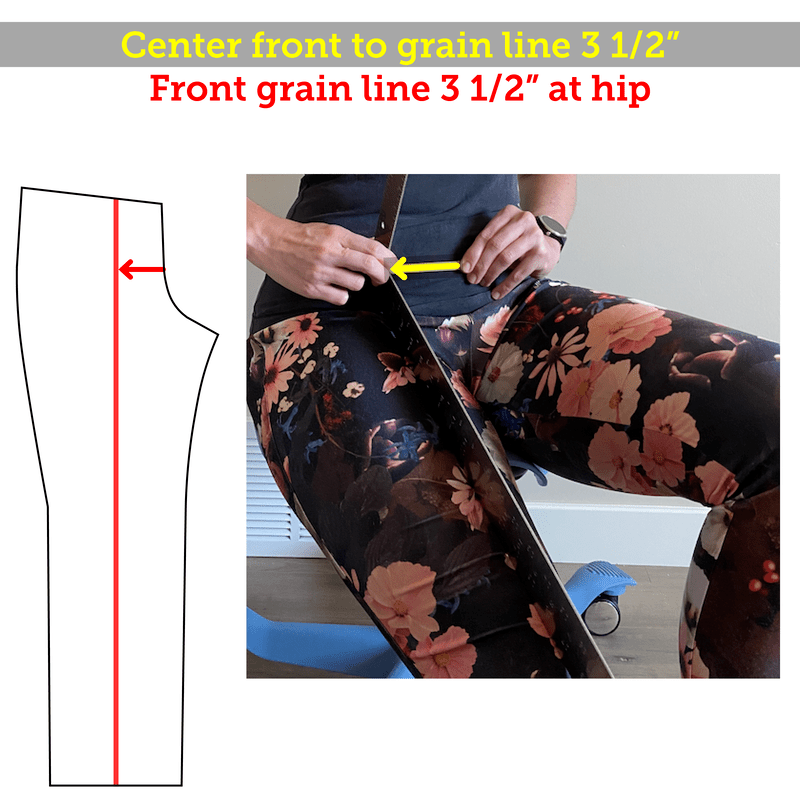
For the front, I used a long ruler and placed one end on the center of my knee. With my leg fully extended, I was able to adjust the placement of the ruler to hit squarely on my quadricep. When I say squarely, I mean centered not only left to right, but centered at my mid-quadricep up to down. I didn’t try to center the ruler left to right at the top of my quadricep since I figured this would give me the wrong value. The other end of the ruler stopped at my hip level. Since I was seated and was able to extend my leg perpendicular to my torso, that hinge point at the top of my leg is also the top of my front crotch curve. Wherever the ruler hit my abdomen was the location of the grain line at the hip level. I measured from the center front out to the ruler. From center front at my hip, my grain line is 3 ½ inches lateral from midline. If my front hip width on my pattern is 10 ¾ inches, then dead center would be 5 ⅜ inches. Instead, my grain line is shifted medially towards the center by almost 2 inches.
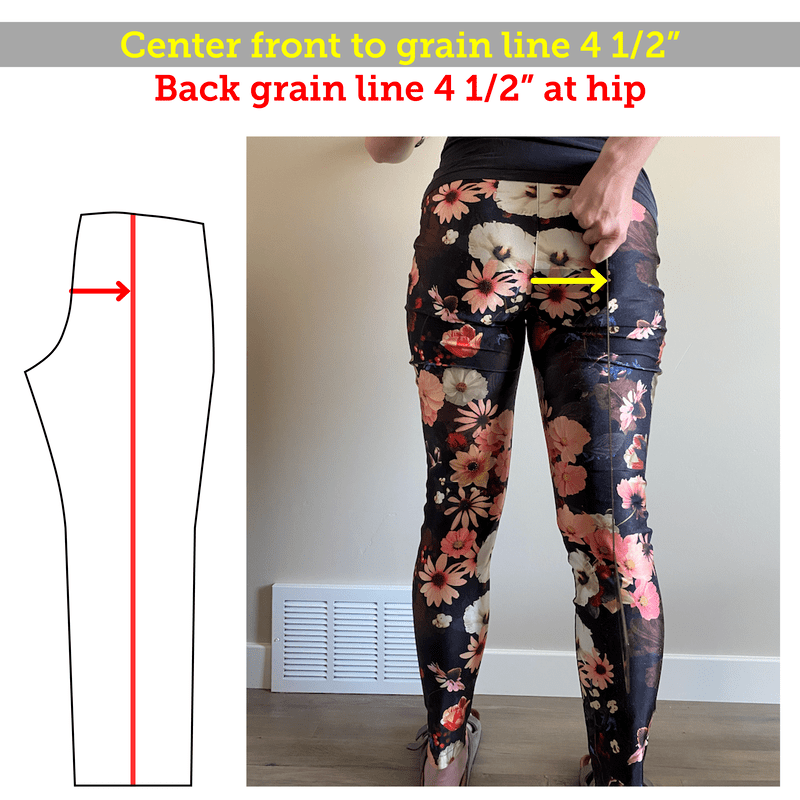
For the back, you’ll need a partner to help place a ruler. Again, I placed the bottom of my ruler at the center of my knee. I lined the ruler at the mid-way point up and down at the center of my hamstring. At the level of my hip, I measured from the center back to the ruler. My grain line is 4 ½ inches from midline. The grain line will not always be the same distance from the center front and center back, so it is helpful to measure both. If the grain line was centered at the back hip level, my back grain line would be at 5 ⅜ inches. However, my grain line is shifted towards the center back by nearly 1 inch.
I make this sound easy, but I did in fact try several muslins and swapped muslin pieces shifting the grain line on the front and back pieces differently. It was not a straight forward process, but at least I had a clear method for experimentation.
At this point, here is what I know. I know that my grain line needs to be centered at my knee and ankle level. I also know where it needs to be placed at the front and back hip level. Now it is time to talk about the crotch hook length, width, and grain line placement.
Crotch Hook Length
2024-06-18: I am aware that the following information about crotch hook length from Michele is no longer available. This is likely because measuring the crotch hook length in this manner is not very accurate and does not translate well to pant patterns. Many factors go into how long your front and back crotch lengths need to be: the size and shape of your body, the style of the pant (i.e., does the pant sit close or far from your body), the placement of the bottom of the crotch curve, the stretch of the fabric, and so on.

Subscribe to continue reading
Become a paid subscriber to get access to the rest of this post and other exclusive content.
