Last year I was watching a sewing guild live event on YouTube, and the Glide No Front and No Side Seam Leggings pattern by Sinclair came up in the discussion. At the time, the moderator was adamant that there was no way a home sewist could make leggings with just a center back seam. However, since I’ve watched all of Shift Fashion’s videos, I knew that you could in fact sew a pair of leggings with no center front or side seams, and that you didn’t need a fancy circular knitting machine either.
Let’s start at the beginning. I’ve been wearing my Greenstyle Simpatico Leggings I made back in March 2024 and then altered in August of 2024. My leggings are over two years old and still doing great. However, I can tell the color is starting to fade a little and the fabric recovery isn’t as good as it used to be. After two years of hard wear, it’s amazing how well these leggings have held up. Now, I could have used the same pattern I had, but I wanted to challenge myself with something new.
I love the leggings that are part of the Motion Shorts by Sinclair. They are similar to the Simpatico, but they include a gusset. I didn’t realize how helpful a gusset is for comfort. I was originally going to make my leggings using the Motion Shorts pattern, slightly altered so the legs are longer, but then I remembered the Glide No Front and No Side Seam pattern!
Analyze Style and Fit
As a legging pattern, these have negative ease and should be fitted across the waistband, hips, and legs. The pattern features no center front seam or side seams, with only a center back seam for construction. It comes with two contoured waistband rises and in multiple leg lengths: short and long shorts, capri, 7/8, and full length. Optional side panels (which add side seams) are available with or without pockets.
How do you eliminate the center front seam and still get a perfect fit? The pattern builds a gusset directly into the front piece, which simultaneously creates the front crotch curve. It is a brilliant design element that is fairly obvious once you understand how it works. The center front is cut on the fold and the front crotch hook is sewn on seperately as a gusset piece. Brilliant!
As with all Sinclair patterns, the instructions are detailed and well-written. Give yourself time to read through them and take notes before you start.
Sizing
Choosing your Height
In order to pick your size, you must first start with your height. The garment is designed for three heights, and it affects the final fit of the garment across all vertical measurements. The three heights are:
- 5’1″ – 5’3″ (Petite)
- 5’4″ – 5’6″ (Regular)
- 5’7″ – 5’9″ (Tall)
I definitely went with the Tall size range even though I’m taller (5’11”).
Choosing your Base Size

Next, using your waist and hip measurements, you can pick your base size. My body measurements are still a 33 to 34-inch waist and a 45-inch lower torso. As always, I used my measuring band method for the lower torso. My hips are technically 42 inches, but the measuring band gives a more consistent fit reference when picking pattern sizes. My lower torso measurement is right between sizes, but that’s less important than the amount of negative ease. Based on my previous leggings (here and here), I know I like 15% to 18% negative ease, so what is the negative ease for this pattern?
Finished Garment Measurements
ℹ️ On page 5 of instructions, the finished measurements are listed. “Waist (negative) 80% of size measurement. Hip (negative) 85% of size measurement.”
That means the pattern is drafted with 20% negative ease at the waist and 15% negative ease at the hip. I double-checked the negative ease on my size and it came out exactly, so I didn’t bother measuring all the other sizes. I’m assuming the 20% negative ease at the waist and 15% negative ease at the hip hold true across all sizes.
So, I need to pick a size where the final waist measurement is roughly 29 inches and the final hip measurement is roughly 38.5 inches.

Size 14 has a 27.7-inch waist and a 37.5-inch hip. That’s too small compared to the 29 and 38.5 inches that are needed. Size 16 is much closer at 29.6 and 39.5 inches. Going bigger means I can take things in as needed. You can’t add fabric, but you can always carefully remove the extra. In the end, I made the size 16 from the Tall size range.
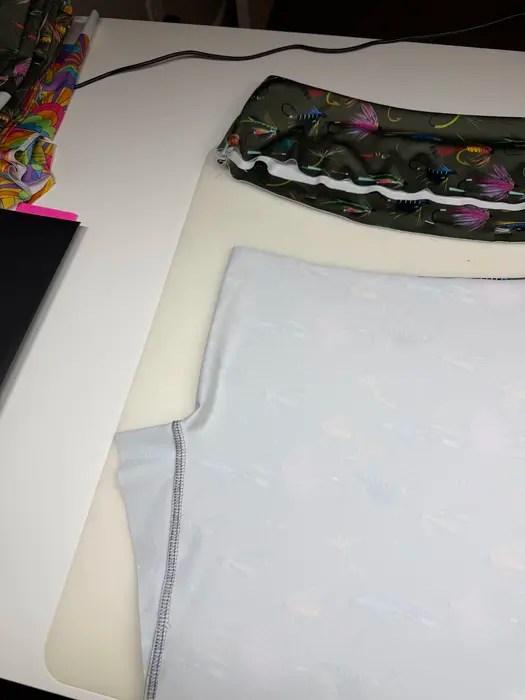
Materials
Do you even have to ask? The OG! Spoonflower Sports Lycra: 88% polyester and 12% Lycra, 4-way stretch, UPF protection that stands up to the sweatiest of workouts, moisture-wicking, high-stretch with excellent recovery, and colorfastness that really lasts for years.
Finding the Drapeline
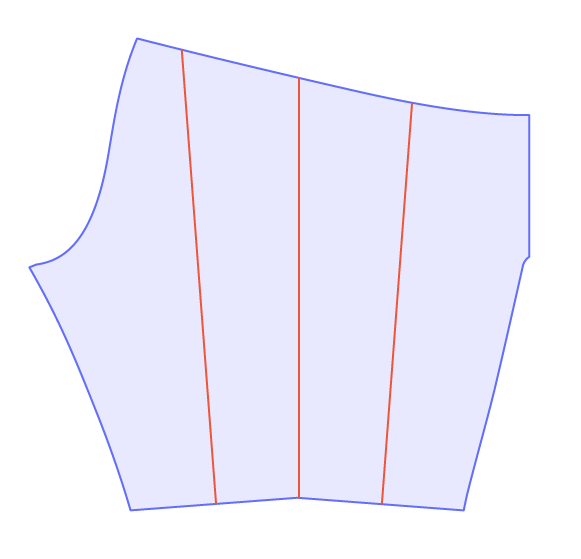
When your pattern piece does not come with a side seam, the first step is to find where the side seam should be. Once the side seam is established, then you are able to locate the front and back drapelines.
ℹ️ For my example below, assume I’ve removed all seam allowance and hem allowances.
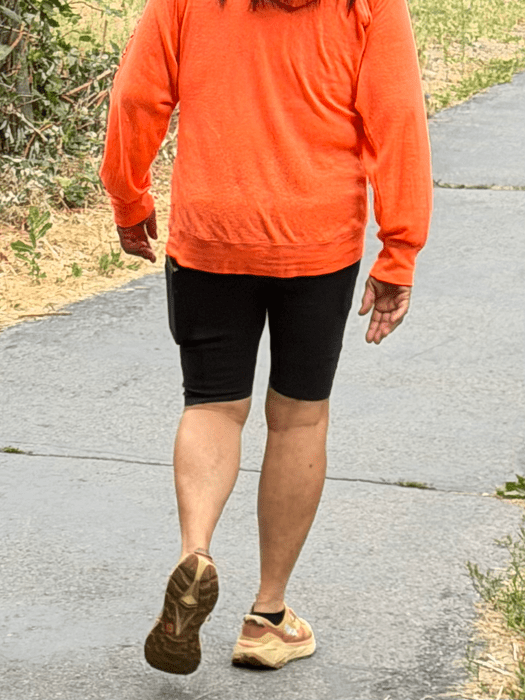
Side Seam
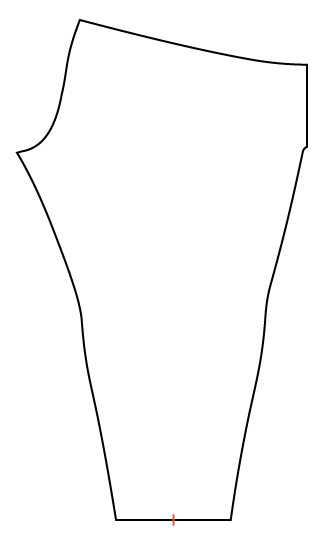
In order to find the drapeline on this pattern, start with the full-length pattern piece. At the hem, find the middle of the hemline. Remember, if your pattern has a hem allowance, exclude that and find the middle of the actual hemline.
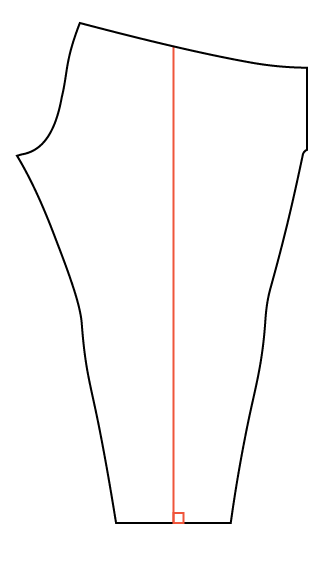
Next, draw a line that is perpendicular to the hemline. This is your side seam line.
Drapeline
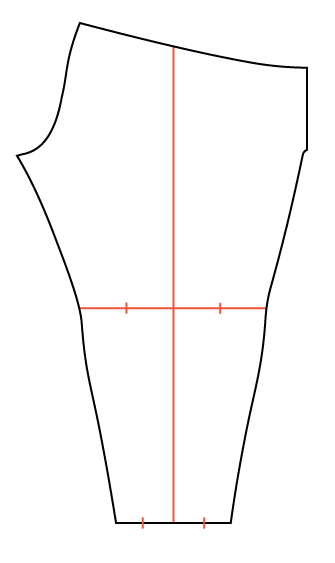
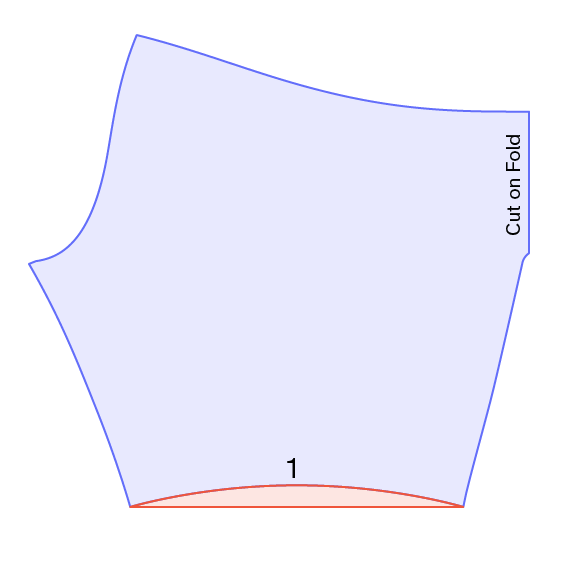
In order to find the front and back drapelines, segment the hemline again into equal parts. Remember to exclude the seam allowance when determining the center of the front and back drapelines.
At the same time, find the horizontal knee line and divide the front and back into equal parts. It is possible that the side seam isn’t in the middle of the kneeline, so when you divide the front and back, do so separately. The front two halves should be equal and the back two halves should be equal, but the front and back halves do not need to match each other.
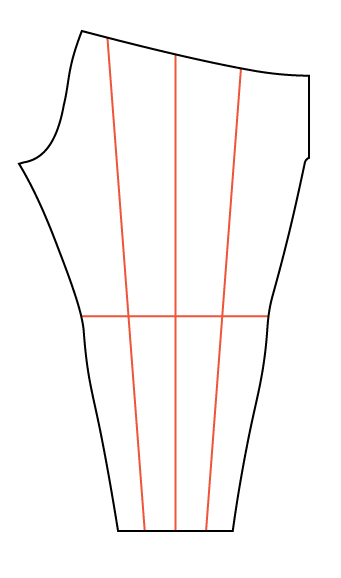
Next, draw a line from the mark you placed at the front hem and connect it to the mark you drew on the front knee. Continue that line all the way up to the waistline. This is the front drapeline. The front drapeline will not be parallel to the side seam.
Repeat the process on the back, connecting the mark on the hem with the mark at the knee and continuing the line up to the back waistline. This is the back drapeline. Again, the back drapeline will not be parallel to the side seam either.
Fixing the Hemline
I’ve posted about this before, but given that I’ve seen this issue repeatedly in ready-to-wear clothes, I want to get on my soapbox and scream: the hem on leggings with no side seam MUST be curved!
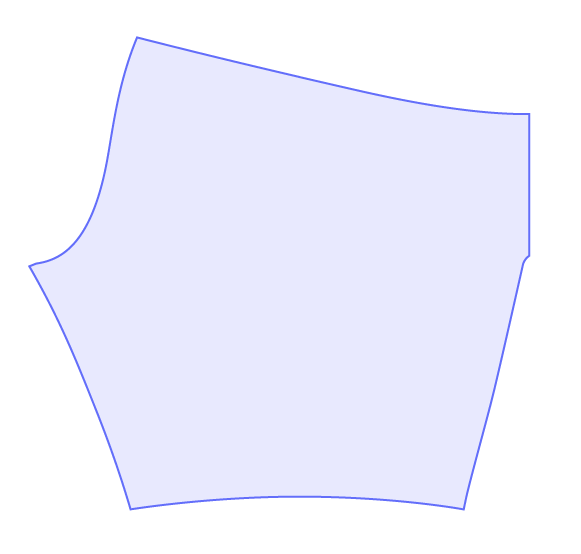
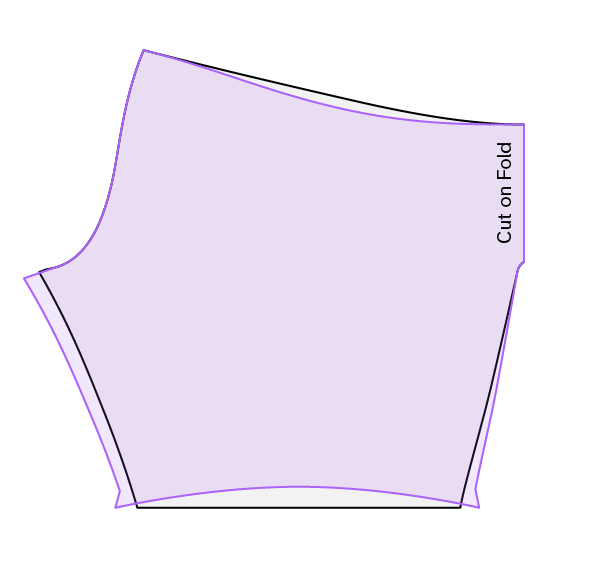
Above is the shorts pattern with the drapeline and side seam lines added.

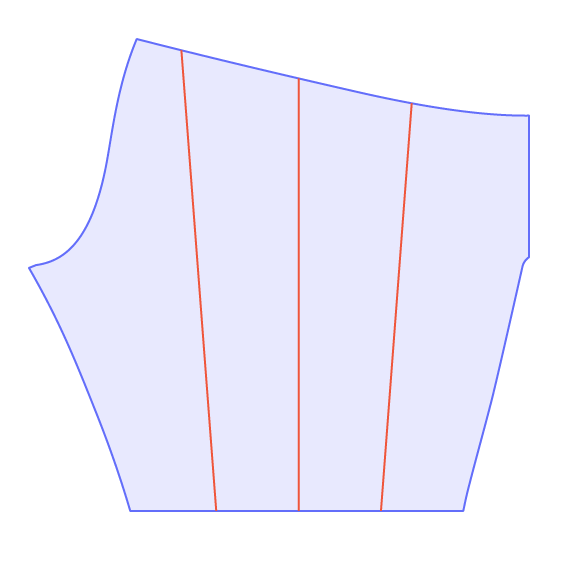
If I split the pattern at the side seam and then rotate the pieces so the drapelines are now parallel to one another, you can see the hem looks wrong. And it is wrong! Very wrong! Putting these two pieces back together doesn’t somehow magically fix the hem when you make your leggings.
So why do I say the hem needs to be curved? OK, let’s start by redrawing the hem correctly, so the hemline is perpendicular to the drapeline.
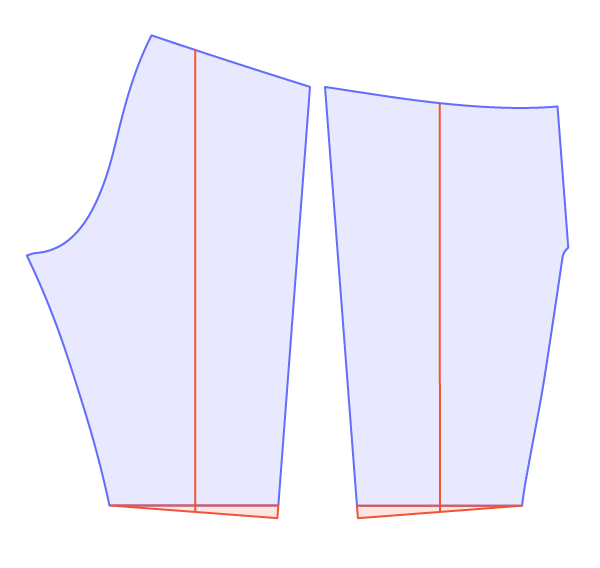
If we put the pieces back together to form a single pattern piece with no side seam, the pattern looks like this. The V-shape at the side seam hemline is a bit harsh and abrupt, but we can fix that easily.
You just take a very gentle curved ruler and draw a smooth line that closely matches the hemline above. Now when you make your leggings, the hemline will appear straight on the body.
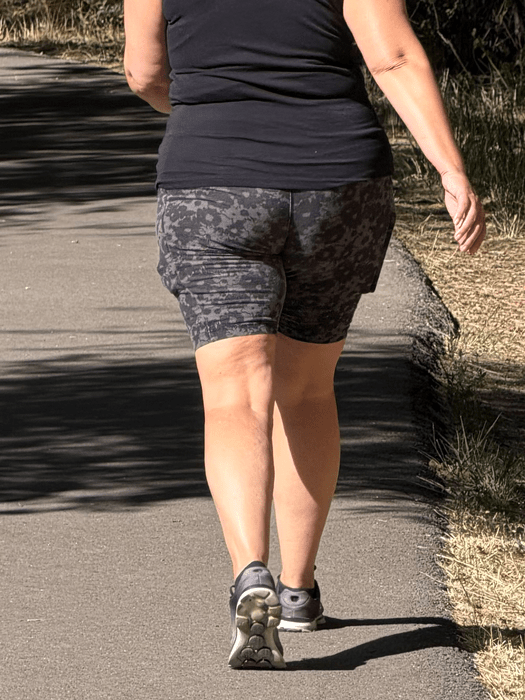
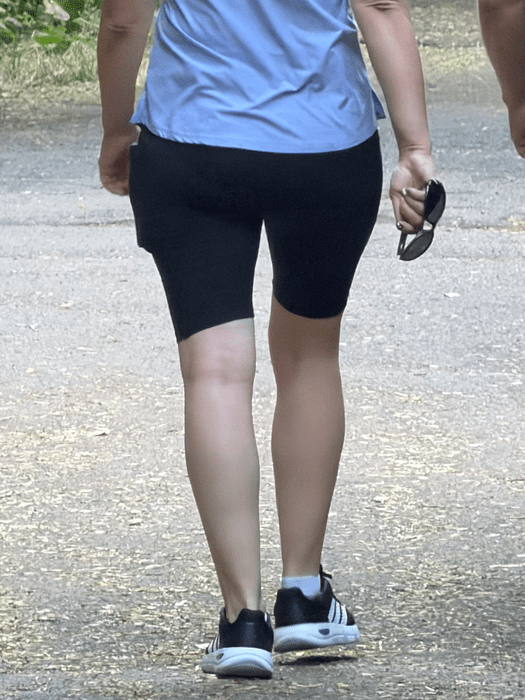
If you don’t do this fix, the hem at the side seam will be oddly long. Here’s a short montage of RTW leggings on normal people. The hems are severely tilted with the side seam much longer than the inseam. This isn’t happening because the inner thighs are some how gobbling up the fabric. You can tell it’s because the leggings have a straight hem and not a curved hem when they were made in the factory.
Adjustments

I didn’t have a ton of adjustments to make, but I’m glad I had my muslin fabric to test the pattern first before cutting into my precious Spoonflower fabric. The first adjustment was to lower the waistline at the side seam by 1/2 inch.
Next adjustment: curve the hemline! The exact amount you need to curve the hemline may differ subtly from person to person, so it’s helpful to try on a muslin version to see how much you need to raise at the side seam hemline. I had to raise mine 1 inch.
The legs were still too tight for me, so I added 1/2 inch to the front and back (1 inch total in circumference) to the hemline and smoothed it back into the inseam.
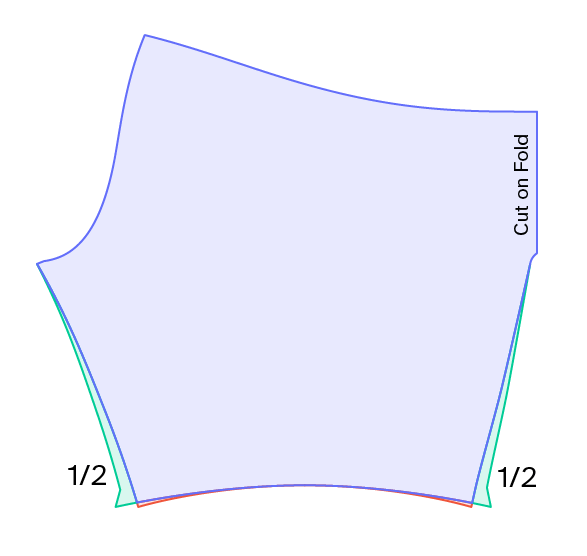
This is where making a muslin was priceless. I knew I needed more room in the back, but I wasn’t sure where to place the extra amount. I tried adding it to the gusset piece, but that just left me with extra fabric in the crotch area, messed up the front fit, and I still did not have enough room for my backside. Through trial and error, I realized I needed to add 3/4 inch to the back crotch hook length to make room. This solution didn’t disrupt the fit of the front, and that’s exactly what I needed.
Final in Purple
Here’s the comparison between the original (black) and my final version (purple). Please, curve your hemline!
Fit
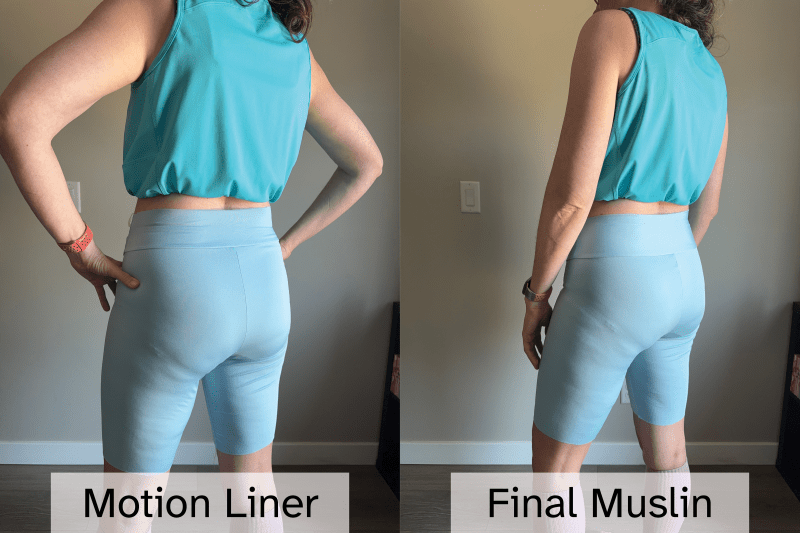
Motion Liner versus Glide
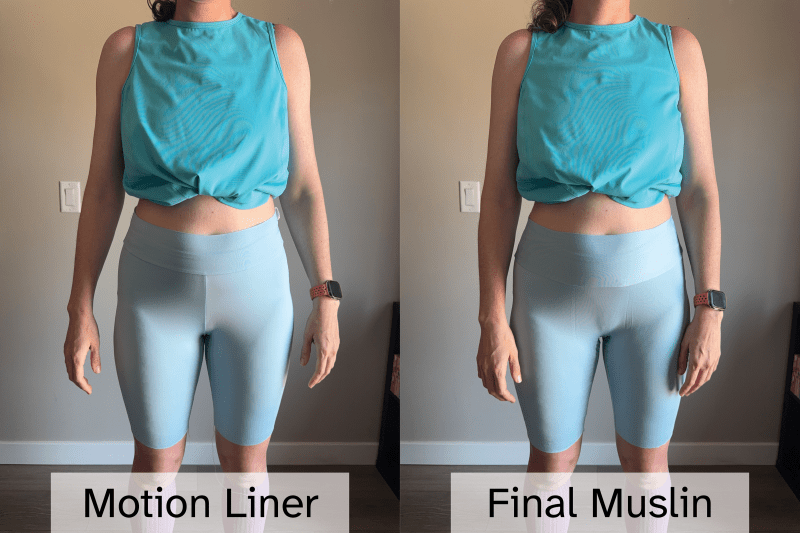
I did end up making a muslin of the Motion inner shorts with the longer leg length. I thought it would be helpful to see that pattern versus the Glide leggings.
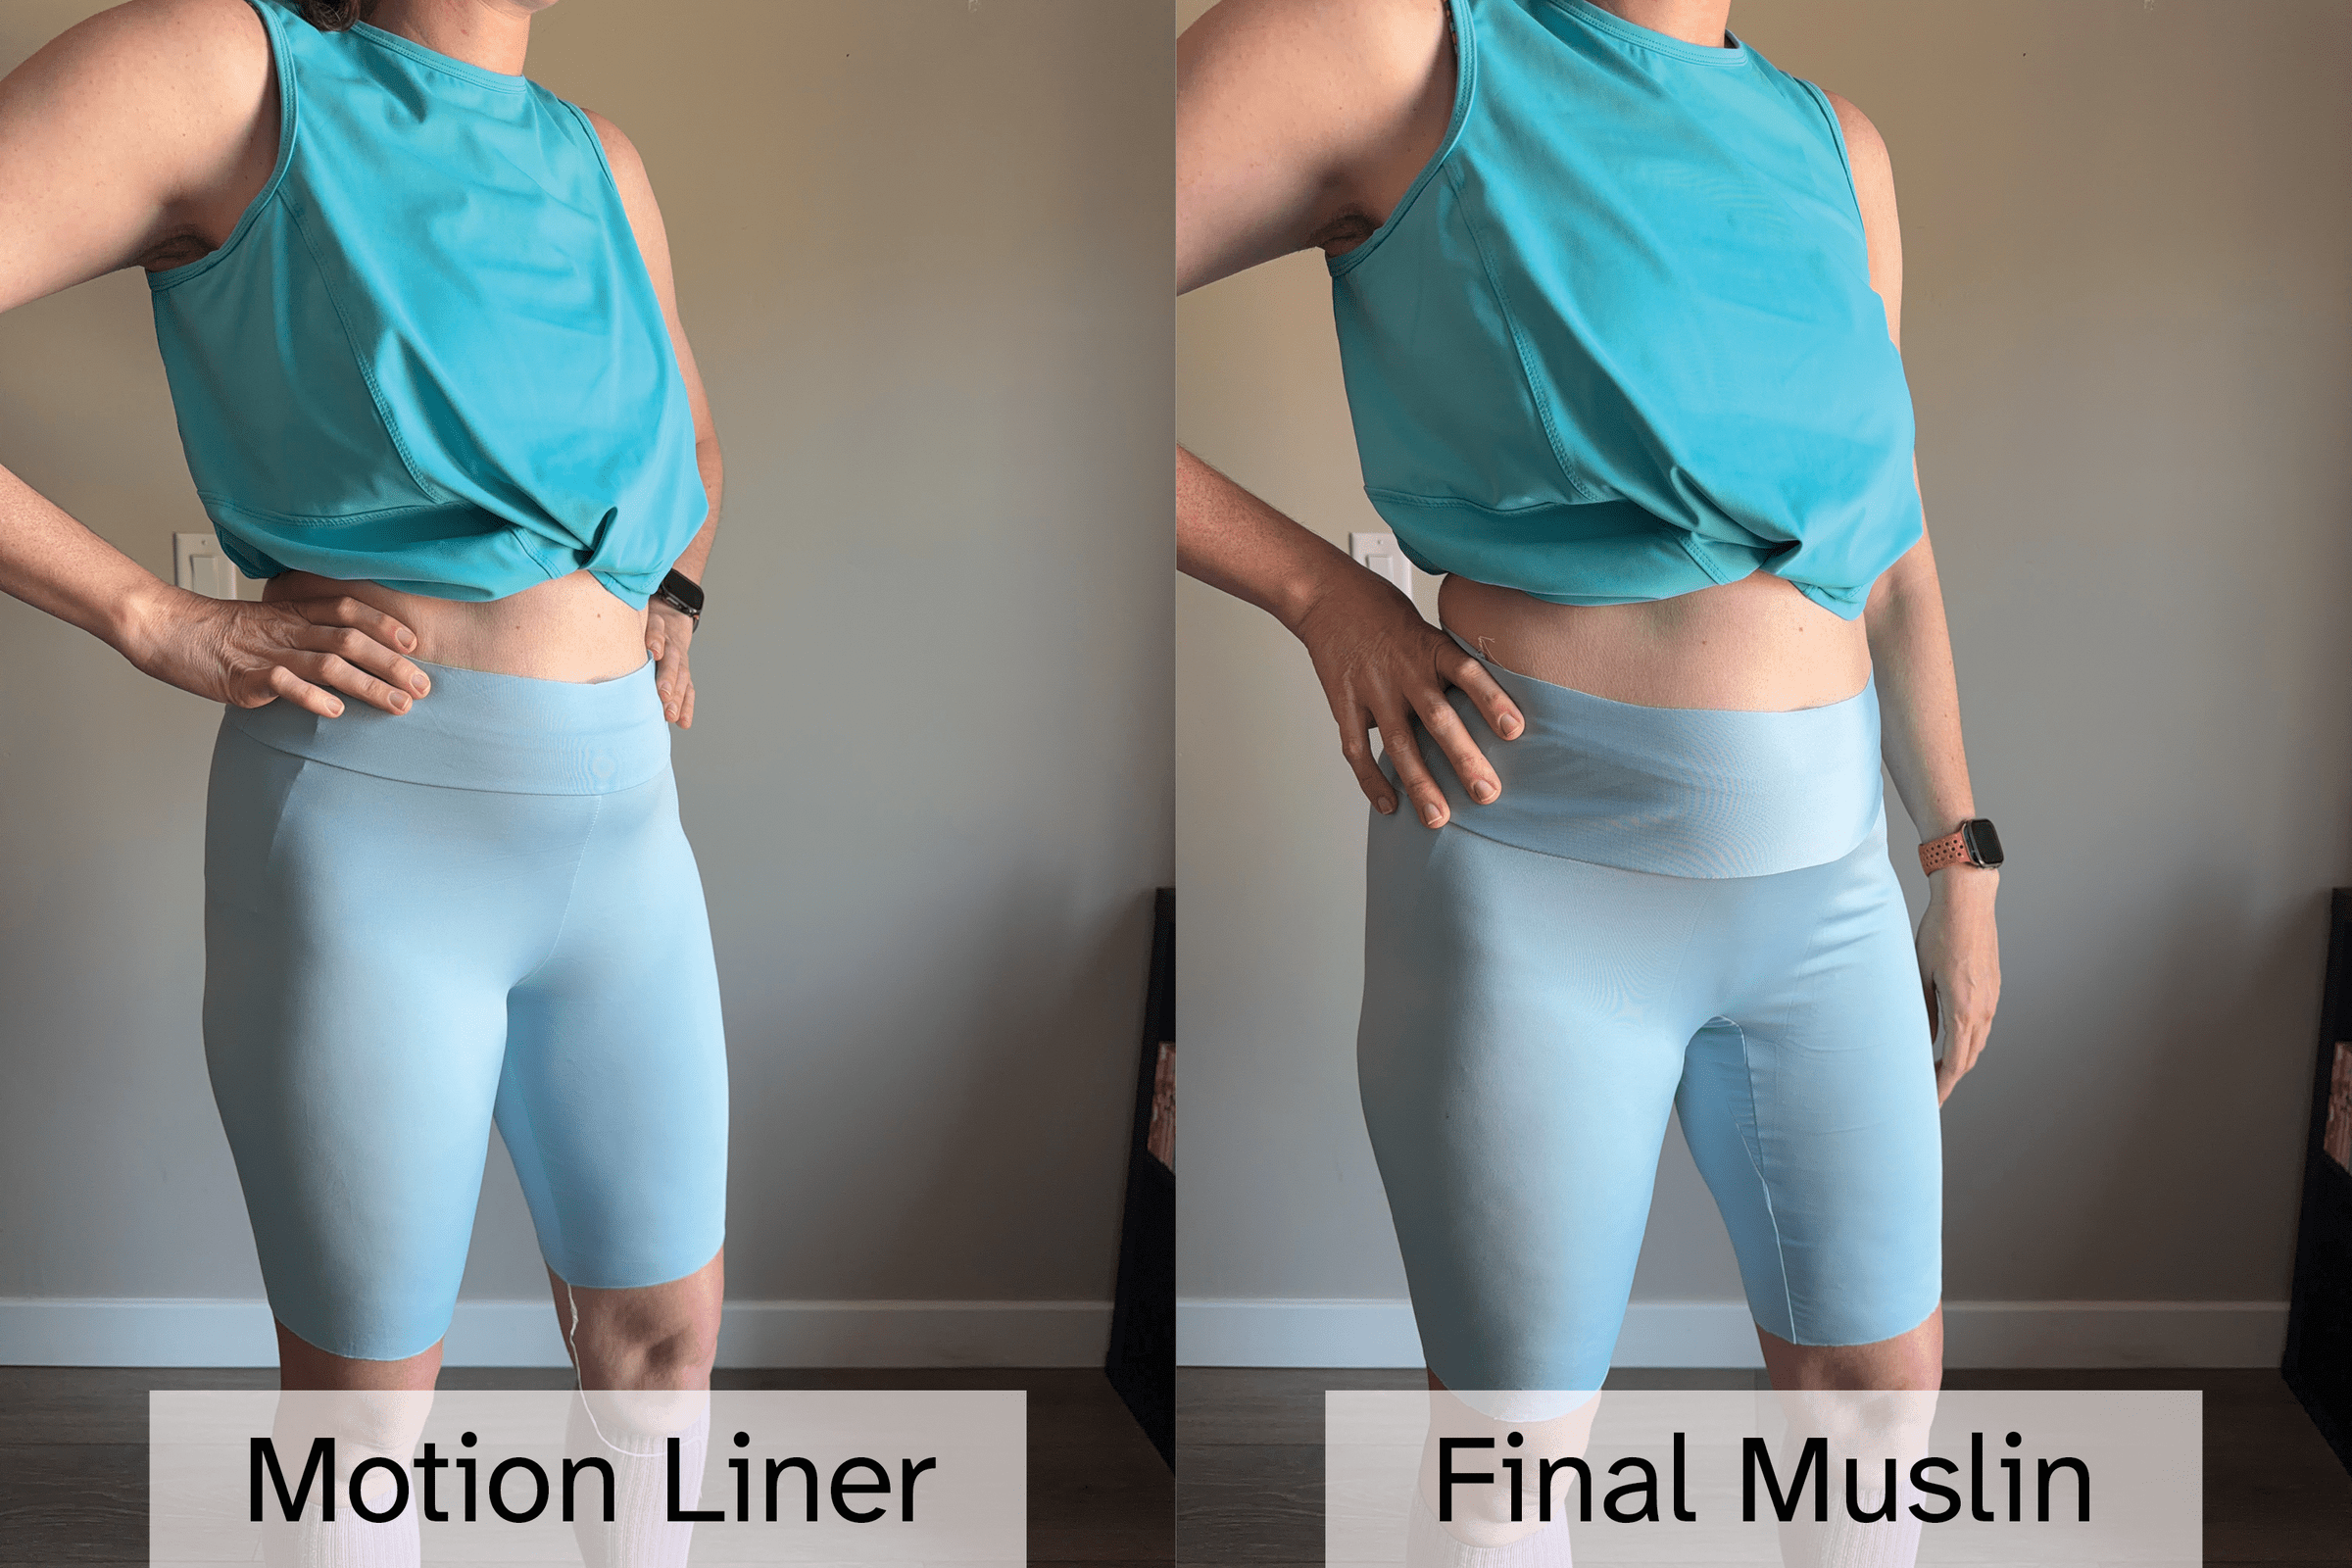
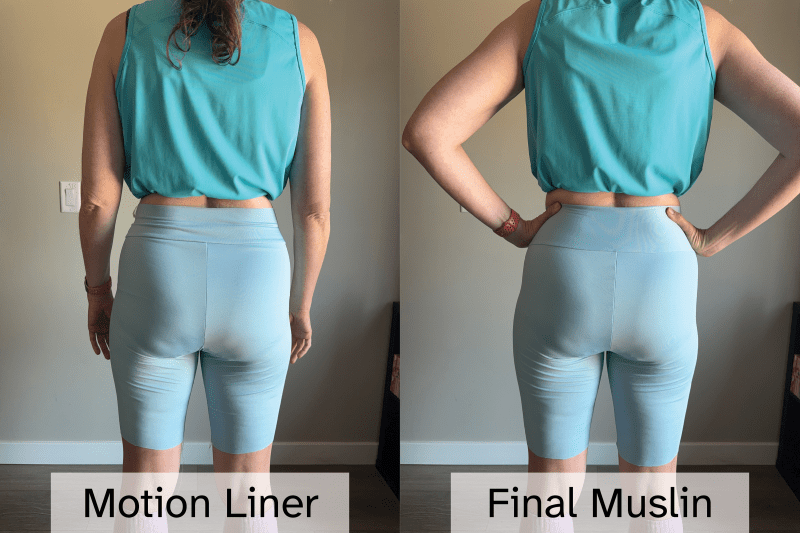
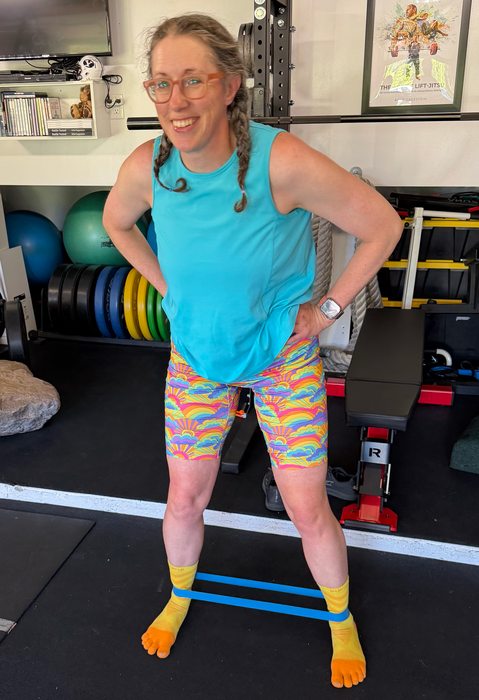
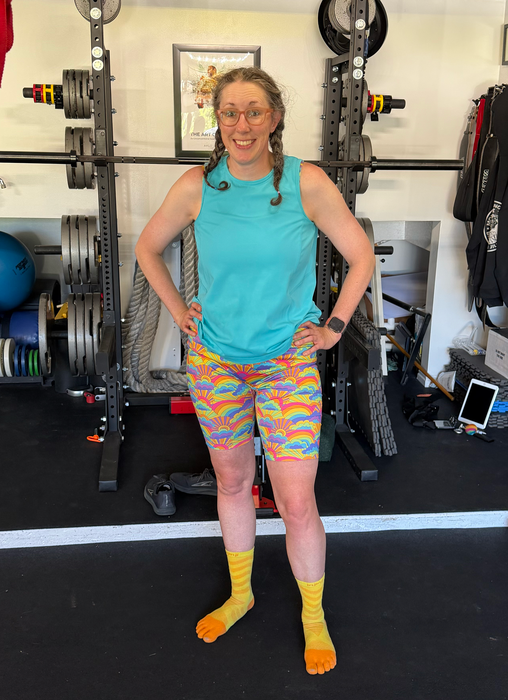
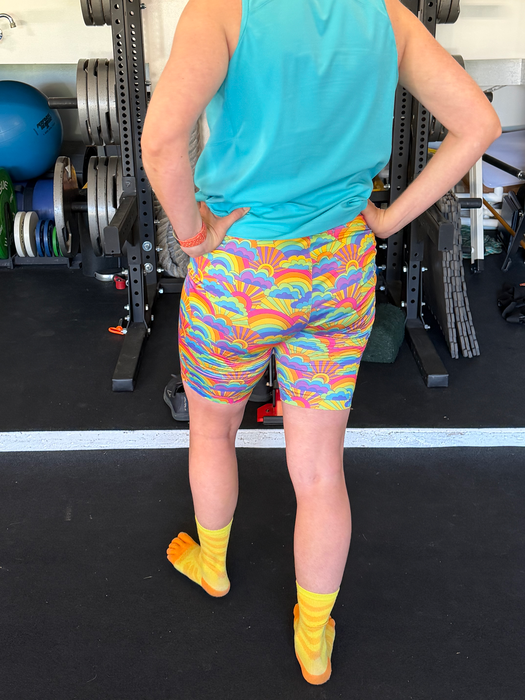
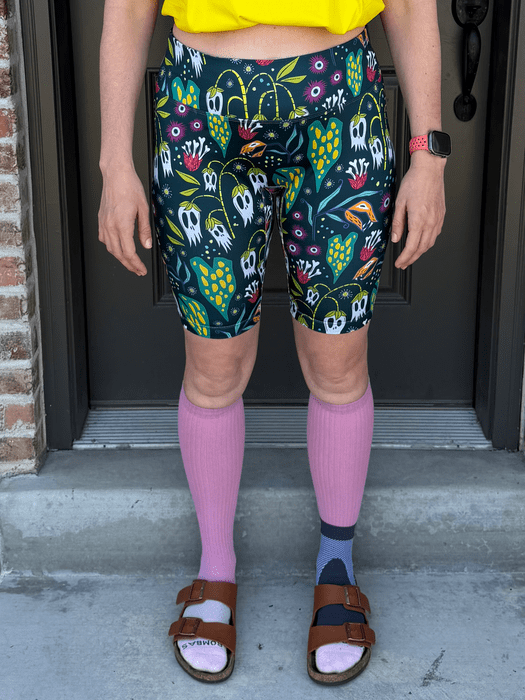
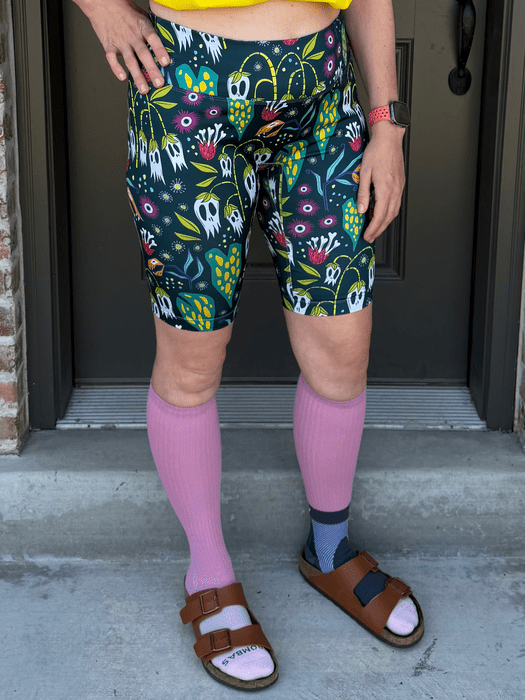
Final Garments


Personal Aside
I’ve been really digging Ken Sakata’s philosophy and ideas about fashion and design. His posts on Substack are worth checking out.

One of the things I’ve been thinking about deeply is what is my “style”. I realize my style is 99% athletic wear for the gym since most of the time I’m exercising. However, I need to bridge that sporty look with the reality that I will have to forever wear compression socks. I don’t remember where I was reading a discussion, but the best art and creativity often comes when there are constraints in place (e.g., art using only one medium). Having the constraint of wearing compression socks really brings into focus the types of sewing projects I want to tackle. I was inspired by this YouTube channel to think outside of the box.
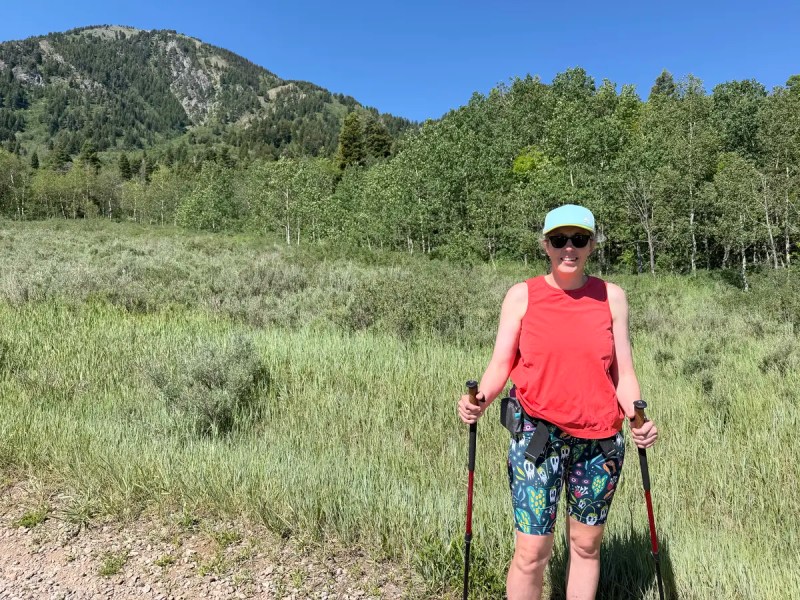
So instead of making just basic t-shirts, maybe I start sewing myself polo style shirts. Or I could spruce up an outfit with my new Closet Core shorts with an oversized denim shirt. I definitely know I want to try to get compression socks that aren’t wild colors, but more neutral so they’re easier to coordinate with my closet. Anyways, be prepared for lots more photos of me in compression socks!

IF YOU FOUND THIS POST HELPFUL, CONSIDER SUPPORTING MY WORK BY SIGNING UP FOR A PAID SUBSCRIPTION.
POSTS OLDER THAN 3 MONTHS ARE NOW FOR SUBSCRIBERS ONLY — YOUR SUPPORT KEEPS THIS SPACE GOING.
INTERESTED IN SUBSCRIBING TO RECEIVE NEW POSTS IN YOUR INBOX?


Leave a comment