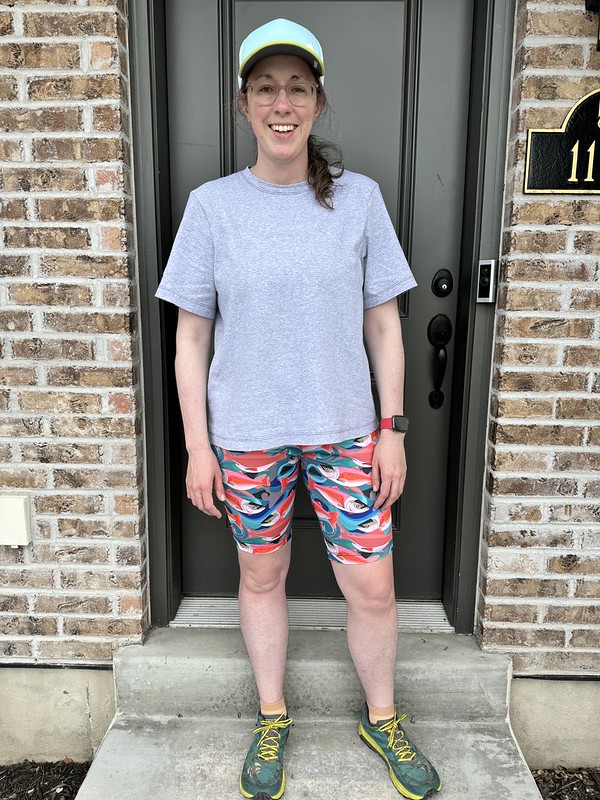
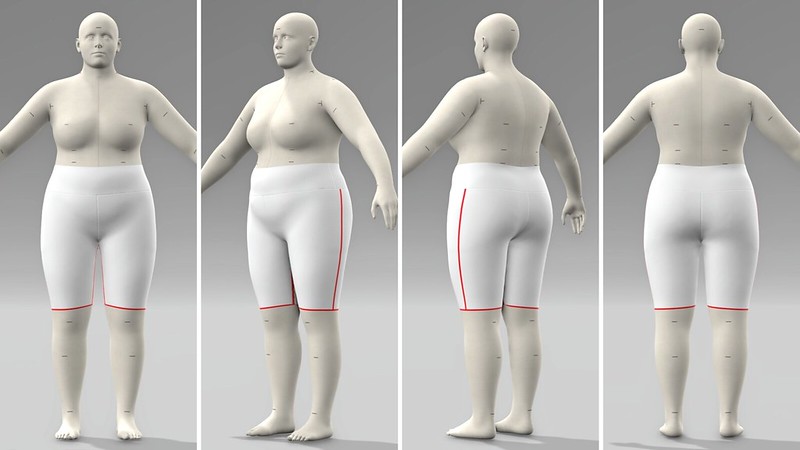
Of course, I needed matching bottoms after all that effort to make new sports bras! Back in January, I started testing the Simpatico leggings from Greenstyle. I was curious how they would fit since they don’t have a side seam. Based on some of my digital comparisons, I wasn’t sure this legging style would work for me.
With a few modifications, I was easily able to get the leggings to fit, and then I had the fun task of shortening the full-length legs to make long shorts. This experiment taught me a lot about the grainline placement on a garment like this.
Analyzing Style and Fit
The pattern is simple and straightforward. It comes in three inseam lengths: petite (26″ inseam), standard (29″ inseam), and tall (31″ inseam). It features a high-rise or mid-rise yoga waistband with no side seam and full and capri-length options. The pattern is a great basic that lets you fit GreenStyle patterns before transitioning to a pattern with more panels and features.
Sizing and Versions
Size Charts
The pattern ranges from 22 to 57-inch waist, 32 to 62-inch hips, 17-3/4 to 33-inch mid-thigh, and 11-1/2 to 22-3/4 inch calf. The pattern has knee placement lines to ensure the calf accommodations are in the correct location.
| Size | Waist | Hip | Mid Thigh | Calf |
|---|---|---|---|---|
| B | 22-23 | 32-33 | 17.75-19.5 | 11.5-12.5 |
| C | 24-25 | 34-35 | 18.25-20 | 12-13.375 |
| D | 26-27 | 35-36 | 18.75-20.5 | 12.75-14 |
| E | 28-29 | 37-38 | 19.5-21.25 | 13.25-14.25 |
| F | 30-31 | 39-40 | 20.25-22 | 13.75-15 |
| G | 32-34 | 41-43 | 21-22.75 | 14.25-15.5 |
| H | 35-37 | 43-45 | 22-23.75 | 15-16.25 |
| I | 38-41 | 46-47 | 23.5-25.25 | 16.25-17.75 |
| J | 42-45 | 48-51 | 25-27 | 17.5-19 |
| K | 46-49 | 51-54 | 27-29 | 18.75-20.25 |
| L | 50-53 | 55-58 | 29-31 | 20.21-25 |
| M | 54-57 | 59-62 | 31-33 | 21.25-22.75 |
Body Measurements
When I tested this pattern in January, my measurements were: 37-inch waist, 46-inch hip, 25-1/4 inch mid-thigh, and 16-1/2 inch calf. If I use the measuring band method, my overall lower torso circumference is 47 inches. Based on my body measurements, I started with size I.
Materials
I tested this pattern with spandex from CV linens. I eventually made the leggings in several other fabrics with no issues.
- Blue Moon Fabrics in Energize spandex (77% nylon, 23% spandex, 320 gsm)
- Blue Moon Fabrics in Performance spandex (72% nylon, 28% spandex, 230 gsm)
- Spoonflower Fabric in Sports Lycra (88% polyester, 12% lycra, 288 gsm)
Alterations
Size I
I started with Size I in the tall inseam with the high-rise waistband.
I really wish every pattern maker would include final garment measurements! I roughly measured the following circumferences on the size I pattern pieces and then subtracted the seam allowance amount from each measurement:
- Top of the waistband = 29.7 – (0.375 × 4) = 28.2
- Top of the crotch curve = 37.5 – (0.375 × 4) = 36
- Mid-thigh = 18.125 – (0.375 × 2) = 17.375
- Calf = 13.5 – (0.375 × 2) = 12.75
The specific relevant content for this request, if necessary, delimited with characters: Industry standards state that a 40-50% stretch fabric should have 20-30% negative ease. However, I’ve always found that much negative ease is too much. When you wear anything with elastic or stretch, the more it stretches on your body (i.e., >20%), the less the fabric can stretch during movement. This makes it more likely the garment will try to shift and move towards a smaller circumference. If you struggle with leggings holding up, this might be why.
Based on my body measurements, the amount of negative ease can be calculated using this formula: Negative Ease Percentage = (1 – (Finished Measurement ÷ Body Measurement)) × 100
- Waist = 1 – (28.2 ÷ 37) × 100 = 23.8%
- Hips = 1 – (36 ÷ 47) × 100 = 23.4%
- Mid-thigh = 1 – (17.375 ÷ 25.25) × 100 = 31.2%
- Calf = 1 – (12.75 ÷ 16.5) × 100 = 22.7%
Realistically, I don’t want more than 20% stretch anywhere.
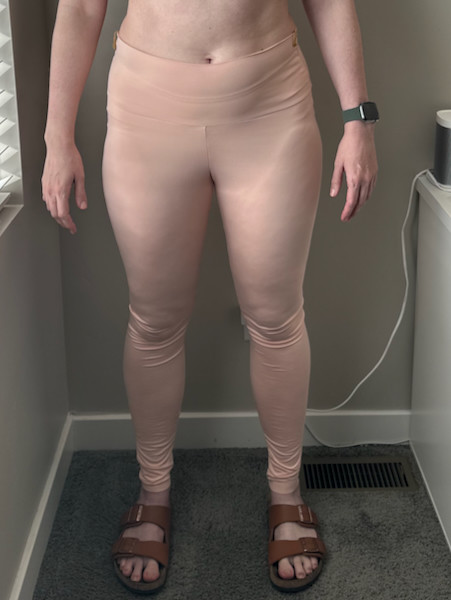

The garment has difficulty staying in place because the negative ease at my mid-thigh is greater than 30%! The leggings are too tight around my legs, sliding down from the mid-thigh and up from the calf. These fit issues show up as wrinkles around my knees, which worsen as I move around in the leggings. The waistband eventually gets pulled down too.
Size J / K
I first noticed that the tall inseam (31 inches) was too long. I went to the standard length inseam (29 inches) for my next version. I also decided to grade between sizes to get the correct amount of ease for each area. The next size up, size J, has the following measurements:
- Top of the waistband = 31.86 – (0.375 × 4) = 30.36
- Top of the crotch curve = 40 – (0.375 × 4) = 38.5
- Mid-thigh = 19.25 – (0.375 × 2) = 18.5
- Calf = 13.75 – (0.375 × 2) = 13
That translates to the following amount of negative ease for my body:
- Waist = 1 – (30.36 ÷ 37 ) × 100 = 17.9%
- Hips = 1 – (38.5 ÷ 47) × 100 = 17.9%
- Mid-thigh = 1 – (18.5 ÷ 25.25) × 100 = 26.7%
- Calf = 1 – (13 ÷ 16.5) × 100 = 21.9%
That’s the perfect amount of ease at the waist and hips. However, I need more ease for my mid-thigh and calf. Two sizes up, size K has the following measurements for the mid-thigh and calf:
- Mid-thigh = 20.85 – (0.375 × 2) = 20.1
- Calf = 14.75 – (0.375 × 2) = 14
These values translate to the following amount of negative ease for my body:
- Mid-thigh = 1 – (20.1 ÷ 25.25) × 100 = 20.4%
- Calf = 1 – (14 ÷ 16.5) × 100 = 15.1%
I think this is OK. I’m close enough to 20% for the mid-thigh and below 20% at the calf.
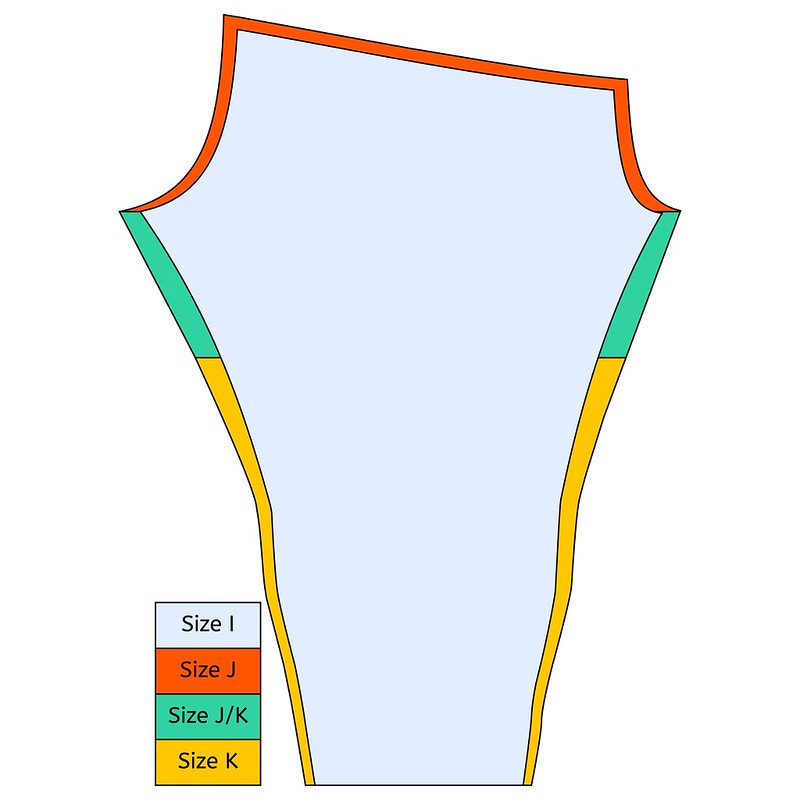
My final pattern is a size J from the waist through the crotch area. From the crotch area to the mid-thigh, I needed to grade between sizes J and K. Finally, my pattern is size K from the mid-thigh to the ankle. This final pattern gives me between 15 – 20% negative ease!

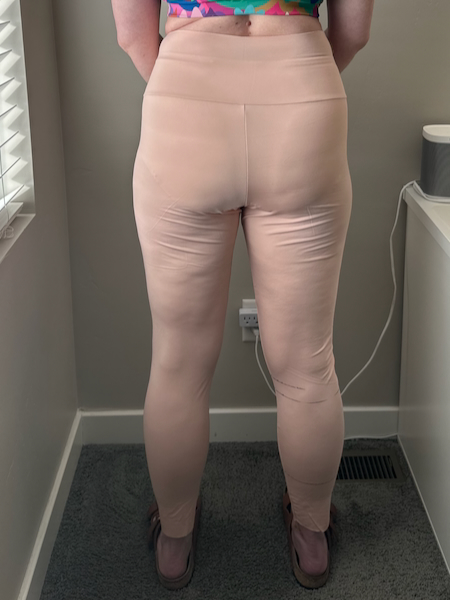
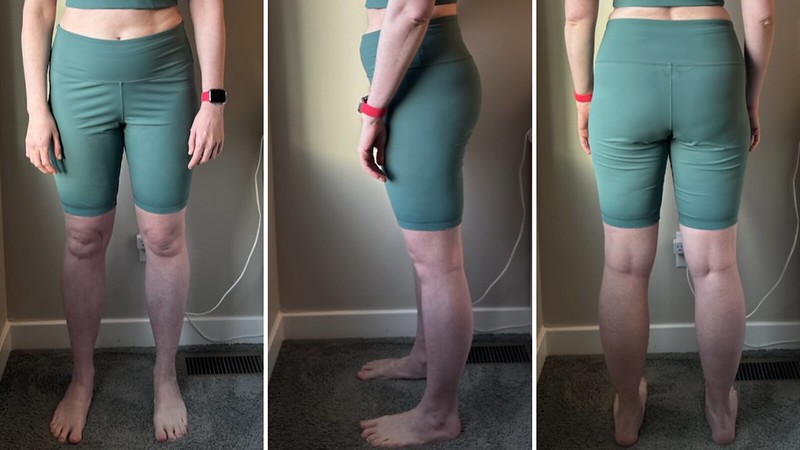
Especially from the back, you can see that I no longer have a ton of wrinkles around my knee. The leggings stay in place when I move around.
Turning Leggings into Shorts
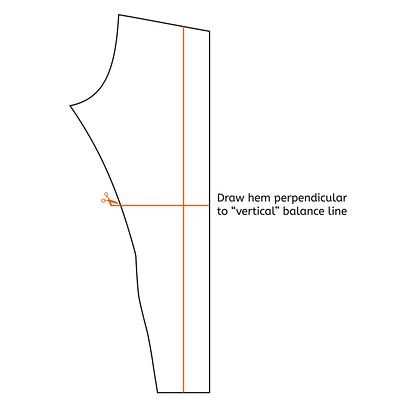
The final conundrum was turning the full-length leggings into long shorts. How do you cut the new hem? Typically, I would draw my hem perpendicular to the grainline.

Ah ha, but this was wrong! The hem of my shorts is not balanced. The inseam is higher, and the side seam is lower. The shorts’ hem is angled! But why?
It makes sense if we split the pattern along the side seam and just focus on the front of the pattern. How do you draw the center vertical balance line on the front piece? In the past, I thought you would find the center of the ankle and draw a perpendicular line from the ankle to the waistline parallel to the grainline. The most notable issue is that the vertical balance line does not bisect the horizontal knee line. I need the vertical balance line to bisect the knee level for pants to hang straight on my body. This is why I never thought this pattern would work for me.

We know that drawing the hem perpendicular to this vertical balance line doesn’t give you a balanced hem on the body.
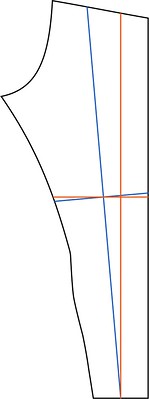
What happens if I draw my “vertical” balance line from the center of the ankle through the center of the knee?

Now, when I draw my short’s hem perpendicular to this “vertical” balanced line, the hem may look tilted on the pattern, but it looks balanced on the body.

For my final pattern, the hem is higher at the side seam by 3/4 inches. I smoothed the hemline so nothing came to a sharp point.

Look, the hem is now balanced on the body.

The hemline perpendicular to the grainline (e.g., red/orange) results in a hem tilted up towards the center of the body. The angled hemline (e.g., blue) results in a balanced hem on the body.
Revisiting the Vertical Balance Lines
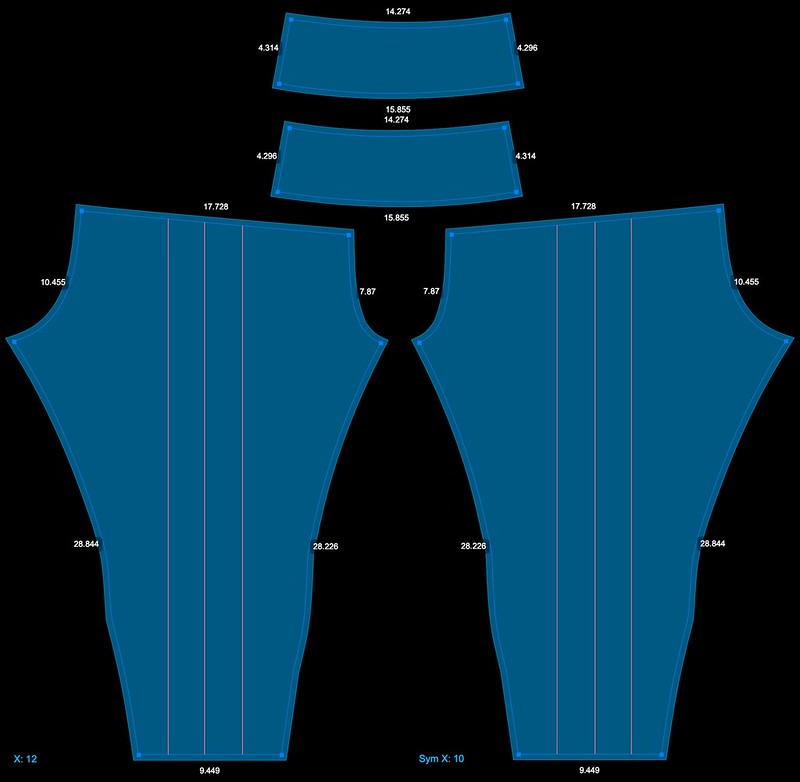
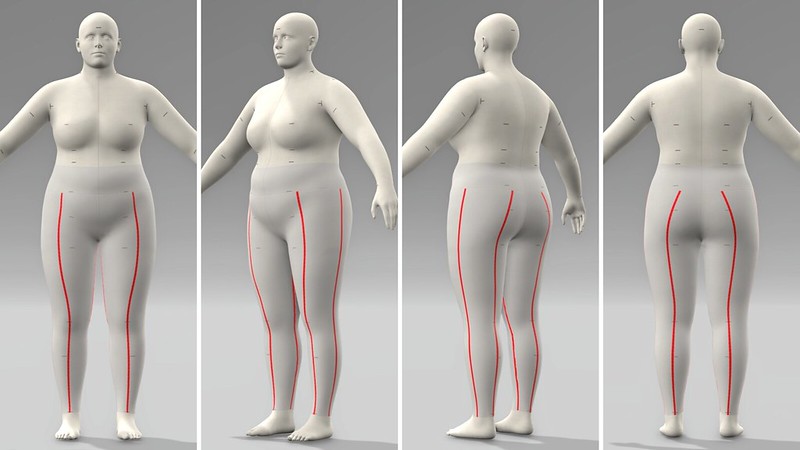
In the past, I drew the vertical balance line like this on the pattern.
And this is how it would look on the avatar.

It didn’t make sense to me how leggings could fit when these are the vertical balance lines, and my use of a laser level never made sense with a pattern like this. However, through the experiment of going from leggings to shorts, I learned that these balance lines are wrong and should look like this instead. The balance line should bisect the ankle and knee.

And the vertical balance lines on the avatar make a lot more sense now!
Final Fit
Blue Moon Fabrics in Energizer Spandex

Blue Moon Fabrics in Performance Spandex
After finishing all the leggings, I noticed that the back inseam is much longer than the front inseam. I’ve never seen a pattern with the back inseam longer. Sometimes the back inseam is shorter than the front to help pull it around the butt. I’m guessing some of the wrinkles under the butt are because of this discrepancy. You really notice the folds on the bottom of my butt with this fabric.
TROUT DOODLE BY DOUBLE J DOODLES

RAINBOW TROUT FROM GROWN FROM GLASS

WONDERLAND FLOWERS BY CECILIA MOK

Conclusions
Obviously, I’m a convert. I didn’t think this pattern would work on my body, and I’m so glad I was proven wrong. I’m also happy I figured out how to place the balance lines correctly. The final fit is near perfect. They are super comfortable and stay in place while working out. I have definitely put them through the wringer these last few weeks. I’ve walked, run, hiked, did yoga, and lifted weights with no issues whatsoever.


Very interesting print.
LikeLiked by 1 person