
I wanted to briefly summarize the issues I’ve had with the Shop Pant from Open Studio Patterns. I sent an email to Open Studio about the final garment measurement issues, and they kindly accepted my feedback and are going to update the pattern:
“Thank you for being so thorough with your PDF. We dove into the measurements and you are absolutely right about the discrepancy! Those finished garment measurements had been coming directly from our pattern grader’s software and we haven’t been able to identify where it went awry. The Shop Pant was released last April, which was before we had implemented a phase of our process that included verifying all the specs on finished samples. This step is usually done by a technical designer when you’re in production of ready-to-wear garments in the fashion industry. We were able to add this step as more resources became available, but really didn’t think the Shop Pant had any issues since so many people have made it already and love it. We sincerely apologize if the error caused you any frustration, especially since our number one goal is to help people along in their sewing practice. We are verifying all of the measurements and updating the chart as quickly as possible. We’ll be sure to re-issue the pattern file to everyone who has purchased it. We appreciate this community so much for supporting each other and sharing knowledge. Thank you for bringing it to our attention.”
I will review the pants in another blog post. This post concerns current size and measurement issues until the pattern is updated.
The Issue In-Depth

Starting on the left, the first column (SIZE) contains the size. The waist measurements are on top, and the hip measurements are on the bottom. The following two columns (BODY MEASUREMENT) have the recommended body measurements in inches and should match the table in the pattern. The fourth column (TABLE) includes the final garment measurements reported under the recommended body measurements in the pattern’s table. I’ve rounded decimals to 1 instead of 2, so 0.75 becomes 0.8. This is the incorrect column. The fifth column (PATTERN) contains the measurements I took from the pattern pieces. I measured the top of the waistband to acquire waistband measurements, and I measured from the top of the crotch curve over to acquire the hip measurements (see image below). The sixth column (DIFFERENCE…) is simply PATTERN minus TABLE. The waistband is larger than reported, and the hip is smaller. The final four columns explore the amount of ease intended vs actual. The TABLE EASE is TABLE minus BODY MEASUREMENT. This is the intended ease of the pattern. The PATTERN EASE is PATTERN minus BODY MEASUREMENT. This is the actual ease of the pattern.

Table vs. Pattern
Measurement


In the figures above, the x-axis is in inches, and the y-axis is each size. The bar represents the recommended body measurement for each size (columns 2 and 3 from the table above). The dot represents the final garment measurement in the table (column 4, TABLE). The cross represents the measurements I took from the pattern pieces (column 5, PATTERN).
Ease
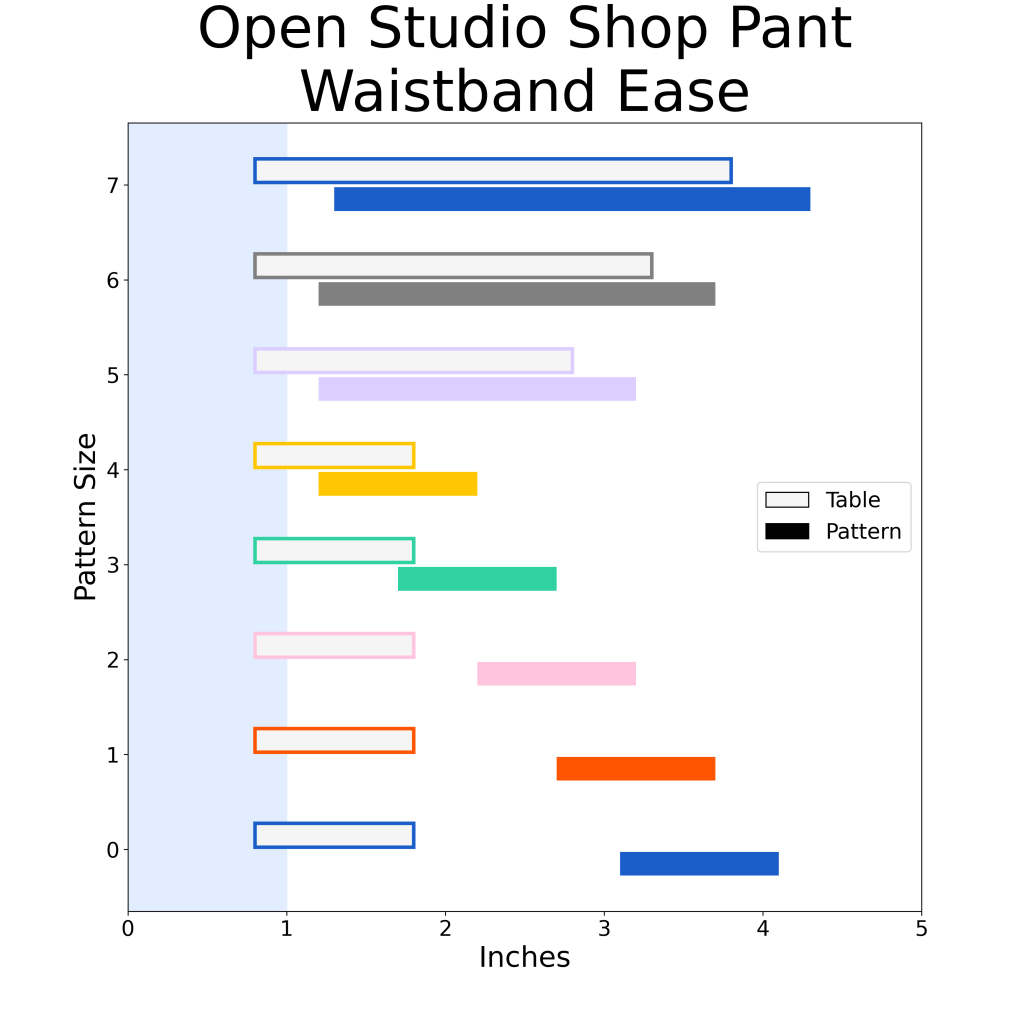
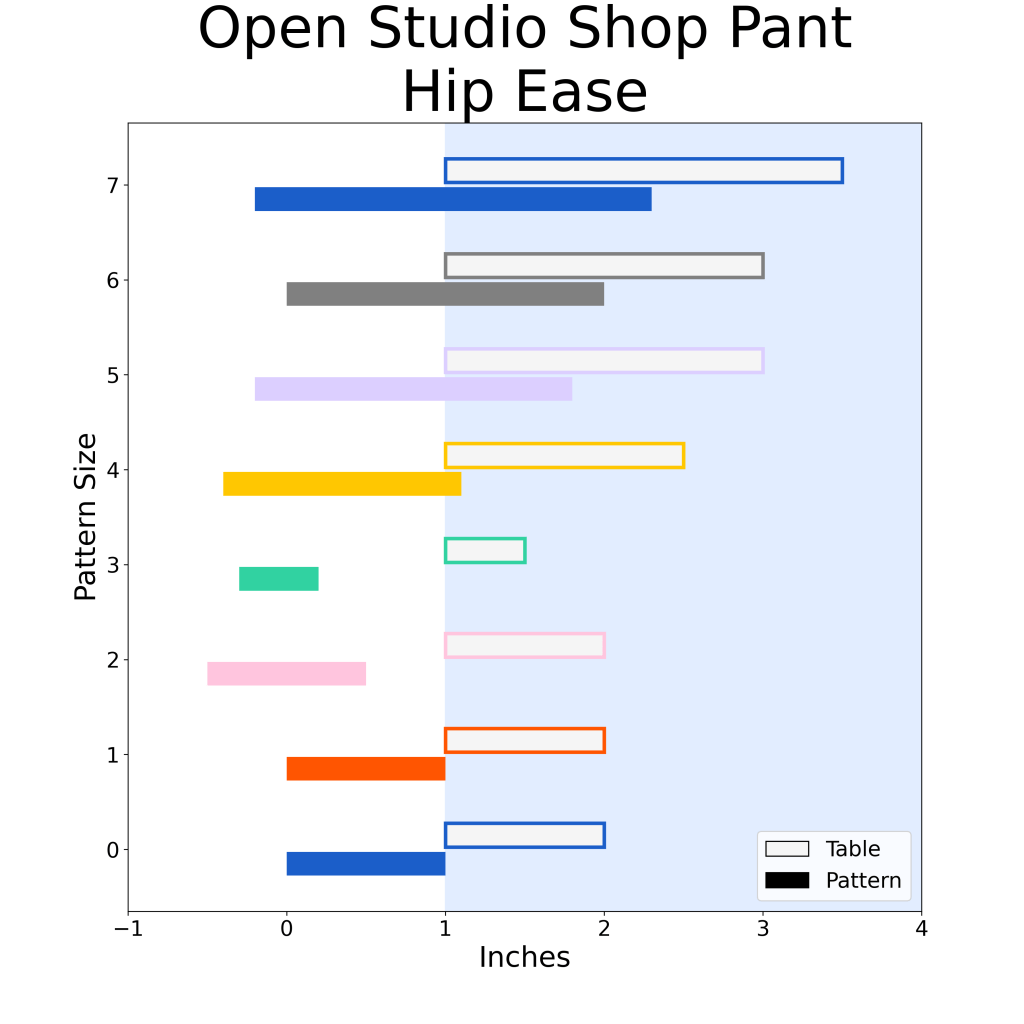
These graphs really highlight the peculiarity of ease across the sizes. Again, the x-axis is in inches, and the y-axis is each size. The shaded light blue area represents an expected ease amount. The open boxes are the intended ease (columns 7 and 8 from the table above). The filled-in boxes are the actual ease (columns 9 and 10 from the table above). The pattern was intended to have a waistband and hip with an expected amount of ease (open boxes). However, the pattern pieces have too much ease in the waistband and not enough ease around the hips (filled-in boxes). The error in waistband ease is so systematic that it has to be a glitch in the computer grading/output!
Conclusion
Would you bake a three-layer cake without using a scale or measuring cups to ensure you had the correct quantity of all your ingredients? Probably not. You might successfully make a cake by accident, but the success rate will be low. What if you are making a box cake now? You should be able to assume that the correct amount of ingredients is in the package, right? I use these analogies to think about what the responsibilities of the sewer should be?
I can understand the case for both. We should expect a certain level of quality from the patterns we purchase (i.e., clear instructions, reasonable grading, and accurate size tables). On the other hand, do enough sewers take the time to measure their body, measure the pattern, and confirm sizing is correct? Patterns aren’t box cakes. They don’t work for everyone straight out of the box. Patterns are more analogous to baking a 3-layer cake from scratch. You can throw caution to the wind and make the pattern without measuring anything, and you’ll occasionally be successful. However, measuring your body, the pattern, etc., will significantly improve your success rate at sewing something that fits.
Yes, I wish the Shop Pant had the correct information in their size table, and they should have done a better job confirming everything before selling the pattern. But how many people have tested, purchased, and sewn these pants in the last 10+ months, and no one spotted the issues with hip and waistband measurements?
This is an excellent example of why measuring your body, measuring the pattern, confirming the information in the size charts, and documenting any alterations you make is so important. I love websites like https://sewing.patternreview.com/, because it is a repository for sewers to learn more about patterns and to share their experiences.
Guidance
If you are planning to make the Shop Pant before they update the pattern, you can use the table above to guide your size selection. Pick a size with at least 1 inch, preferably 2+ inches of ease at the hips. In the table above, it’s the “PATTERN” column that contains my hip measurements of the pattern pieces.
And sew a test garment for sure to confirm you have the correct size!

IF YOU FOUND THIS POST HELPFUL, CONSIDER SUPPORTING MY WORK BY SIGNING UP FOR A PAID SUBSCRIPTION.
POSTS OLDER THAN 3 MONTHS ARE NOW FOR SUBSCRIBERS ONLY — YOUR SUPPORT KEEPS THIS SPACE GOING.
INTERESTED IN SUBSCRIBING TO RECEIVE NEW POSTS IN YOUR INBOX?

Thank you!! I just made this (early Feb 2023) having downloaded the pattern on 13 Jan 2023, made size 1, and had to cut out 5cm (!) from the waist and was very puzzled about that. Also my waistband was very short which was very stressful… it was fine after taking the 5cm out which is in accordance with what you’ve found. Open Studio has not published or referred to this error on their website or contacted me to correct the sizing – they have just replaced the sizing table on their website with a new one showing actual garment measurement (but even that isn’t completely the same as your measurements). I also don’t understand the notches on the waistband, they don’t seem to correspond to anything on the legs. I just thought I must have made a mistake somewhere but I am heartened to see it wasn’t just me. Thank you for raising this. I will also be writing to OSP.
Based on the erroneous size chart for this pattern, I would have to grade from 3 waist to 2 hip.
My practice is to print all sizes I need to grade, trace to tracing interfacing, then tissue fit, and make as many adjustments on pattern before cutting fabric.
If the tissue fit confounds my adjustment expectations, then I would start comparing pattern piece measurements with my measurements.
Means I don’t waste time measuring pattern pieces that are recorded accurately in their finished size charts 😁😅🤣
I just finished these pants last weekend! Between this post and the Crooked Hem posts, I am a little annoyed at my timing to make these! I also found the waist too big and the hips much smaller than expected.
Adjustments: I originally graded from a size 1.5 waist (halfway between 1 and 2) to a 2 hip, thinking that would give me plenty of ease/space (1″ inch at waist, 2″ at hip) if I wanted to adjust for a tighter fit later (W: 29.75″, H: 38″). The waistband ended up being too short for the pant, which I’m not sure yet if it was a grading issue on my part (haven’t gone back to measure!). I ended up taking in the waist 2 cm, which meant the original WB would be the right size. The hips I left as is, but they have much less ease than I expected. Probably only 0.5″, if that, which is right on for your table. There’s room in the crotch, waist, and thigh, and the pants will stretch a little, so I’ll keep it. If it’s annoying, I can let out the side seams and get some space back from the seam allowance.
Should we measure patterns? I think that one is asking a lot, because you have to be burned to learn that lesson and doesn’t account for fabric choice, imprecise sewing, or adjustments. This was a wearable mock-up, I just assumed my butt grew (known to happen), I graded wrong, my seam allowances were off, or I still have a lot to learn about ease (true regardless).
The Lander Pant includes extra seam allowance at the sides, and you sew the WB end seams after attaching the WB to the pant and fitting. I like that insurance.
This is a brilliant piece of research. Your comments about baking cakes are so clear. Nowadays I always measure, but in earlier times I didn’t, and was repeatedly disappointed. Your message is so important. Thank you!
Rachel Cole
Everyone starts that way. I knew I was intimidated and confused about what to measure and why when I started sewing. Thank you for your feedback and kind words!
That explains why I had to make so many adjustments to my shop pants. I made the size that seemed correct based on the charts, and ended up making several changes as I sewed. The main issue was the waistband! I’m an adventurous stitcher, but not super experienced, so I never thought to measure the pattern! Thank you for this, and for giving your feedback to the pattern company. I look forward to receiving the updated sizing information.
It can seem daunting to know what to measure and why and hopefully since you read my blog, you know there are just a few key areas you can check. Measuring the waistband and hip is a good thing to do and isn’t too difficult. If you are okay with me asking, do you remember what adjustments you made to your pants?
post
I’m happy to share! I made this twice, both were size 2, chosen based on my hip size of 38.5″. I took out 1.5″ for the pants waist on each one, and of course had to trim the waistband down to fit the new pants waist. It was pretty long. Second pair I also ended up taking a larger seam allowance on the outside leg seam to slim the fit just a bit, and made the back pockets an inch shorter on pair 2 because they hung down my backside too far on pair 1. That’s just preference but I didn’t like the way they looked in the original size/fabric. The smaller ones are better.
Next time I make the pattern, I plan to use the top down center out method to see if I can make better adjustments to the fit. I want to learn how to do that anyway, now that I’ve read all of the information.
I read your posts about the center grainline with interest but I haven’t tried to work that out for my pants. I’m sure I did something bad to that by taking in the outside leg only for pair 2, instead of equal amounts from outside and inside, but they look fine on me.
I ended up with two nice pair of pants, a style that I like and the fit looks good, but it stretched my skills a LOT to get them there. The zipper instructions were great and the zip came out really well.
I should add to my already long reply below that I had cut the waistband a longer than specified because I’d had problems in the past with pants waistbands coming up a little short. I’ve been on a pants making journey – it’s what I wanted to learn first and coincidentally before I knew much about sewing. 🙄 (Thus the adventurous stitcher description.) In one particular case it was a crappy pattern issue and next it was me. So now I cut them long and use the Morgan Jeans waistband method. When I watched the video for those jeans I felt like a “jean-eous” because I had already been doing my waistbands that way. This exacerbated the issue with the Shop Pants.
If you haven’t, I encourage you to post about your experience with this pattern on https://sewing.patternreview.com/. It is so helpful when there’s a database for patterns. There are no entries for the Shop Pant yet, but I’ve started my entry as a WIP. https://sewing.patternreview.com/cgi-bin/readreview.pl?readreview=1&ID=187461