Mirri Jumpsuit from Papercut Patterns

I have a closet full of joggers, comfortable relaxed-fit jeans, summer and winter hiking pants, and workout leggings. I don’t have a skirt, dress, or even nice slacks. I love WFH, but it really changes what is in your closet. For tops, I have really nice knitted sweaters, but only drawers full of Union St Tees. No complaints, but I’ve got nothing if I have to dress in business attire! I needed to make something business appropriate that could be worn in summer or winter. I hate dresses/skirts, so I started to look for trousers alternatives. I found this pattern and knew it was what I needed in my wardrobe.

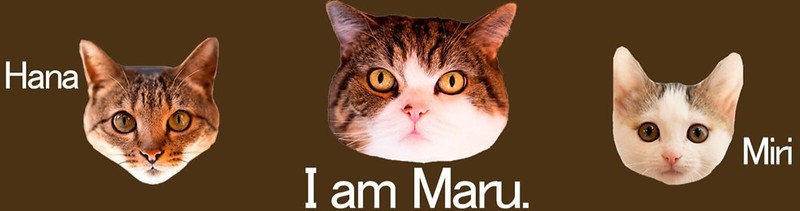
I can’t think of this pattern and not think of Maru’s sibling, Miri. I’ve enjoyed watching Maru and his box obsession since 2007ish when Cute Overload existed. Even though Cute Overload closed down its blog in 2016, I still enjoy their box shenanigans on YouTube.

Download My Pant Pattern

I’ve made my pant pattern pieces available for download.


Click the colorful button above, and a new tab should open with the Gumroad link. The pattern is available in two formats: print-at-home (A4 or US Letter) and large format (A0 or 36 x 48″).

Analyzing Style and Fit

Style

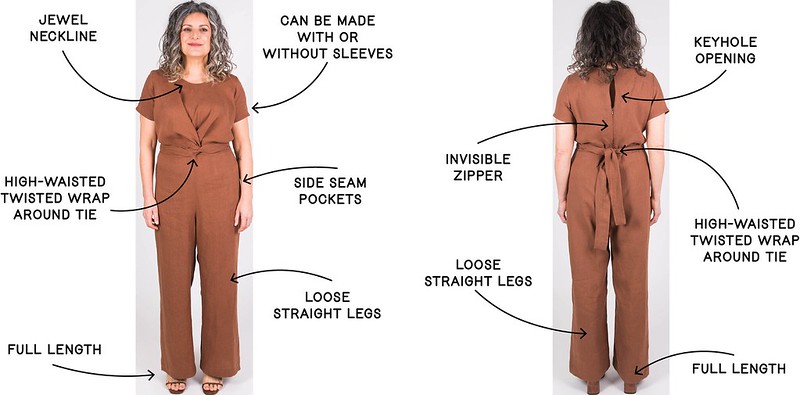
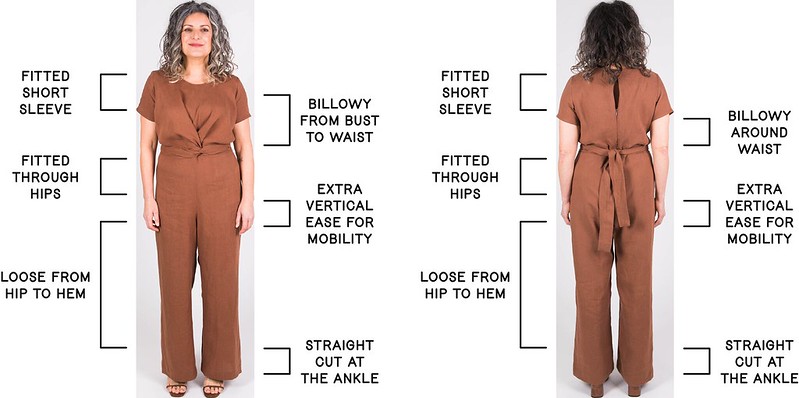
The bodice features a jewel neckline and a twisted wrap-around tie detail and can be worn with or without sleeves. The back bodice includes a top button loop closure, a keyhole opening, and an invisible zipper. The trousers have side seam pockets and loose-fitting straight legs. The hem should hit below the ankle bone. From photos, the wrap-around tie detail should be just below the bust and at or above the natural waistline. The crotch curve should not sit too close to the body, which makes sense, being a jumpsuit. There needs to be some ease, so you don’t give yourself a horrible wedgie when you lift your arms. The jumpsuit generally looks fairly relaxed and should only be slightly fitted through the hip area.

Fit

Materials and Notions

Meet MILK Smooth Drape Twill in Mauve

I made the jumpsuit using a new-to-me fabric. It is Meet Milk Smooth Drape Twill in Mauve. The material is a medium-weight woven twill made with TENCEL Lyocell and features a gorgeously fluid drape with a smooth, soft finish.

Meet MILK Plain Corozo Button in Mauve

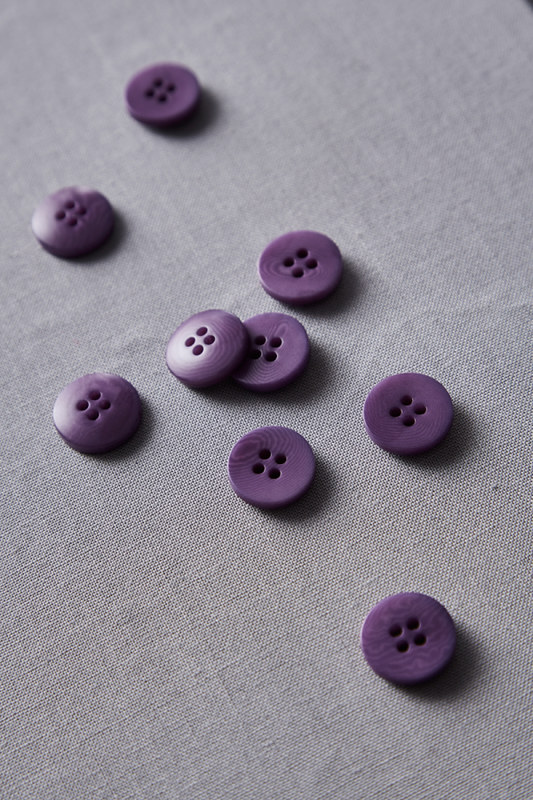
I was able to purchase a matching invisible zipper and button from MeterMeter. The button was Meet Milk plain corozo button, 11 mm in mauve.

Meet MILK Invisible Zipper in Mauve

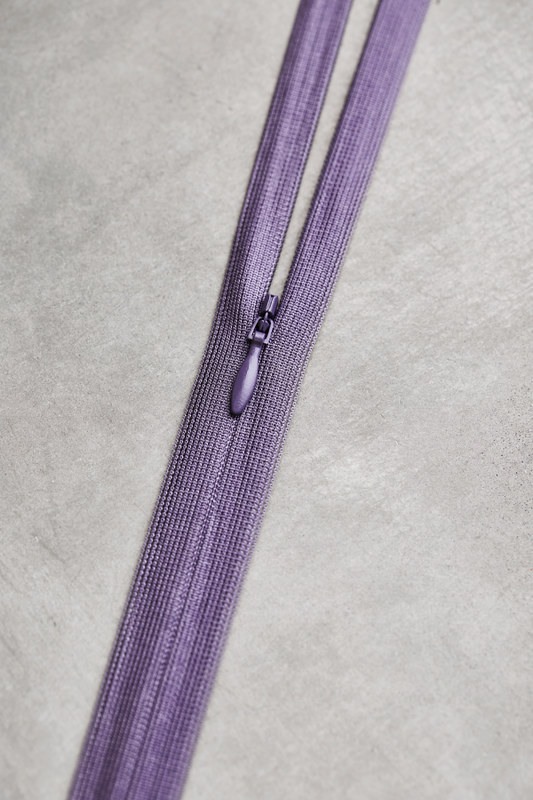
The zipper was Meet Milk invisible zipper, 60 cm in mauve.

Determining the Correct Size

Body Measurements

Sizes12345678
Bust29.932.334.63739.441.744.146.5
Waist2224.426.829.131.533.936.238.6
Hip32.334.63739.441.744.146.548.8

My current body measurements are a 39-inch bust, 36-inch waist, and 44-inch hip. If I consider my anterior tilting pelvis, my hip measures 46 inches. Based on my waist and adjusted hip measurement, I should cut out a size 7. Based on my bust measurement, I need to cut out a size 5. More on bodice size below…

Finished Garment Measurements

Sizes12345678
Bust35.437.840.242.544.947.249.652
Waist27.629.932.334.63739.441.744.1
Hip34.336.63941.343.746.148.450.8

When seated, my hip measures 47 inches. For size 7, the final garment measures 48.4 inches at the hip, so I’ll have enough ease. Notice that if I made a size 6, the garment would only be 46.1 inches at the hip. I wouldn’t be able to sit comfortably in the jumpsuit.

What About the Bodice Size?

Across Bodice Measurement

I wish patterns would provide more finished garment measurements. My bust measurement is unreliable for determining the correct size. I made a straight size 7 and noticed how well it fit when I tried on the bodice without sleeves. The shoulder seam ended precisely at the end of my shoulder point. The armhole sat evenly around my arm and wasn’t gapping or pulling anywhere. Often, I need to scoop out the armscye and adjust the length of the front and back shoulder. Check out my Fiber Mood Norma Blouse for the most recent shirt fitting. I noticed that I couldn’t go any smaller on the back bodice of the Mirri jumpsuit, so I took some measurements to confirm my sense of fit.

Size 7 Across Back Measurement

The garment across the back measures 7.75 inches, excluding the ⅜ seam allowance from the center back and armhole. In total, the back bodice measures 15.5 inches.

My across-back measurement is currently 15.5 inches. Even though my bust measurement means I should make a size 5 bodice, my across-back measurement is the same as the size 7 garment. The measurement confirms how it felt. I couldn’t go any smaller on the back body.

Size 7 Across Front Measurement

The garment across the front measures 9 inches, excluding the ⅜ seam allowance from the center front and armhole. In total, the front bodice measures 18 inches. My across-front measurement is 18 inches, so I couldn’t go any smaller on the front bodice either.

High Bust Measurement

Let’s see if I can find more converging evidence. If I measure my high bust, I measure 42 inches. You read that right; my high bust is LARGER than my full bust. Thank you, swimmer lats! I would be better off selecting a size based on my high bust measurement, not my full bust measurement. I hate using the word standard, but the standard fit would be a smaller high bust and a larger full bust. Since I don’t follow this arbitrary standard, I need to use the measurement that will impact fit, and that’s my high bust measurement. What do you do if a high bust isn’t in the body measurement chart?

Most patterns are drafted with B-cups, and I confirmed that Papercut patterns are drafted for B-cups in the 1-8 size range.

“If you fit into both the 1 – 8 and the 6 – 14 size ranges and you’re unsure which size to purchase, the biggest difference between the two is the 6 – 14 size range has been drafted for a larger bust cup, and a curvier figure.”

The 1-8 size range is based on a dressmakers size B cup and a 5”3 – 5”7 height. The 6-14 size range is based on a dressmakers size D cup and a 5”3 – 5”8 height. Now all I have to do is subtract 2 inches from the bust measurement to get the high bust measurement because the difference between high bust and full bust for B-cups is 2 inches (e.g., 39 full bust – 37 high bust = 2). Remember, my full bust measures 39 inches, and my high bust measures 42 inches.

Sizes12345678
Full Bust29.932.334.637.039.441.744.146.5
High Bust27.930.332.635.037.439.742.144.5

Ah ha! Based on my high bust measurement, size 7 really is the correct size!!!!!

First Muslin with Laser Level

I didn’t worry about marking waistline placement until I attached the bodice to the trousers. I used a belt for this first muslin to hold the trousers up and shifted the waistline until it sat well through the crotch curve. I paid close attention to the front-to-back swing and made sure that the side seam hung straight.

Conveniently, I can use the laser level to find the center grainline at my hips with just one leg. Do not use the laser method until you’ve centered the grainline at the knee! I centered the grainline at the knee before cutting out this first muslin.

The purpose of using a laser is to determine the difference between your body’s center grainline and the pattern’s center grainline. If they are off, the trouser legs will swing inward or outward. In my case, the pattern’s center grainline is too wide, and that causes the leg to swing inward toward my inseam. To draw the center grainline on the pattern, find the middle of the ankle and draw a line perpendicular to the hem. That’s the center grainline of the pattern.

To find my body’s center grainline, I line the laser up with the middle of my ankle and the middle of my knee. Now, I can observe how far off the laser is at my hip. For the front pattern piece, the difference is 1.25 inches.

When I line the laser up with the middle of my heel and the center of my knee, I see that the laser is 0.5 inches away from the back pattern’s center grainline.

Adjustments and Alterations

Bodice

Front Bodice
The original pattern is grey.
My final garment is in red.

I only needed to adjust the outer shoulder point for the front bodice. I moved the outer shoulder point forward 0.5 inches, so it was sitting on my shoulder correctly.

Back Bodice
The original pattern is grey.
My final garment is in red.

Because I moved the outer shoulder point forward on the front bodice, I needed to do the same for the back bodice. I moved the outer shoulder point 0.5 inches towards the front body. Next, at the center back waistline, I removed 1 inch and graded it back to the zipper notch.

Sleeves

Sleeve Adjustment Method

Finally, I also moved the shoulder point 0.5 inches forward on the sleeve cap. I’ve tried a lot of ways to make this adjustment, and I found this pivot method really helpful. I drew a vertical line at the original shoulder point and then drew a line from the back and front notches to the same point on the vertical line. I cut along these lines leaving a pivot point. I pivoted the shoulder cap forward 0.5 inches and cleaned up the lines.

Sleeve
The original pattern is grey.
My final garment is in red.

Front Trousers

Front Trousers
Grainline Aligned
The original pattern is black / grey.
My final garment is in red.
  • (1) I centered the grainline at the knee.
  • (2) Using my laser level, I determined I needed to shift the center grainline placement at my hip level by 1.25 inches.
Front Trousers
Center Front Aligned
The original pattern is black / grey.
My final garment is in red.

It is easier to see the adjustments when I align the center fronts.

  • (3) I removed 0.375 inches at the hip and graded it back to the waistline and knee.
  • (4) I lowered the side waistline by 1.25 inches.

Back Trousers

Back Trousers
Grainline Aligned
The original pattern is black / grey.
My final garment is in red.
  • (1) I centered the grainline at the knee.
  • (2) Using my laser level, I determined I needed to adjust the center grainline placement at my hips by 0.5 inches.
Back Trousers
Center Back Aligned
The original pattern is black / grey.
My final garment is in red.

With the center backs align, the adjustments to the side seam are easier to see:

  • (3) I removed 1 inch at the hip and graded it back to the waistline and knee.
  • (4) I lowered the side waistline by 1.25 inches.
  • (5) I removed 1 inch from the top of the center back like I did with the back bodice piece. I graded it back to the top of the crotch curve.
  • (6) I lowered the back inseam by 0.25 inches, so it was the same length as the front inseam and not longer.

Toile

It’s helpful that I cut this fabric with the pattern lined up with the center grainline. I was able to double-check that the center grainline placement is still good, and it is. The legs hang straight!

Final Fit

I was nervous about this fabric. I wanted to use heavy linen, but I knew the jumpsuit would look super wrinkly with wear. So I opted for something I hoped to be less wrinkly. You can see in these photos after a day of wear, there are some wrinkles, but nothing like linen. I’m also happy that the fabric resists dry winter static problems. I’ll be adding this fabric to my closet in the future. It’s soft, drapes really nicely, and doesn’t get staticky.

Discrepancies

Instructions Not Included in PDF

Papercut patterns has provided a great step-by-step tutorial on their website. There’s one step online that is not included in their PDF and that’s the last step of hand stitching the facing to the seam allowance.

Conclusions

I love the thoughtful design and look of the jumpsuit. I picked the pattern because it looked like the perfect “dress” without being a dress. For such an intriguing design, the pattern was really straightforward to sew. I was thrilled with the instructions and pattern drafting since there weren’t any typos or errors. Once I got the pants fitted to my body, the pattern is lovely!

11 thoughts on “Mirri Jumpsuit from Papercut Patterns

Add yours

    1. Thanks. I never thought I would make a jumpsuit, let alone something all in purple! A laser is helpful if you are like me and struggle to get a decent fit, even after using methods like TDCO and adjusting your size to accommodate your body and shape better. Not all patterns need this center grainline adjustment (i.e., Worker Trousers and Shop Pants), but other patterns do (i.e., May Jeans and this pattern). It’ll depend on your body and the pattern. I like the laser level because it completely removes the guesswork from adjustments.

      Like

  1. I just love these posts of yours! They are worth their weight in gold, with all the detail and images. Thank you for sharing them with us and teaching us as you go.

    I’ve sewn for a very long time now and read/studied anything related to sewing & fit for almost as long. There are lots of techniques, methods and theories out there about pant fitting but your centre grainline method is the only sure-fire way to get those pants hanging on grain. It took me many re-reads of the pant posts you made along your journey and many muslin practices to finally grasp your central, simple, and very accurate premis about that centre grain and it’s significance. Admittedly, there would have been far fewer muslins had I not gone down the rabbit hole of making the ever so slight changes that your posts detailed when you were doing your own research…. but I wanted to prove your findings to myself and see the effect on my own body so I repeated each of your experiments and, by george, the effects of each little change were the same on my body as they were on yours, lol!

    BTW, I remember reading about the software program you are using now but couldn’t find the specific post about it when I went looking. Can you remind me what it is, or perhaps point me to the post?

    Liked by 1 person

    1. At the top of my blog, I have a menu tab called “BROWZWEAR.” That’s the app I taught myself back in December. If you click that tab, it will give you all the posts I have about the app. Hopefully, that’s the app you were looking for. I love hearing that you went down the same rabbit hole as I did to study fit. It means a lot to me that anyone is interested in my way of testing and experimenting and trying new ways to fit pants.

      Like

  2. I think jumpsuits are going to be my solution for ‘not-a-dress’ outfits too! This one looks great on you. As always, I appreciate your detailed overview of your process.

    Liked by 1 person

    1. I have never ever in my entire life felt comfortable in a dress or skirt, so yes, this is a much better alternative, and it feels a lot more like “me.” Glad to have inspired you too!

      Like

  3. The knee on my right leg bends inward – knock knee, I think. Do you think your laser method would work? I have had a pant pattern fitted, but I think I messed with the curves below the knee, and now I can see the inseam curving toward the front. So, I’m wondering if the laser method would work. You well-fitting jumpsuit has inspired me to perfect my pants pattern!

    Liked by 1 person

    1. The whole purpose of my blog is to inspire other people to test and experiment. What works for me may or may not work for others, but you won’t know until you try. I’d love to know about your experience if you do try using a laser level.

      Like

Leave a Reply

Fill in your details below or click an icon to log in:

WordPress.com Logo

You are commenting using your WordPress.com account. Log Out /  Change )

Twitter picture

You are commenting using your Twitter account. Log Out /  Change )

Facebook photo

You are commenting using your Facebook account. Log Out /  Change )

Connecting to %s

This site uses Akismet to reduce spam. Learn how your comment data is processed.

Website Powered by WordPress.com.

Up ↑

%d bloggers like this: