My jaw dropped to the floor when I started comparing the self-drafted trousers pattern for Ryan to actual sewing patterns that I had in my collection. The style and fit of my self-drafted trousers were closest to Thread Theory’s Jutland Pants, with a few modifications to leg fit, pockets, etc. Over a year ago, I tried to make Ryan a test pair of pants using the Jutland pattern, and it was such an awful mess that I almost lost all hope of ever being able to make Ryan pants. Luckily I found a pattern from freesewing.org, Theo trousers, that resulted in pants that nearly fit. I didn’t want to show the comparison between Ryan’s self-drafted pattern and the Theo pant, because, in the end, they are almost identical. Yay for freesewing.org pattern!! In this post, I will be showing you how I drafted a pair of non-stretch trousers for Ryan and how the self-drafted pattern compares to the Jutland pant pattern.
DRAFTING PATTERN
If you need a refresher on how to create a duct tape sloper, here’s a link to that post: https://handmadephd.com/2018/07/11/quick-sloper-using-duct-tape/.
FRONT LEG
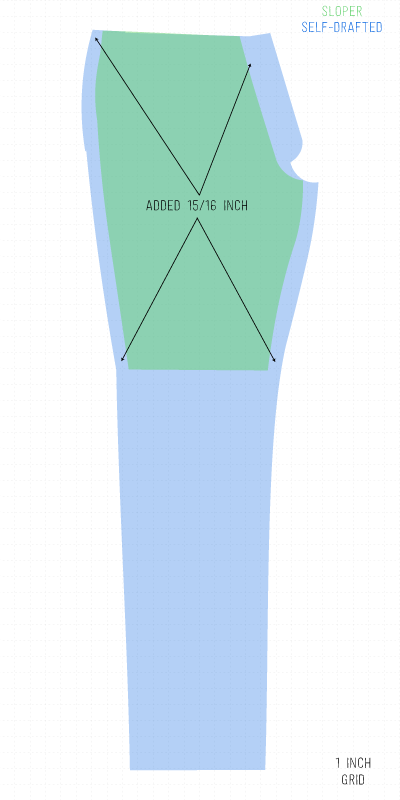
I didn’t alter the waistline, because Ryan prefers to wear his pants higher on his waist. I added 15⁄16 inch to the side seam, inseam, and along center front. I stopped when I got to the crotch curve and just blended the existing curve down to the inseam. Using the Jutland pant pattern, I added the front fly extension. Unfortunately, the Jutland pattern has a jean style pocket, and I wanted a slash pocket (not shown). This post isn’t about how to change pockets on pants, so I won’t go any further on that topic. I used the Theo trouser pattern to finish the leg from the knee down. I like the narrower leg on the Theo.
BACK LEG
Again, I added 15⁄16 inch to the side seam and along center back. For the inseam, I added 1 ⅞ inches at the crotch curve and quickly graded it back down to 15⁄16 inch along the rest of the inseam. Like the front, I blended the back crotch curve into the inseam. I used the original Jutland pant pattern to draft the dart (not shown) and I used the Theo trouser pattern to finish the leg from the knee down.
Why choose 15⁄16 inch to add around everywhere? In my last post, I had used ¾ inch for my self-drafted pattern and sewed with a ½ inch seam allowance. For my pants, I would have added ⅞ inch if I used a ⅝ inch seam allowance to compensate for the add ⅛ inch to the seam allowance. The Jutland pattern also uses ⅝ inch seam allowance, so ⅞ inch is where I started. I wanted to give Ryan a little looser fit, so I added 1⁄16 inch. Adding ⅛ inch around everywhere would have been too much. Adding 1⁄16 to ⅞ equals 15⁄16, so I added 15⁄16 inch around everywhere.
Why is adding ⅛ probably too much? Let’s count the number of seams around the pant: (1) center front, (2) right side seam, (3) center back, and (4) left side seam. For each of those seams, you would be increasing the amount of fabric by ¼ inch, because you are adding ⅛ inch to either side of the seam. With four seams, that means you are adding a whole inch (4 seams x ¼ inch) to the circumference of the pant. That’s too much added wiggle room. This is why I used 1⁄16 inch instead. Now I am only adding ½ inch of wiggle room. The difference between ⅛- and 1⁄16-inch is astounding! Amirite?!
SELF-DRAFTED VS JUTLAND PANTS
When I compared Ryan’s self-drafted pattern to the Jutland pants, I realized that there’s no such thing as average or normal! Let’s talk about measurements and sizing of the Jutland pant first. Ryan’s measurements are: waist 36 inches, hip 43 inches, inseam 34 inches. His measurements fit precisely for size 36 of the Jutland pant.
I did notice that the inseam of the finished garment is 35 inches, which is cool that the pattern accommodates for tall people! Now let’s look at the comparison between the self-drafted pattern and the Jutland pant pattern.
FRONT LEG
For ease of viewing, I left off the pockets, because I used a slash pocket instead of the jean pocket included with the Jutland pattern.
Here’s what I would do if I were to alter the original Jutland Pants:
- Deepen crotch curve by ~¼ inch
- Remove ~1 ½ inch wedge from center front
- Add ~¾ inch to inner thigh blending into the knee width
- Add ~½ inch to side waist
- Shorten leg by ~1 ¼ inch
- Narrow leg by ~2 inches along the side seam
BACK LEG
Here’s what I would do for the back piece if I were to alter the original Jutland Pants:
- Drop side waist by ~2 ¼ inches and add ~½ inch to the width
- Remove ~1 ½ inch wedge from center back
- Reduce crotch length by ~1 ¾ inches
- Shorten leg by ~1 ¼ inch
- Narrow leg by ~3 inches along the side seam
At least with this, I no longer feel like I’m taking crazy pills when I compare my pant patterns to sewing patterns. Ryan and I clearly aren’t “average”.
FINAL VERDICT
I did sew a test pair of pants first using muslin fabric to be extra sure the fit was going to work. I sewed the final pair of pants with 100% linen fabric from JoAnn. I made sure to interface high stretch areas like the top of the pocket, waistband, and zipper extension. Otherwise, sewing with linen was pretty straightforward.
The only way I’ll ever sew a pair of trousers is if the pattern was drafted from a duct tape sloper. Yup, I’m done with wracking my brain trying to figure out alterations.
What another great project! I love the linen you used! And the fit is amazing! You are certainly not “average”, I would say more like brilliant by using the duct tape sloper to customize your fits! Perfect from now on! ❤
LikeLiked by 1 person