The first pair of trousers I made from my duct-tape sloper was a pair of stretch skinny jean shorts. I had previously made skinny jeans so I was able to compare my self-drafted version with an altered pattern. This time around, I am trying a new pattern, Alina Sewing + Design Co. Chi-Town chinos Expansion Pack No. 2. I have been futzing with this pattern for months now and could never get the fit right. I now understand why.
DRAFTING PATTERN
If you need a refresher on how to create a duct tape sloper, here’s a link to that post: https://handmadephd.com/2018/07/11/quick-sloper-using-duct-tape/.
FRONT LEG
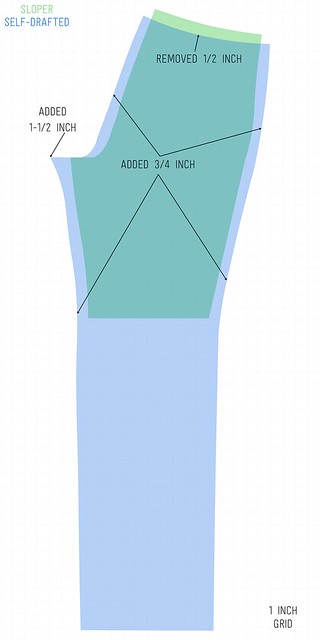
I dropped the waistline down a ½ inch. This change is arbitrary and has more to do with where I wanted my trousers to sit. I added ¾ inch to the side seam, inseam, and along center front. I stopped when I got to the crotch curve and just blended the existing curve down to the inseam. Using the Chi-Town chinos pattern, I added the front fly extension and cut out the shape of the front pocket. I had to also redraft the front pocket pieces, but that was straightforward once I got my front pant piece figured out.
Let’s discuss how I drafted the leg from the knee down. The patterns I have used up to this point are Simplicity 8056 and Simplicity 1696. My old pattern fit pretty well. I was never quite happy with the upper part of the pant, but the leg fit was always perfect. I used my old pattern to finish the leg here.
BACK LEG
I dropped the waistline down a ½ inch. I added ¾ inch to the side seam and along center back. For the inseam, I added 1-½ inch at the crotch curve and quickly graded it back down to ¾ inch along the rest of the inseam. Like the front, I blended the back crotch curve into the inseam. I used the original Chi-Town chinos pattern to drafted the dart (not shown) and I used my old pattern (based on Simplicity 8056 and 1696) to finish the leg from the knee down.
Why choose ¾ inch to add around everywhere? It was an educated guess. The Chi-Town chinos call for a ½ inch seam allowance. If your pattern uses a ⅝ inch seam allowance, then you’ll need to add ⅛ to ¾, in other words, you’ll need to add ⅞ inch everywhere and 1-¾ inch to the back crotch curve.
SELF-DRAFTED VS CHI-TOWN CHINOS
I’m less confused about how I would go from my self-drafted pattern to the actual Chi-Town chinos pattern. That’s progress, but I still don’t understand how or why my “optimal” pattern is nowhere near the Chi-Town chinos pattern.
FRONT LEG
Here’s what I would do if I were to alter the original Chi-Town chinos:
- Drop center front waist by ~1 inch
- Extend crotch length by ~½ inch
- Add ~¾ inch to inner thigh and ~½ inch to outer thigh, blending into the knee width
- Do ~1 inch knock knee adjustment (see below)
- Lengthen pant by ~2-¾ inch
BACK LEG
Here’s what I would do if I were to alter the back:
- Drop the side waist by ~1 inch
- Remove ~2 inch wedge from center back
- Shorten crotch length by ~1 inch
- Do ~1 inch knock knee adjustment (see above)
- Widen bottom leg by ~2 inches
- Lengthen pant by ~2-¾ inch
Here are my thoughts about the knock-knee alteration. I don’t have knock knees. I have an excellent straight posture from my feet to my hips. However, my outer hips are more full than average, which in comparison to my knees would be “knock-kneed” for a normal person. Sometimes the description of pant alterations biases people’s thinking about whether or not they need to use the alteration. This is what happened to me. I would read about the knock-knee alteration, but think that wasn’t needed for me because I don’t have the “classic” knock knee issue. Don’t let the alteration name bias your thinking! You might have toothpick legs but still need to make a large thigh alteration or have larger legs but need to do a thin thigh alteration to get the pattern to fit right.
FINAL VERDICT
For my pants, I used an 8-8.5 oz. chino twill from SellFabric.com. The fabric is medium- to heavyweight, think old-school Docker khakis like I used to wear for my Catholic school uniform. I’m the one in the middle if you can’t tell. I don’t know that I like the stiff structure pant, but that’s another issue altogether.
Beautiful fitting pants!! Success – you must feel amazing 🙂 I know if I looked in the mirror and saw those pants on myself I would be thrilled to bits.
LikeLiked by 1 person
Couldn’t have said any better!
LikeLike
I am jumping for joy for you! All your persistent work has paid off! YAY! I love both you newly designed pants AND that well crafted top! Congratulations on finding the perfect fit! And, thanks aging for the awesome diagrams for reference! They really help us newbies to understand!
LikeLiked by 1 person
I definitely don’t dread making pants anymore!
LikeLiked by 1 person
Just wanted you to know I nominated you for Mystery Blogger Award in my latest blog! You have really inspired me! Check it out! No worries if you think it’s too much work, but I really think you might enjoy the process! Take care! Danita
LikeLiked by 1 person
You’re too funny. I was literally in the middle of reading your blog post when I got your reply!! 😂
LikeLike
Happy to make you laugh with tears in your eyes!!! LOL
LikeLiked by 1 person