
In the 1950s, Lieutenant Gilbert S. Daniels led a study that collected measurements from over 4,000 US Air Force pilots, such as height, weight, and chest circumference. The researchers used these measurements to calculate average values to design a new cockpit. Surprisingly, when Daniels compared the cockpit dimensions with the average measurements, he found that no single pilot conformed to the average in all dimensions. This realization led to the concept of “the flaw of averages,” highlighting the inadequacy of designing systems based on average measurements. To address this issue, Daniels suggested adjusting cockpit components to accommodate a wider range of body dimensions. This led to adoption of adjustable seats, control sticks, and pedal positions, allowing pilots to customize their cockpit to suit their unique physical requirements. The study emphasizes the importance of accommodating individual differences in creating more inclusive and effective designs. How does this relate to measuring your hips and sizing?
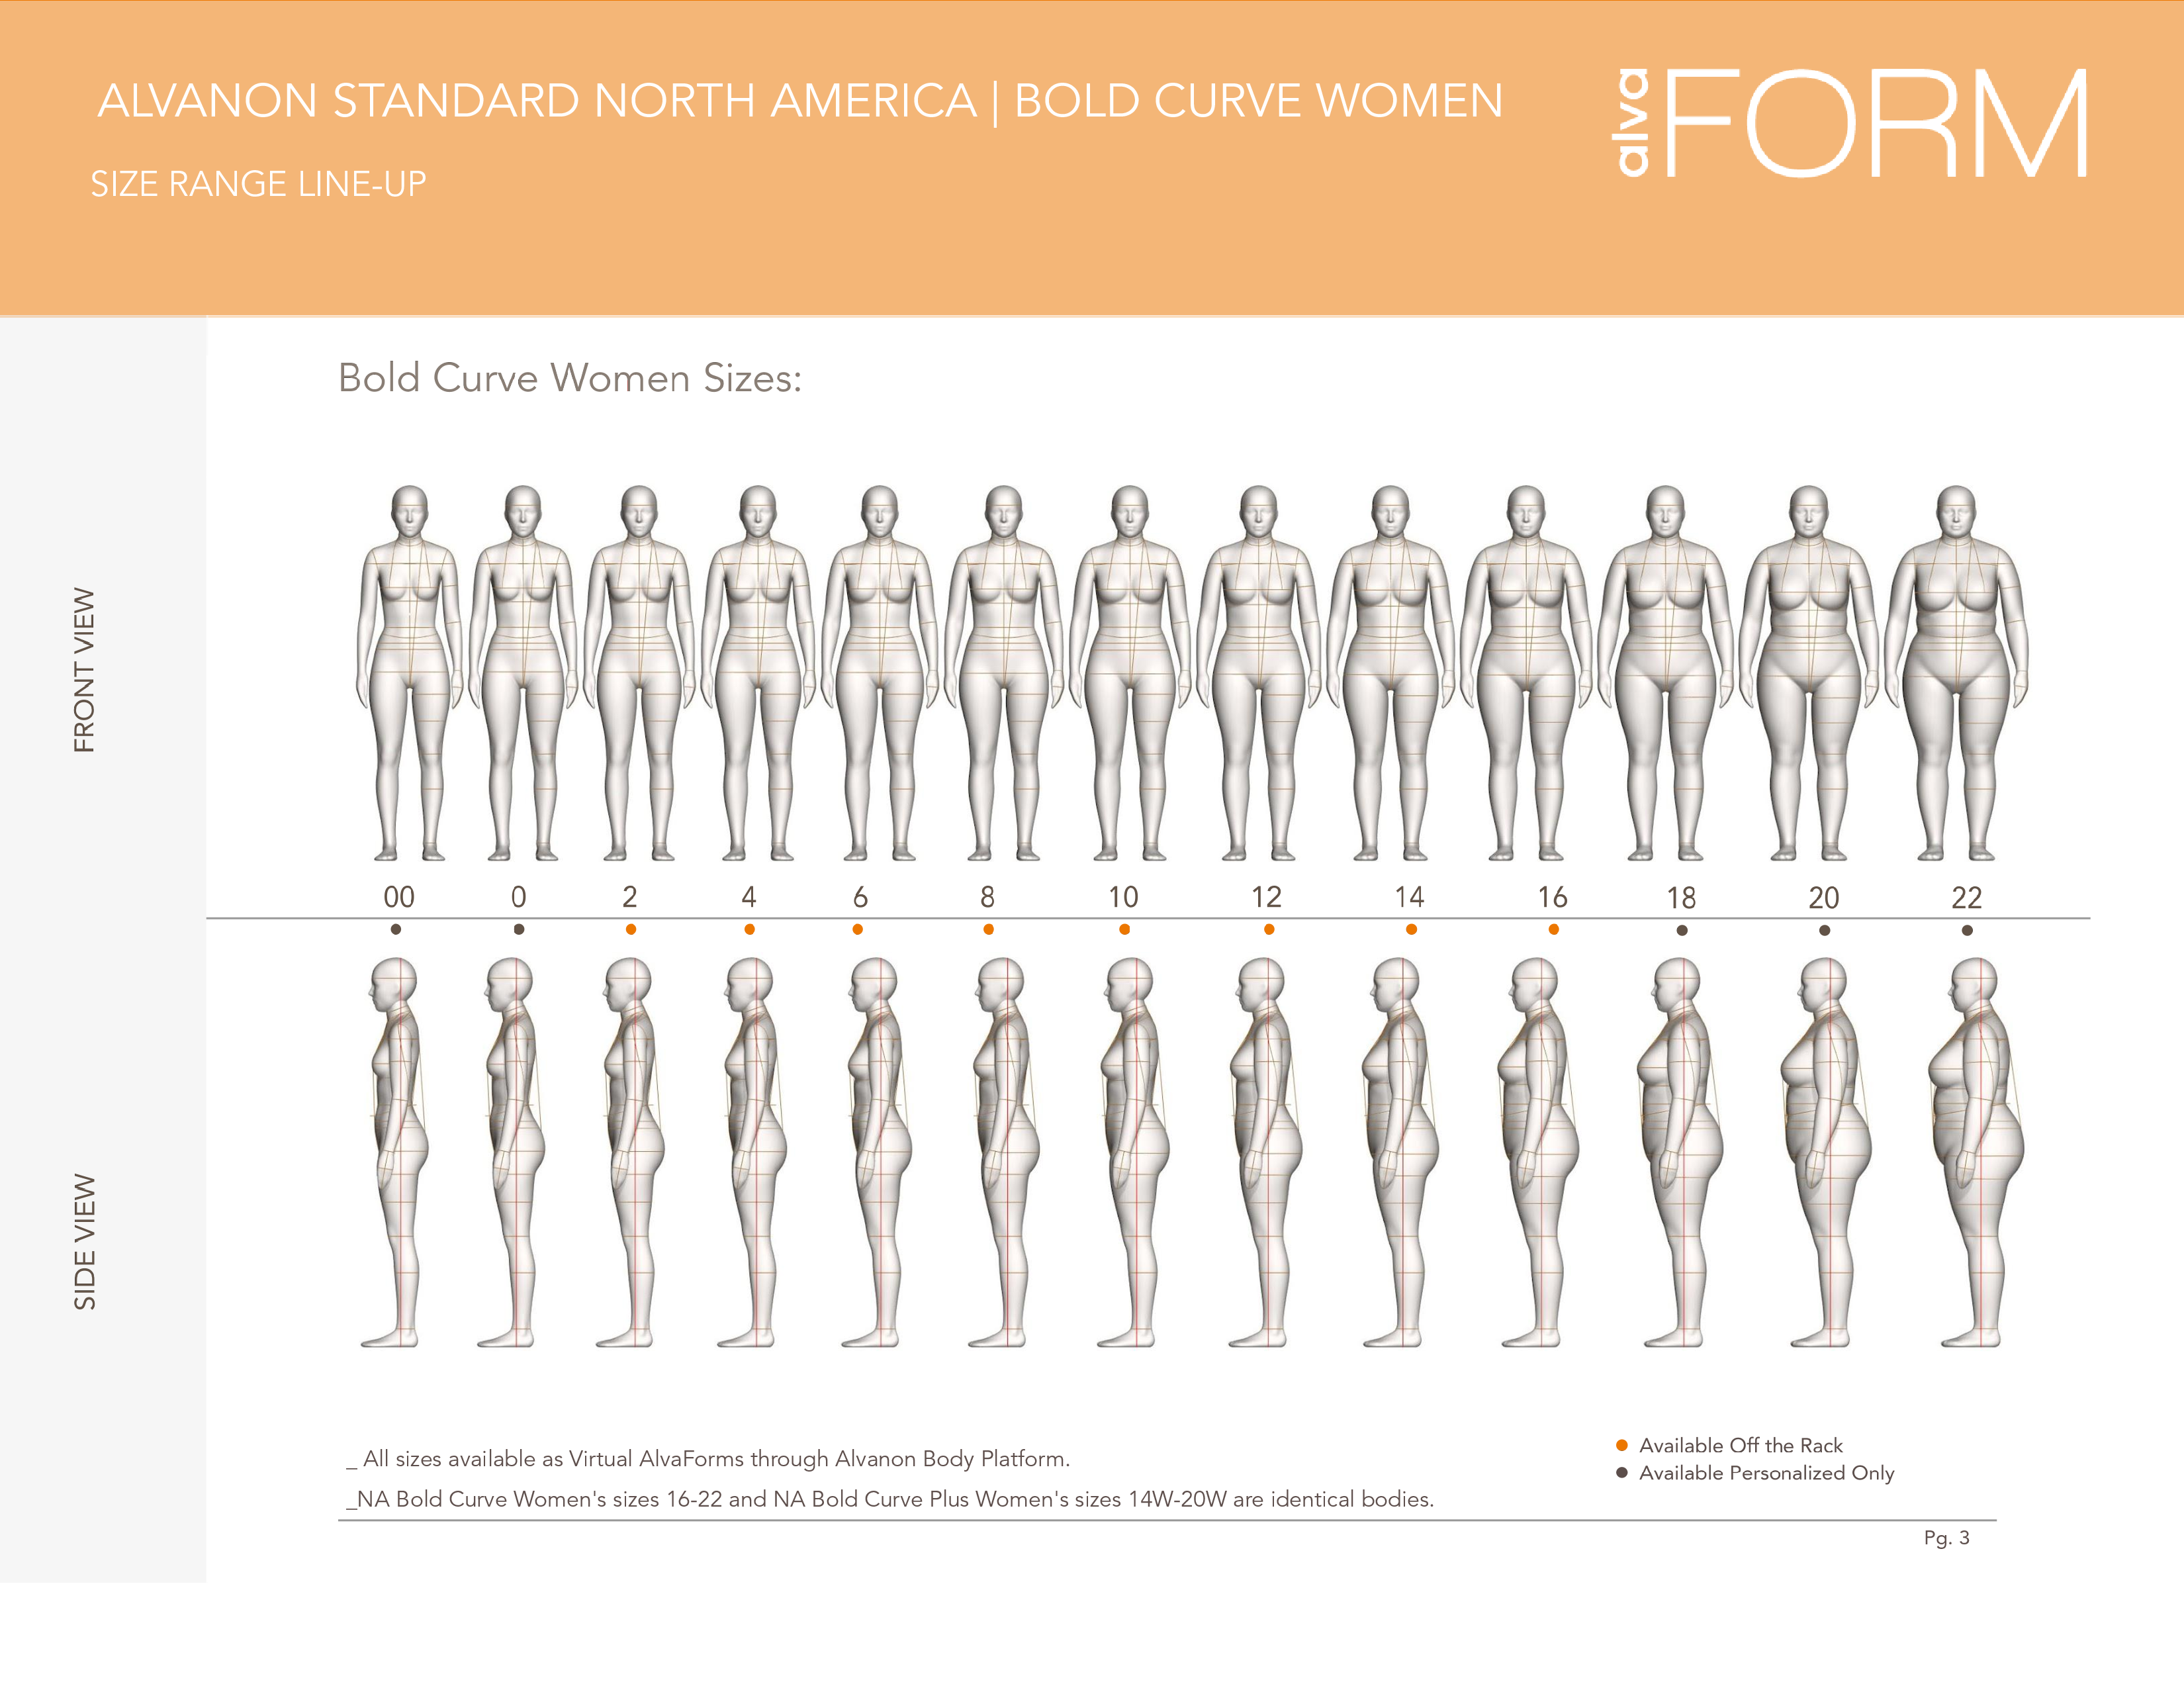
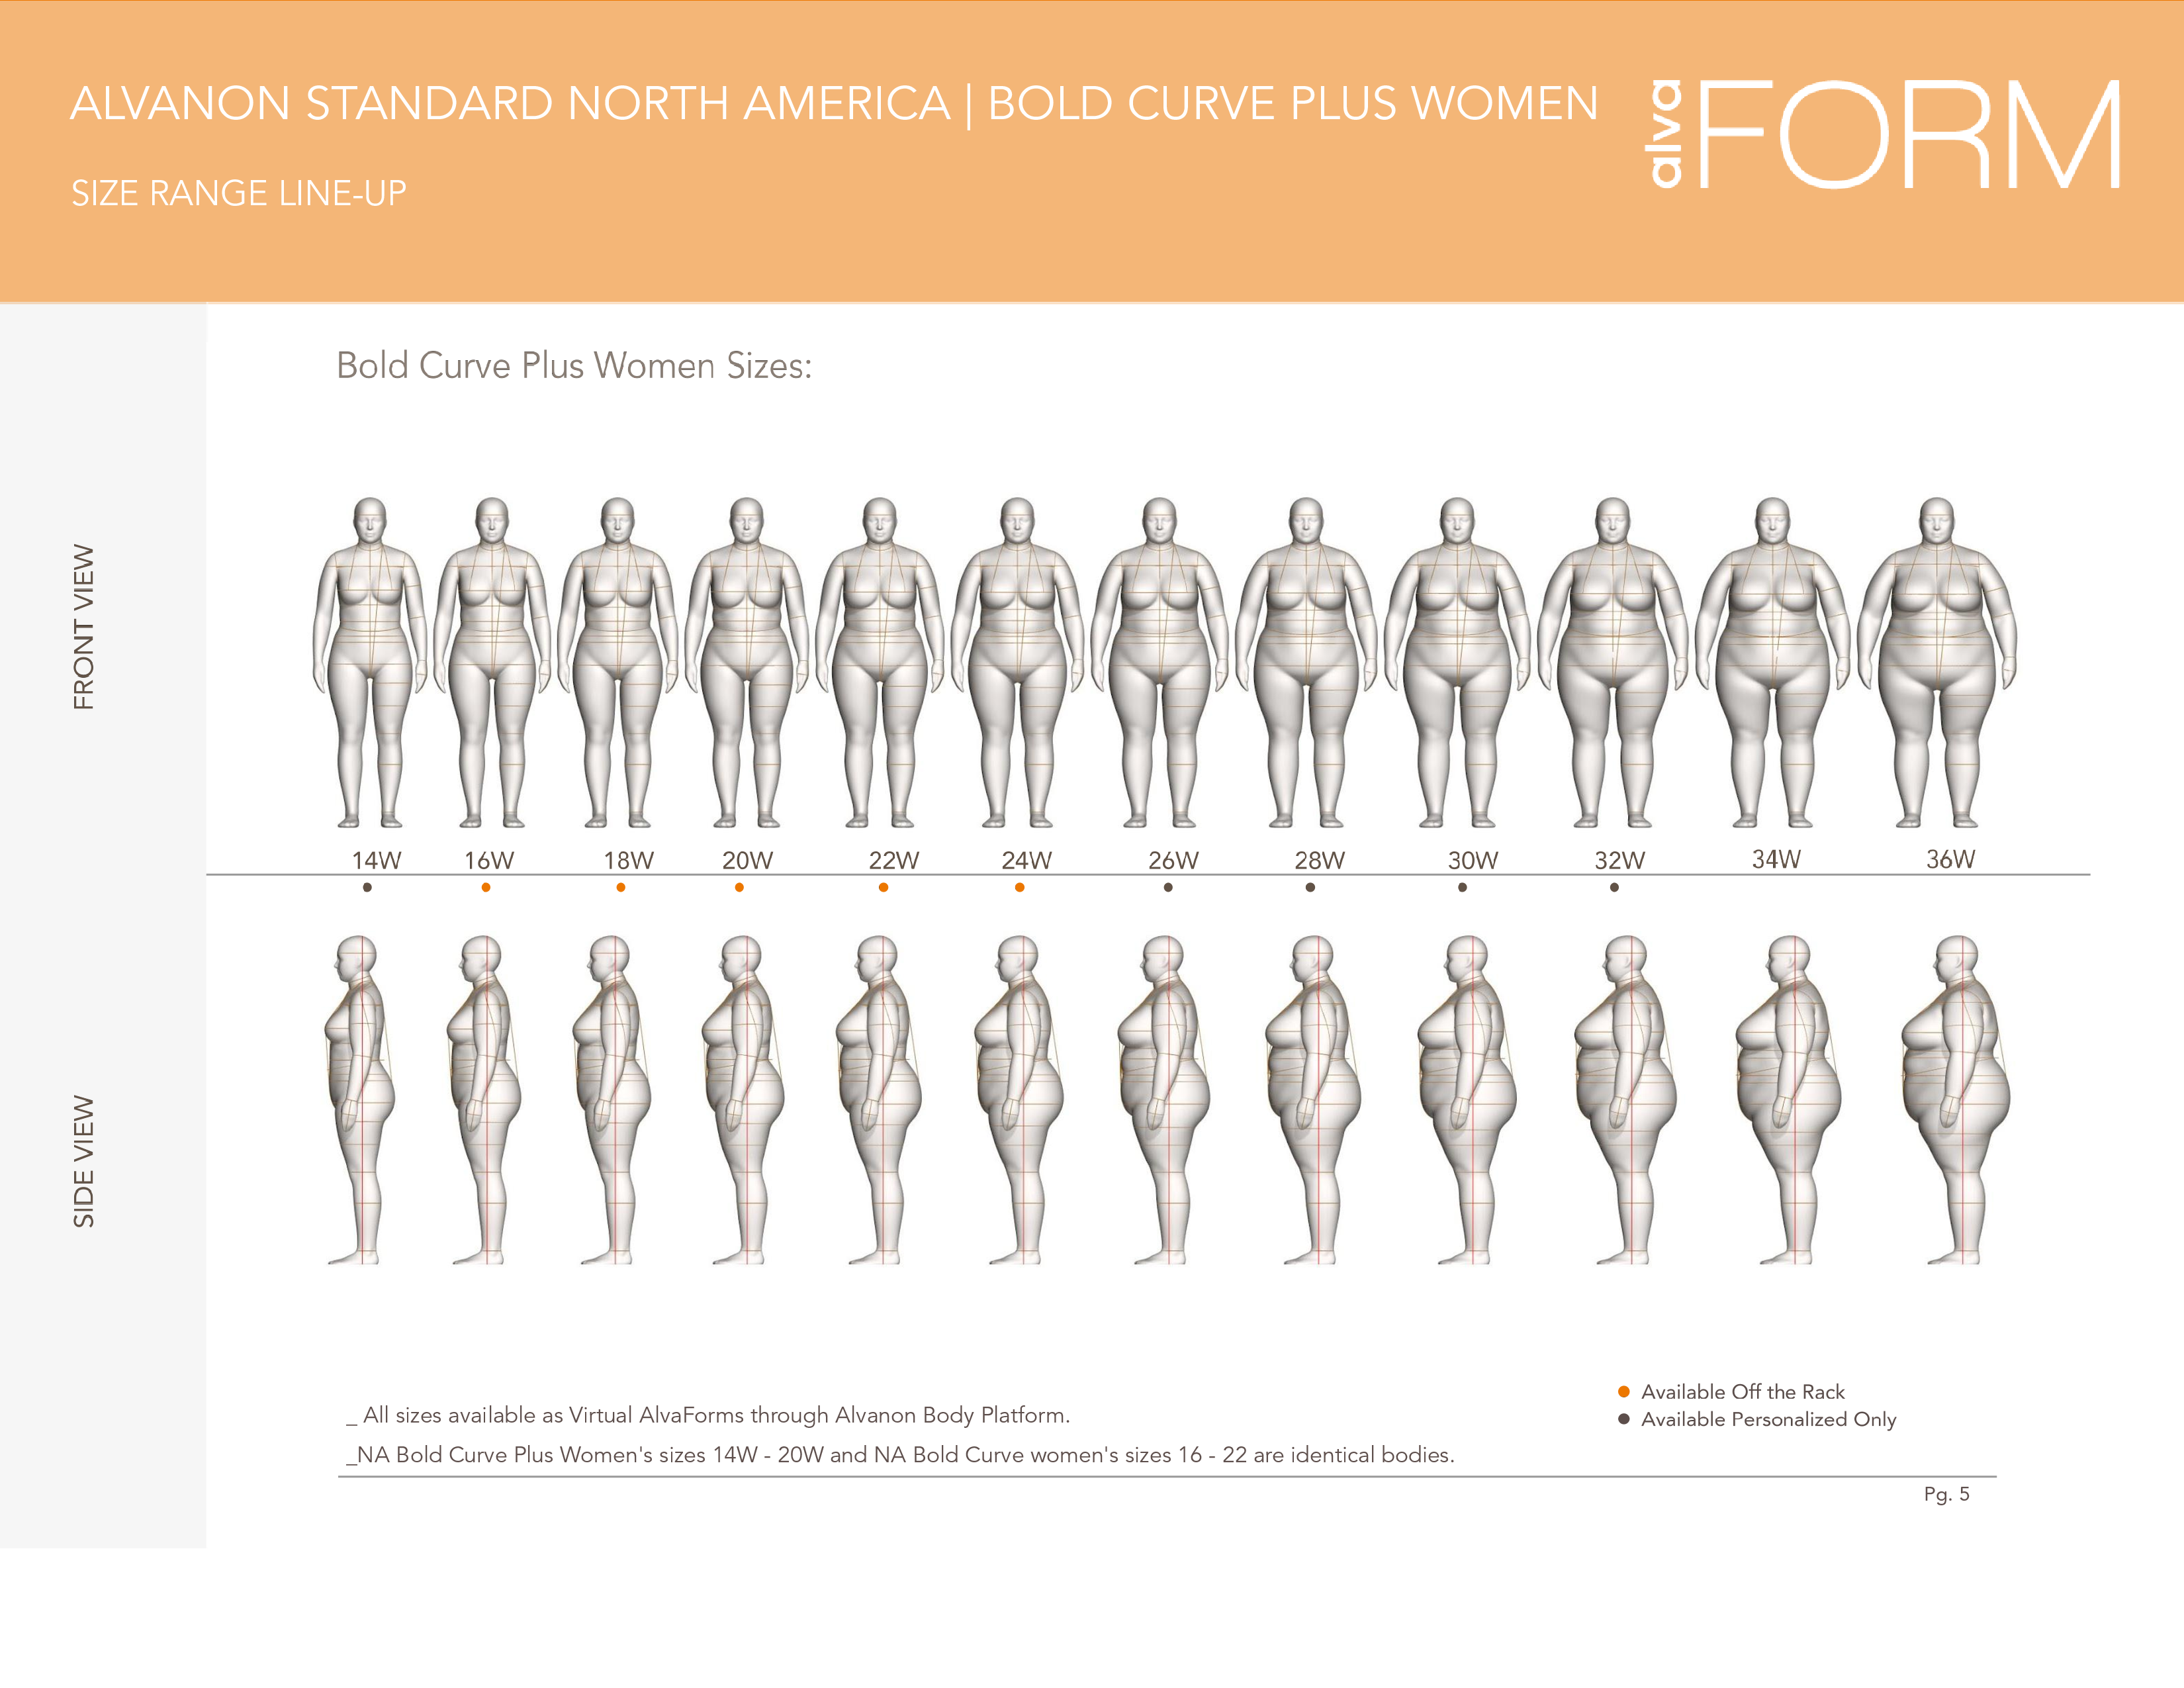
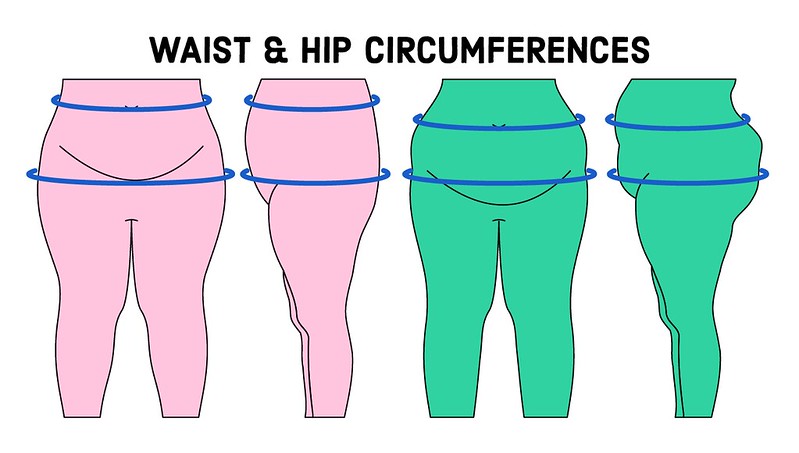
Let’s start with the assumptions made when patterns use an average body form. Take a look at sizes 00 – 14, and you’ll notice that there’s generally minimal stomach protrusion. However, as sizes get larger, there’s a consistent amount of stomach protrusion, and it is in the same spot across all sizes. Similarly, there’s a predetermined amount of butt protrusion that occurs at the exact location for every size. Moreover, the vertical distance between the waist and hip levels remains consistent for all sizes. All these body forms have the exact same posture. And finally, each size has its own specific across body depth and width, which increase as the sizes go up. But here’s the thing—very few people truly match these “average” body forms because there are so many variables to consider. Let’s unpack those key variables in a bit more detail.
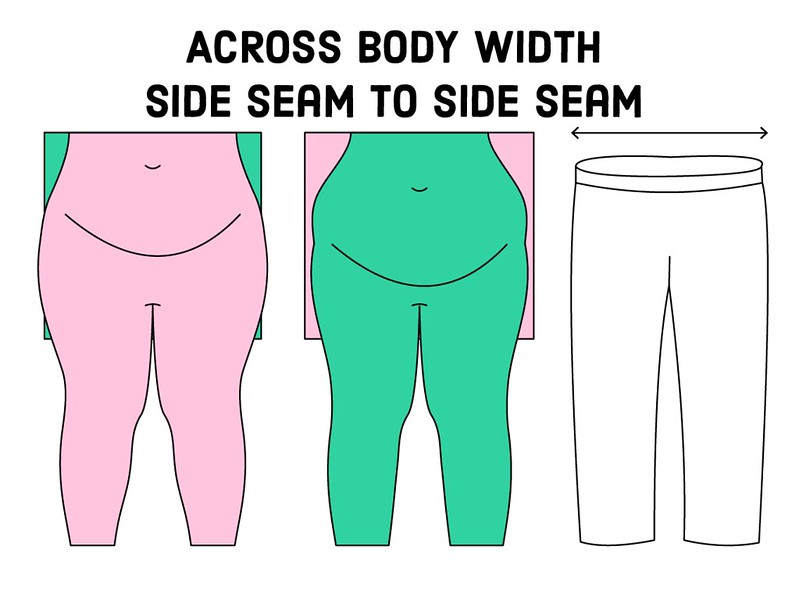
Let’s assume these two bodies have the same hip circumference as measured with the traditional method, tape measure at their widest part. One of the first variables that can differ between people with the same hip circumference is the across body width. This represents the horizontal measurement from side to side. You can see in the illustration that the pink body has a wider across body width compared to the green body.
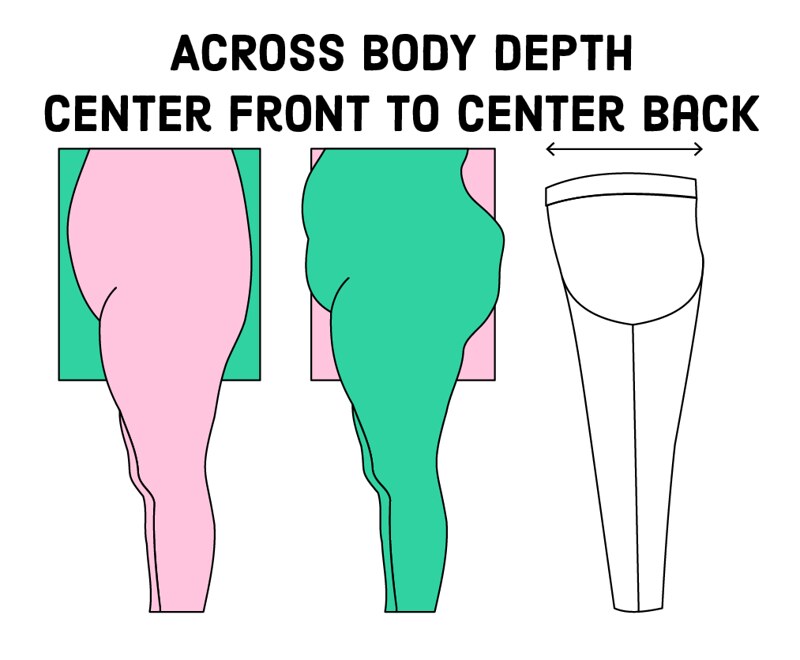
The second variable is across body depth. This represents the horizontal measurement from center front to center back. Although the pink body has a wider across body width, its across body depth is narrower than the green body. This is how the two bodies can have the same hip circumference.
The next variables are waist and hip circumference and the relationship between those two measurements. Where these measurements are taken is debatable, making it hard to decipher how they relate.
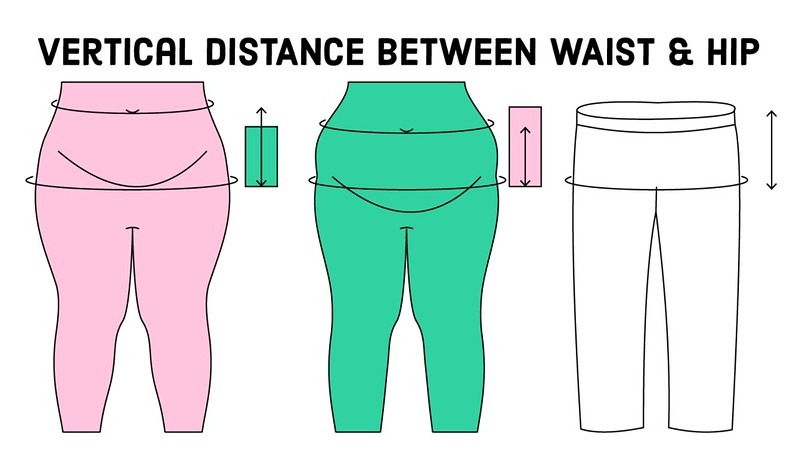
However, one key relationship between waist and hip measurements is their vertical distance. Industry-standard says the distance should be 7-9 inches for women, but the value will differ for everyone. I only measure 5-1/2 inches, for example.
So, how can an average body form also accommodate individual differences? Through sizing! You can go up and down a size to match your body’s needs.
This idea of “flaw of averages” is why I take the approach that I do for picking a pant size. Whatever body form (more often than not, it’s an AlvaForm) was used to design the pattern is considered the average, and chances are, I will not match this average. To avoid the hassle of measuring all of these variables and relating them back to the pattern pieces, I prefer to use the poster board method. I had been using the yardstick method, but the poster board is so much more convenient. The poster board method involves determining the largest possible torso circumference and using that value to determine size. You’ve accounted for all the possible variables listed above by obtaining the maximum torso circumference. Then, you can customize the garment’s fit throughout the torso by adjusting the side seams or incorporating/changing darts along the waistline. See ‘Another Example’ below for more details.
Recap of Blog Posts
Introduction
In my first post, I shared ideas on how to make measuring your body for pants more inclusive and accessible. The post highlights four essential objectives that any measurement technique should aim to accomplish: descriptive instructions, qualitative measurement, reliable results, and valid size selection.
Method 1 Only Use Hip Circumference
In my second post, I discussed the strengths and weaknesses of the conventional approach to measuring hip circumference. While I believe that relying solely on the widest circumference is inadequate, I still provided suggestions to improve this technique.
Method 2 Yardstick
In my third post, I analyzed the advantages and disadvantages of incorporating a yardstick in the conventional hip measurement technique. However, a significant downside of this method is its limited accessibility, particularly for people with restricted mobility.
Method 3 Poster Board
Finally, my last post covered a method I had only just discovered. Instead of using a tape measure with additional tools, the last method uses a poster board to acquire the overall circumference of the torso. I believe that this method has great potential and effectively achieves all the objectives that were outlined at the start.
Measuring My Body

Size Selection
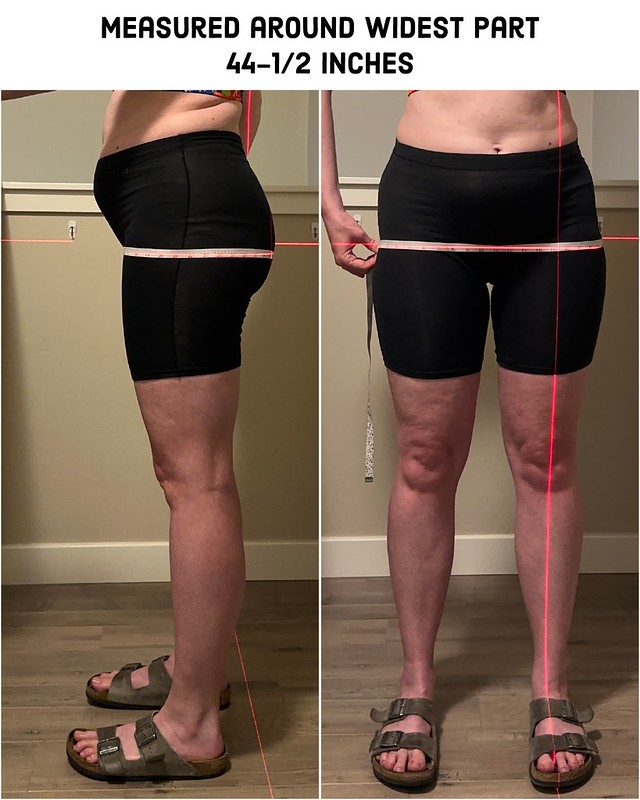
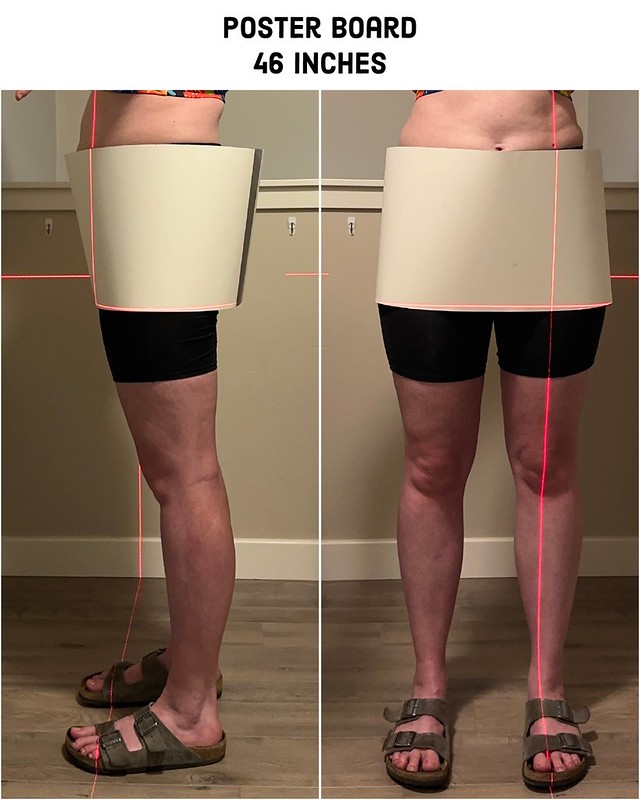
| Tape Measure | Yardstick | Poster Board | |
|---|---|---|---|
| Waist | 35.5 | 35.5 | 35.5 |
| Hips | 44.5 | 46 | 46 |
My waist at my belly button measures 35-1/2 inches. For my hip, if I just use the tape measure at my widest part, I measure 44 – 44.5 inches. If I measure where my butt protrudes the most and place a vertical yardstick at my belly, I measure 46 inches. If I measure using the poster board band, I measure 46 inches.
| Size | 14 | 16 | 18 |
|---|---|---|---|
| Waist | 33.5 | 35.5 | 37.5 |
| Hip | 44 | 46 | 48 |
Going back to the Sew House 7 size chart from the first post, it is clear that based on my improved torso measurement using the measuring band, I should make a size 16 as I initially determined. I was able to obtain my size by just using a single tool, the measuring band. Thanks to this simple tool, I was able to obtain an accurate measurement without any guesswork or uncertainty.
Another Example
I’ve also tested these methods out with Ryan; I just don’t have photos.
| Tape Measure | Yardstick | Poster Board | |
|---|---|---|---|
| Waist | 33 | 33 | 33 |
| Hips | 40 | 40 | 42 |
The reason the yardstick doesn’t give the correct torso circumference is that Ryan’s upper thighs contribute to his overall torso circumference and not a protruding stomach. In the past, I have held two yardsticks against each thigh and taken the measurement around them to get 41.5 – 42 inches. However, the poster board is a simpler method. Although most of Ryan’s pants are self-drafted patterns, I have discovered that the corresponding larger size is necessary for him. For the Trigg Shorts, he wears a size F (42.5 hip), and for the Iron Joggers, he wears a size XL (41-42 hip). See reviews here:
- https://sewing.patternreview.com/review/pattern/188882
- https://sewing.patternreview.com/review/pattern/188814
- https://sewing.patternreview.com/review/pattern/188417
If you look up sizing, you may notice that Ryan’s waist is a size smaller than his hip measurement. For elastic waistbands, this is easy to fix. I just tighten the elastic. For fitted waistbands, you may have to incorporate more darts like I did with his self-drafted trousers pattern.
By taking the overall torso circumference, the corresponding size will best accommodate the body area that requires the most space. In Ryan’s situation, he has protruding upper thighs, which means he needs additional across-body depth. However, other areas like across-body width and waist circumference may not require this extra space, and adjustments like taking in the side seam or adding extra darts may be needed. These adjustments will reduce the across-body width and waist circumference, respectively. In simple terms, fit the body area that needs the most room and modify the rest as necessary.
Conclusion
I would greatly appreciate any feedback or comments regarding your experiences with measuring your lower body and selecting sizes. Additionally, if you have any suggestions on how I can modify my descriptions or language to better cater to a wider range of body shapes and sizes, please do not hesitate to contact me via email or leave a comment below. Thank you for your support and for following along!

IF YOU FOUND THIS POST HELPFUL, CONSIDER SUPPORTING MY WORK BY SIGNING UP FOR A PAID SUBSCRIPTION.
POSTS OLDER THAN 3 MONTHS ARE NOW FOR SUBSCRIBERS ONLY — YOUR SUPPORT KEEPS THIS SPACE GOING.
INTERESTED IN SUBSCRIBING TO RECEIVE NEW POSTS IN YOUR INBOX?


Hello, I’m familiar with your posts from instagram, and I started reading your blog recently because I’m in the process of drafting my first pants block. Measuring is challenging!
Have you compared the outcomes of these different hip measures in terms of the overall fit of the finished garment? Visually seeing the yardstick method makes me wonder about how that would impact a closer fitting pant compared to a looser one given the distance between the yardstick and your body at the level of measure.
It’s also interesting that you mentioned the industry standard vertical distance of natural waist to hip variation; presumably commercially drafted patterns are making similar assumptions in their block, so are you adjusting your vertical heights between low hip and waist while sewing as well? If the pattern assumes that your hip is 3″ lower than it is in reality then I imagine that might have some big implications for how the garment fits. (Apologies if you’ve already covered this in another post — you have a very rich blog archive to read through!)
Hi! I have only compared the outcomes of the different hip measurements on myself, my husband, and a few friends. I’ve even connected with folks on Instagram who’ve shared their experiences. So far, everyone has had more fitting success with their pattern size based on the yardstick and/or measuring band method. In this series, I spoke about across-body depth and width. The size based on your hip circumference only accounts for across-body width (e.g., side to side), and adjustments must then be made for the across-body depth (e.g., crotch curve). Unfortunately, how you change the center front/back seam is complicated and confusing. Do you lengthen/shorten the crotch hook? Do you extend the center front or center back rise? Do you raise or lower the end of the crotch curve at the inseam? Do you change the slope of the center front/back? Do you soften or exaggerate the crotch curve? Should you make a combination of these changes? These decisions are complicated and overwhelming, often leading to undesirable results. However, using the size based on the yardstick and/or measuring band ensures a size that fits the across-body depth and now shifts the alterations to the across-body width. Altering the across-body width is straightforward and easy compared to the crotch curve. You simply have to take in the side seams as needed.
You’re absolutely right that standard commercial patterns assume a certain distance between the waist and hips. The Big 4 suggests 7-9 inches for the waist-to-hip vertical distance. If you’re using an alvaform (like many indie designers), you can find those specifics on their website (https://alvanon.com/resources/the-alvanon-standard-series/). I tackle this issue while fitting my muslin. I start with a separate waistband and a mockup of a single leg. I wear the detached waistband and tweak the single leg’s position until it fits perfectly. I try to understand the designer’s intention for the pattern’s fit by studying it closely. For instance, if a dropped crotch effect is intended, I ensure the bottom of the crotch curve isn’t too snug against my body. Once I’ve figured that out, I pin the pant leg to the waistband and mark the new waistline. Often, I need to lower the waistline because my waist-to-hip distance is smaller. Picking the size to fit your across-body depth means you picked a crotch curve shape that should fit your body. You want to make sure that the crotch curve is placed correctly on your body to maximize fitting success. Working with a separate waistband and pant leg lets you do this regardless of your body’s waist-to-hip distance.
In the future, I hope to provide more solid data to highlight the pros and cons of these methods. If you have any more questions or need assistance navigating my blog, don’t hesitate to shoot me an email. Your curiosity is greatly appreciated. Thanks a bunch for reaching out!
Thank you for these great posts. They have been very helpful..
I have learned so much from your pants fitting posts. Thank you!
I’m intrigued by your poster board/laser example. In the past I’ve used a poster board but thought it needed to be perfectly cylindrical-essentially lining up with the vertical laser as well the horizontal laser. In your photos, I see your poster contouring around belly/butt/hips but still keeping the poster board level horizontally. My method resulted in balanced skirts & pants, but they felt sort of oversized. I suspect your approach would give a starting size that allows for closer contouring around the hips/butt/belly in pants while still maintaining balance lines. Interesting concept that I’ll have to experiment with.
Thank you for your kind words and insights. You interpreted my photos correctly. It is not necessary for the poster board to be perfectly cylindrical. The tube will distort to fit around your body.