
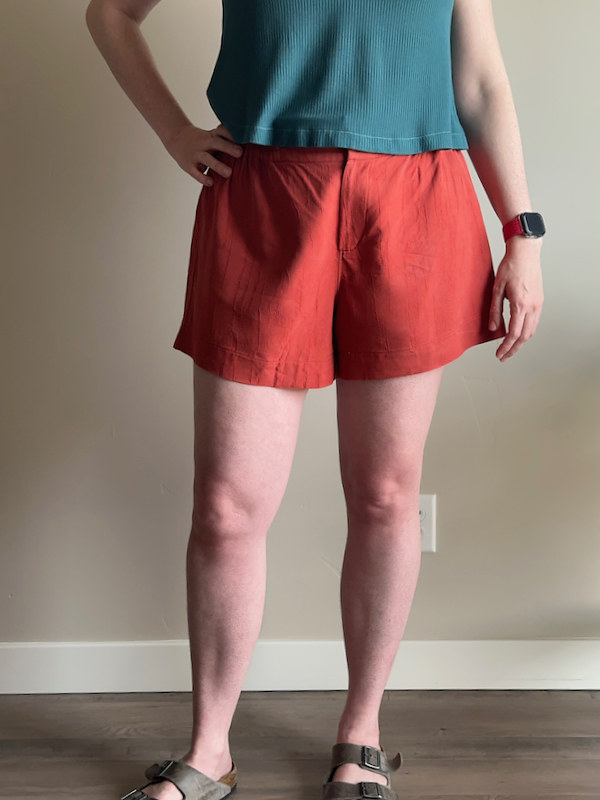
I made yet another pair of elastic waistband shorts for summer. My first pair was a simple style (Tula from Papercut). My second pair was the Pomona from Anna Allen, featuring no side seam. My third pair is the Dani from True Bias. This pair is unique because I made View A, which includes a zippered fly front, even though the waistband is elastic. I’ve also tried new-to-me fabric for all of these shorts. I hadn’t used Tencel until now because I was worried it would be staticky. So far, static is not an issue at all.
Analyzing Style and Fit
The Dani shorts have an elastic waistband, inseam and rear pockets, a paper bag waist, and leg and center front options. Views A and C are shorts, and Views B and D are pants. Views A and B use a zip-fly construction with two small buttons at the waist. Views C and D include a full elastic waistband with no additional closures.

One thing I noticed about these shorts is an excess of fabric gathers on the back pieces. This results in fabric pooling along the center back. I don’t love the look on my body.
Materials and Notions

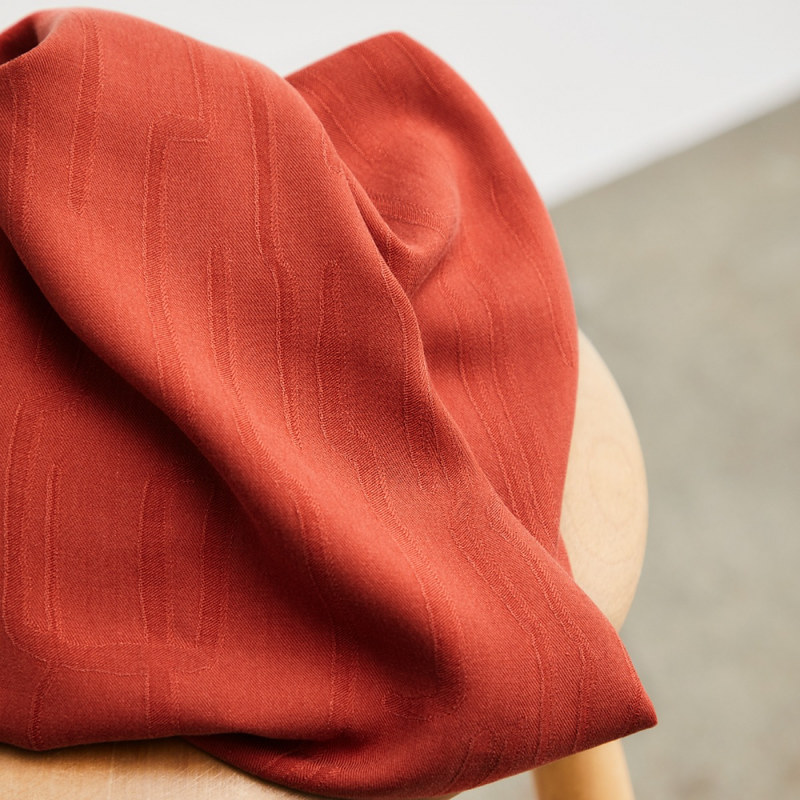
I made my shorts using Meet Milk Lane Jacquard in Cider. The material is a medium-weight jacquard weave fabric made with TENCEL. The material is 200 g/m2 (~6 oz) and has a fluid drape. I suggest a lightweight fabric with a flowy, fluid drape for this pattern. This pattern is definitely not intended for a stiff fabric or thick fabric. The lighter, the better.
Sizing and Version
Body Measurements
Size | 0 | 2 | 4 | 6 | 8 | 10 | 12 | 14 | 16 | 18 |
---|---|---|---|---|---|---|---|---|---|---|
Chest | 32 | 33 | 34 | 35 | 36 | 37.5 | 39 | 40.5 | 42.5 | 44.5 |
Waist | 26 | 27 | 28 | 29 | 30 | 31.5 | 33 | 34.5 | 36.5 | 38.5 |
Hip | 34 | 35 | 36 | 37 | 38 | 39.5 | 41 | 42.5 | 44.5 | 46.5 |
My current body measurements are a 36-inch waist and a 44-inch hip. If I consider my anterior tilting pelvis, my hip measures 46 inches. Based on my waist, I should make a size 16, but based on my adjusted hip measurement, I should make a size 18. The instructions suggest, “Use your hip measurement as your main guide in choosing a size. Because of the elastic waistband and overall ease of the pattern, check the finished measurements chart before blending sizes.” Let’s see what the final garment table suggests.
Final Garment Measurements
Size | 0 | 2 | 4 | 6 | 8 | 10 | 12 | 14 | 16 | 18 |
---|---|---|---|---|---|---|---|---|---|---|
Waist w/o elastic | 35 | 36 | 37 | 38 | 39 | 40.5 | 42 | 43.5 | 45.5 | 47.5 |
Elastic | 24 | 25 | 26 | 27 | 28 | 29.5 | 31 | 32.5 | 34.5 | 36.5 |
Hip | 38 | 39 | 40 | 41 | 42 | 43.5 | 45 | 46.5 | 48.5 | 50.5 |
Length | 14 | 14.25 | 14.5 | 14.75 | 15 | 15.25 | 15.5 | 15.75 | 16 | 16.25 |
Looking at the final garment measurement, I find myself in a bit of a conundrum. The 45.5-inch waist without elastic on Size 16 would work for me and make it over my 44-inch hips. The size 16 hip measures 48.5 inches, which is larger than my 47-inch seated hip measurement. Great. It looks like I should adjust my size from 18 to 16? However, look at the recommended elastic cut chart (i.e., waist with elastic). The size 16 waist with elastic will be slightly less than 34.5 inches once you sew the elastic together. That is too small for my waist measurement. The size 18 waist with elastic is approximately 36.5 inches and is a much more appropriate measurement for my body.
The body and final garment chart give some hints as to how these shorts should fit. They should have a ton of ease throughout the torso and hips and only be fitted at the waistband. Even though it might look like I need to go with a size 16, the size 18 will fit my waist better and give me the extra ease intended for my hips.
Version
I made View A, shorts with a zip fly and two buttons at the waist, in size 18.
Fitting Method
This is my third pair of shorts this year, and I’ve learned a lot about fitting shorts. Namely, start with full-length legs. Having the full-length leg on the pattern allows you to evaluate the drape of the pant most effectively. The only way I’m able to mark the center grainline is from the middle of the ankle, so that’s why I start with the full-length leg first.
Waistline

The first step is to evaluate waistline placement. I determined I needed to remove 2-1/2 inches from the center front and 1-1/2 inches from the side seam. For this step, I just sew together one leg, so I can clearly see how the center grainline molds around my torso.
Key Grainlines

Next, I drew the center grainline, knee level, and crotch level. I’ll use these key grainlines to further assess drape and fit.
Does the Center Grainline Bisect the Knee

The next check is whether the center grainline bisects the horizontal knee level. In this case, the center grainline did. Fantastic. I removed the lower leg at this point because it was no longer needed to assess the drape.
Find Your Body’s Center Grainline

Next, using my laser-level method, I marked my body’s center grainline on the pattern, so I could compare it against the center grainline on the pattern. For both the front and back pieces, the center grainlines matched. No additional adjustments were needed. Sweet.
Going From Full-Length to Shorts

Returning to the original pattern, let us look at how the shorts are drafted. For the front pattern piece, 3/8 inches were added to the side seam and inseam. However, for the back pattern piece, 1 inch was added to the inseam, but only 1/2 inch was added to the side seam. One of the legs was drafted correctly, and the other wasn’t. Can you guess which one is wrong?
Once you have full-length pants draping correctly for your body, the pants will continue to drape correctly even if you shorten the leg length. What do I mean by drape correctly? The inseam and side seam hang perfectly vertically, the front and back center grainline match your body’s center grainline, and the pant legs show no sign of twisting, swinging, or bunching. I think everyone has, at some point in their lives, taken pants and cut them into shorts.
However, shorts often have more ease at the hem than cut-off pants. So, do you add the same amount to the hem at the inseam and side seam or different amounts? When the pant leg is cut above the knee level, the hem dictates how the leg hangs. In other words, with nothing below the new, shorter hem, the hem becomes the point at which gravity pulls downward. Therefore, when you widen the hem, you MUST add the same amount to the inseam and side at the hem level. If you add more to the inseam, like on the back pattern piece, the hem level is no longer balanced, and the legs will now swing and twist because the hem is off balance.

Another way to describe this, the center grainline is like the pivot point on a see-saw (top of the triangle in the figure above); when balanced, the pants are at static equilibrium. An object is at static equilibrium when it is not moving up, down, left, or right and is not rotating or spinning. If balanced full-length pant legs are shortened, the static equilibrium is maintained. This would be like proportionally reducing the weight on either side of the see-saw. The see-saw would still be balanced and at static equilibrium. Now if you want to widen the hem of the shorts, this is like lengthening the arms of the see-saw. If you increase one side more than the other, the see-saw will tip. However, if you extend both sides equally, the see-saw will remain balanced.

For this pattern, the front was drafted correctly, adding 3/8 inch to the side seam and inseam equally. However, the back piece was drafted incorrectly. The side seam added 1/2 inch, but the inseam added 1 inch, which is incorrect. Therefore, I added 1/2 inch to the side seam and inseam to keep the back hem balanced.

The last step was the add the 1-3/4 inch cuff back to the pattern.
Original vs My Final Pattern

The original pattern is in blue. My pattern is outlined in red. The only alteration I made was to the waistline and the inseam of the back piece.
Final Fit


Conclusions
I can imagine people making the pants, thinking they look great and drape well, then trying the shorts and being disappointed with the fit because of the back inseam drafting. A small change, like removing the excess from the back inseam, can make a big impact. I also don’t love the pooling gathers along the center back of the shorts. I recognize it is a design feature, but I don’t like how it looks on my body. The inseam is also very short. I didn’t end up creating a cuff because my fabric is too lightweight, so it wouldn’t hold the cuff, but also, the inseam is already a bit too short for me. If I ever made this pattern again, I would try going down a size to see if the back would look better. I would also lengthen the shorts a least 1 inch for a single folded hem or 2+ inches if the fabric could hold a cuff.
Otherwise, the pattern has everything I would expect: inclusive sizing, accurate final garment measurements, sizing layers in the PDF, clear instructions, and an online sew-along.
I created a list of possible patterns when I started my shorts projects. I focused on elastic waistbands and not fitted waistbands. I also excluded anything with pleats. I just don’t like how pleats look on my body. Here’s the list I pulled together. Are there any patterns you think are missing from my list?
- Pomona from Anna Allen
- Tula from Papercut Patterns
- Dani from True Bias
- Palisade from Papercut Patterns
- Pietra from Closet Core Patterns
- Saturday Shorts from EA
- Spring Shorts from Peppermint Magazine
- Dorian from Seamworks
- Opal from Megan Nielsen
- Vero Beach from Hey June Handmade
- Goji from Deer and Doe
- Soline from Staystitch
Leave a Reply