Iron Joggers from Green Style

I reviewed men’s joggers a while ago, and one of the patterns I evaluated was the Iron joggers from Green Style. Based on my review, I knew I would have to center the grainline at the knee, raise the waistline, and move the center grainline towards the side seam for both the front and back pieces. I shouldn’t need to adjust the crotch length or the length of the legs. Spoiler Alert: these are the exact changes I had to make, and I love when my process and the math work out!

Analyzing Style and Fit

Style

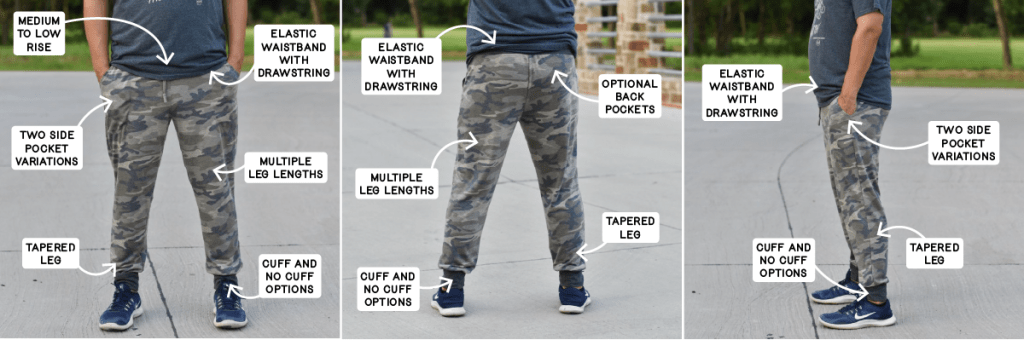
The Iron joggers differ from the Brassie joggers in terms of options. The Iron joggers have fewer rise options but more leg lengths and pocket options. The Iron joggers have one rise, medium to low. The joggers have four short lengths: 5, 7, 9, and 11-inch inseam. The joggers also come in capri length and full-length with a cuff. Finally, there are three different full-length options with no cuff: 30, 32, and 34-inch inseam. That’s a total of 10 different leg length options. All leg variations have a tapered leg. Moreover, there’s an option to taper the calf even more on the full-length cuff option. The pattern includes two types of side pockets (slant pocket or zipper pocket) and an optional zippered back pocket. The waistband is a straight elastic band and includes a drawstring.

Fit

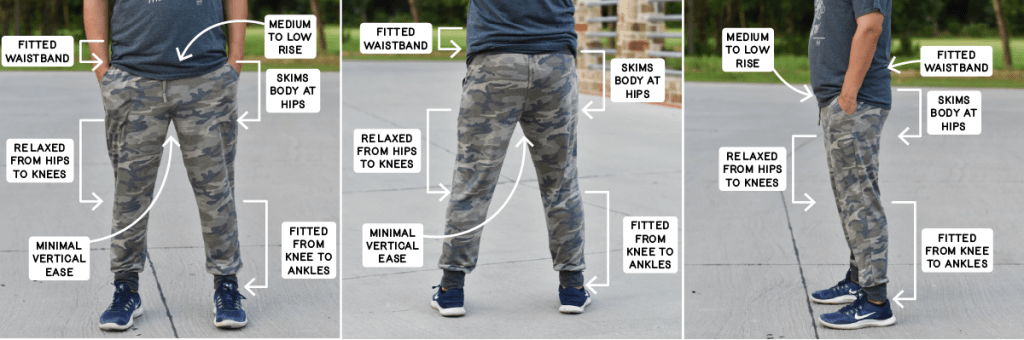
In terms of fit, the joggers obviously have a fitted waistband. Around the hips and butt, the joggers will skim the body but not tightly. Depending on the body, the front torso will be anywhere from relaxed to skimming the body. The vertical ease is minimal on these joggers, and the bottom of the crotch curve should fit near the body. The pant legs are relaxed from the hips to the knees. However, the legs from the knee to the ankles are slim and tight.

Materials and Notions

Polartec® Power Grid™ 9110 OR

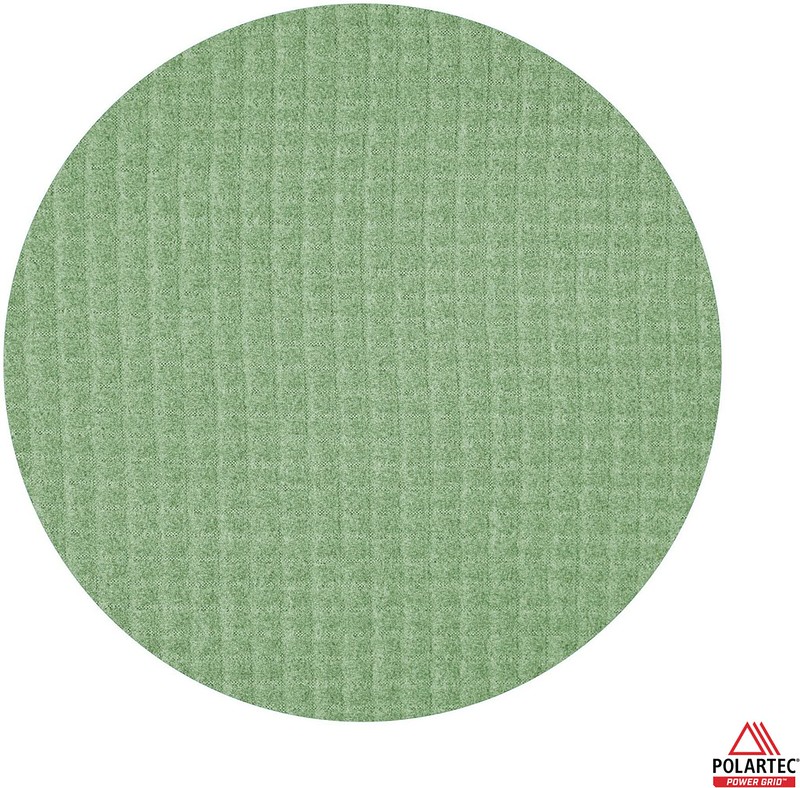
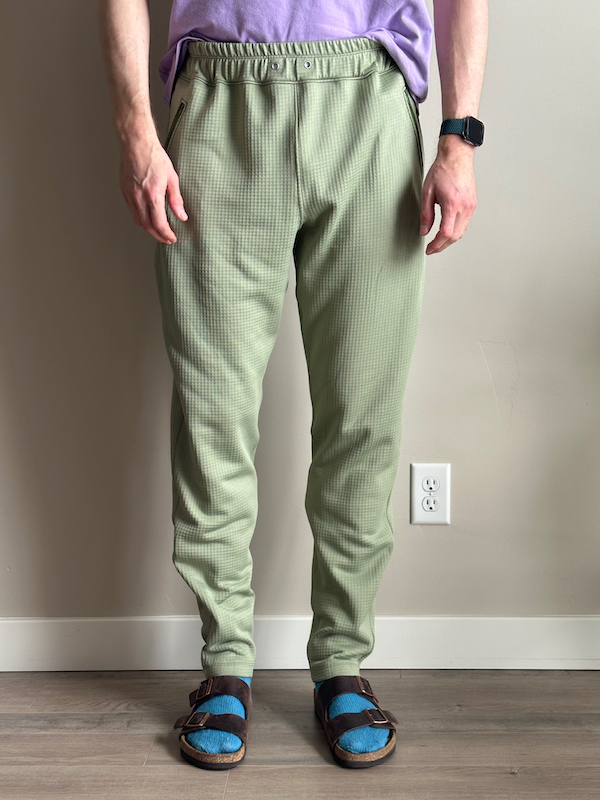
I used Polartec® Power Grid™ 9110 OR for my joggers, purchased from Ripstop by the Roll. For my zippers, I used YKK #3 7-inch nylon coil non-separating zippers from Wawak.com. I’ve worn my joggers several times and find the fabric perfect for neighborhood walks when it’s in the 40s outside. This was precisely what I wanted. We already have pants for 20s and 30s weather, but we needed something for the 40s.

Sizing and Version

Determining Size

SizeWaistHip
XXS24-2531-32
XS25-2633-34
S28-2935-36
M30-3137-38
L32-3339-40
XL34-3541-42
2XL36-3843-45
3XL39-4146-48
4XL42-4449-51

Ryan’s waist is 32.5 inches, and his hips are 40 inches. He doesn’t have a forward-tilting pelvis like me, but he does have upper thighs that protrude, so his thighs should be accounted for in his hip measurement. I calculated that his upper thighs add 1.5 inches to his hip measurement. I also checked his hip measurement when seated. When seated, his hip measures 41.5 inches. Since his adjusted hip measurement falls within the XL size, that’s the size I used.

The Iron joggers do not have a final garment table, which bothers me. However, I did measure a few things on the XL size just to be sure. The final garment at the top of the joggers (not the waistband) measures 41.5 inches, and at the hips (i.e., the top of the crotch curve) measures 44 inches. I’m happy with the ease at the hips, and the waistline is supposed to be generous.

Pattern Version

I made size XL with:

  • Zippered side pockets
  • Long length (34-inch seam)
  • No cuffs

WARNING: Side Seams Are Not The Same Length

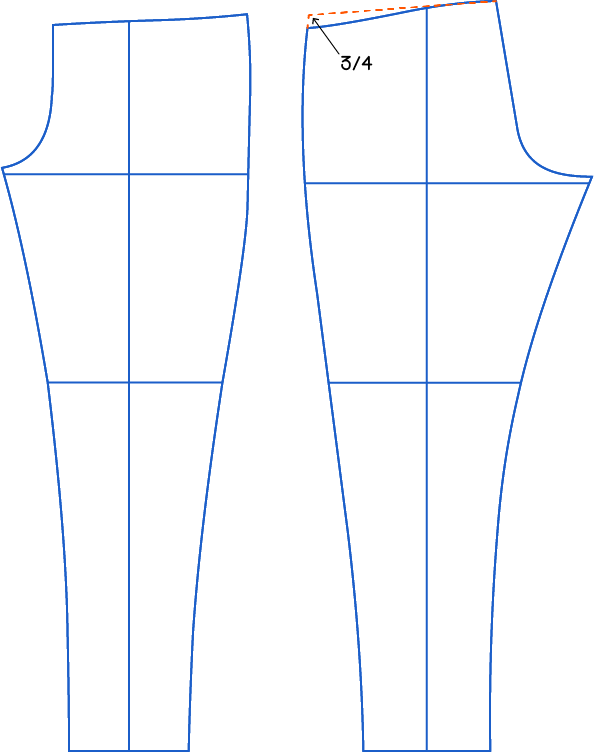
Before I get into fitting and adjustments, I want to point out that the side seam on this pattern does not match. For size XL, the back side seam was 3/4 inches shorter than the front. Your side seams need to be the same length. I contacted the pattern company weeks ago about this discrepancy but have not received a reply.

Does the Center Grainline Bisect the Knee?

The first step with any pants is to confirm that the center grainline of the pattern bisects the horizontal knee level. I knew from my previous posts that the center grainline would not bisect the horizontal knee level. To find the center grainline, draw a vertical line from the middle of the ankle up to the waistband. I drew my horizontal knee level at the 11-inch inseam shorts marker on the pattern, which conveniently corresponded to the middle of Ryan’s kneecap. The front center grainline was off by 1/4 inches, and the back center grainline was off by 1/8 inches. Therefore, the front is 4-3/4 and 5-1/4 and needs to be 5 on each side. The back is 5-1/2 and 5-1/4 and needs to be 5-3/8 on each side.

To fix this issue, cut along the horizontal knee level. You now have two pieces: the upper joggers and the lower joggers. Next, you want to line up the center grainline of the lower joggers with the actual middle of the horizontal knee level on the upper joggers. Finally, you will redraw the lower joggers by connecting the upper joggers’ horizontal knee level with the lower joggers’ hemline. When I redrew my lower leg, I drew a straight line, removing the shaping in the pattern. After my experiences with the Brassie jogger, I knew the shaping would make the lower leg too tight.

Laser

Before

Once I fixed the center grainline at the knee, I cut out and sewed a muslin to test the center grainline placement at the hip. I also added extra fabric at the top of the waistline so the rise could be adjusted too. First, we adjusted the waistline and then addressed the center grainline placement. With Ryan’s ankle and knee lined up with the laser, I compared Ryan’s center grainline (i.e., the laser) to the pattern’s center grainline. For the front piece, the laser was lined up with the pattern’s center grainline at the knee and hip. The front hem twists toward the inseam because the back center grainline is off. The laser was not lined up with the pattern’s center grainline for the back piece. The hem was swinging toward the side seam, thus pushing the front hem around. This is why the front center grainline is twisted toward the inseam. The back center grainline at the hip is 1/4 inch too medial.

After

I didn’t have any knit fabric in my stash for a toile, so I made a second muslin to confirm the alterations worked. Yes, I realize I’m using stiff woven muslin to test a stretch knit pattern. However, as long as there is some ease in the pattern, you can always use woven fabric to test a knit pattern. Because I am not trying to read draglines or wrinkles, the material choice is less important. I can still address 3D shape and drape questions, regardless.

Adjustments and Alterations

Rise

Based on the muslin fitting, I added 1-1/2 inches to the center front, 3/4 inches to the side seam, and 1 inch to the center back. Remember, I’ve already adjusted the pattern to make sure the front and back side seams match. The additional 3/4 inches added to the side seam is in addition to the previous fix.

Center Grainline at Hips

When I fixed the center grainline at the horizontal knee level, that shifted the center grainline at the hip level. At the hip level, the front center grainline moved 1/4 inch towards the side seam, and the back center grainline moved 1/8 inch towards the side seam. Based on the laser level, I knew I needed to shift the back center grainline at the hips over some more. It needed to move 1/4 inch towards the side seam. The final result is that the back center grainline moved 3/8 inches towards the side seam after the knee and hip level adjustments.

The front center grainline was already shifted 1/4 inch when I made the change at the knee level, and I wonder if I could have shifted it another 1/8 inch at the hip level. When we are talking about 1/8 inches, the change is so minuscule. I didn’t make any additional changes to the front pattern piece because the fit was good enough, but I’m guessing I probably needed to shift the front center grainline over 1/8 inch at the hip level, so it moved a total of 3/8 inches towards the side seam as well.

Comparison

Original Pattern in Blue
Altered Pattern in Red

With the center grainline lined up, here is the difference between the original pattern in blue and my final version outlined in red.

Original Pattern in Blue
Altered Pattern in Red

When I line up the center fronts and backs, respectively, you can see how the center grainline has shifted towards the side seam.

Final Fit

Conclusions

Much like my version, I’m happy with the fit. I’m also pleased that I have a pattern I can use if I ever need to adjust the size.

What I Like

  • You definitely get your money’s worth with this pattern. The pattern includes 10 leg length variations, 2 front pocket options, and 1 back pocket option.
  • The size range is inclusive, and there are plenty of sizes across the range.

What I Don’t Like

  • I hate to see lazy drafting. The side seams on a pant pattern should match, but they don’t on this pattern. On size XL the back side seam is 3/4 inches shorter than the front side seam.
  • I also have the same complaint I did with the Brassie joggers. The pattern should include a final garment measurement table and the body measurement chart. The final garment table should include waist, hip, and rise information, at the least. I would also like to see mid-thigh and calf measurements too.
  • I wish this pattern included multiple rises and not just a single rise.
  • Finally, I emailed the pattern company twice, once about a final garment table (March 10) and again about the side seam discrepancy (March 18), and I never got a response back. Customer service apparently isn’t a priority.

Leave a Reply

Fill in your details below or click an icon to log in:

WordPress.com Logo

You are commenting using your WordPress.com account. Log Out /  Change )

Facebook photo

You are commenting using your Facebook account. Log Out /  Change )

Connecting to %s

This site uses Akismet to reduce spam. Learn how your comment data is processed.

Website Powered by WordPress.com.

Up ↑

%d bloggers like this: