
I learned a lot between drafting pants for myself and drafting pants for Ryan. Specifically, I learned where the crease line should go at the crotch level in order to fit quadriceps. Fitting pants is more than just widths and lengths put together. Your unique body shape is important too. Continue reading to learn more!
Grain Lines
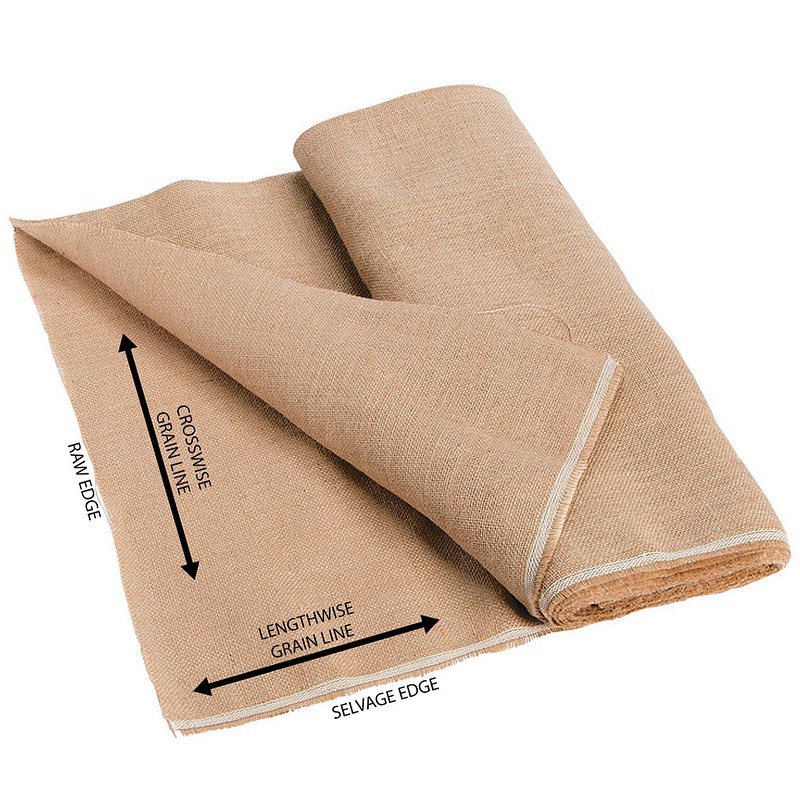
Lots of terms are thrown around when talking about drafting / altering pants. I’ve used the term “grain line” when referring to the center line down pants, which is parallel with the body and perpendicular to the floor. There’s been confusion with the use of the word grain line because, more generally, the grain line refers to the fibers’ direction in the fabric. Lengthwise grain lines are the fibers that run parallel with the selvage edge. Lengthwise grain line is also sometimes called straight grain. Crosswise grain lines are the fibers running parallel with the raw edge of the fabric. Instead of using the term grain line, to refer to the center of the pant, I will use the term “crease line”. If you were adding a crease to your pant this is exact where the crease would go, the center of your pant leg.

Crosswise Grain Lines
The measurements at the ankle, knee, crotch, hip, and waist are crosswise grain lines. These lines must be horizontal and parallel to the floor or level. There is definitely a learning curve when learning how to fit pants, and the only way I’ve learned is through mistakes. One of the major mistakes I use to make is yanking, pulling, stretching, and contorting fabric until the pants “look” like they fit. When you pull on the fabric and stretch fabric, you’ll move the fabric off the grain line. The pants will take on a mind of their own and start fitting oddly as you make adjustments since you are now trying to adjust pants on the bias. Keep cross grain lines parallel to the floor!
Lengthwise Grain Lines
Lengthwise grain lines, including the center crease line, should hang on the plumb. In other words, the lengthwise grain line on pants should hang straight up and down. Most of my fit issues deal with lengthwise grain lines. If the center crease line is off, the pants won’t be balanced, and the lengthwise grain lines won’t be plumb. The rest of the blog post is about getting the center crease line plumb.
A Note About Fitting
The looser you make your pant, whether testing a pattern with a muslin or toile or creating a basic pant block, the easier it will be to keep crosswise grain lines level and lengthwise grain lines plumb. The muslin should lay over the body smoothly without pulling. Everybody has warbles and lumps, and bumps and clothing should gently lay across the body and not be pulled tight. Tight fitting pants are not the way to try and disguise or hide your body. Love your body. Fit your clothes accordingly.
Loose-fitting pants should look just as flattering as skinny pants if everything is balanced and altered properly. Going from loose-fitting pants to tighter-fitting pants is rather easy too. You just take in the side seam below the upper thigh / crotch level and inseam without adjusting the center front or back or the crotch curve / length. Do yourself a favor and stop trying to adjust the fit on tight-fitting pants.
I’ve actually draped pants on myself. It’s an awkward acrobatic challenge when trying to drape the back pattern pieces, but maybe you have a friend or partner that can help? Wear leggings so you can pin / tape the muslin to that without having to go fully naked. It helps to draw the crosswise and lengthwise grain lines to ensure you keep everything level and plumb. Smooth fabric over the body and stop tugging and pulling!
Measurement Points

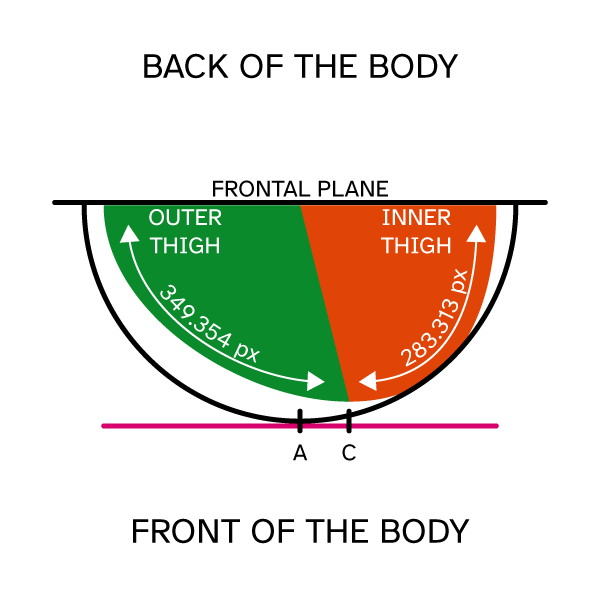
In my previous post, I describe the locations where I take measurements and how those locations map onto pattern pieces. I like to measure at the ankle, knee, top of the leg (AKA crotch), top of the crotch (AKA hip), and waistband level. I will quickly review the information about measuring at the ankle, knee, and hip. This blog post is mainly about the crotch level.
Ankle

The ankle crosswise grain line needs to be centered on the crease line. To see if pants are off-balance, find the center of the ankle and draw a perpendicular line from the bottom of the pant towards the waistline. You will immediately see if the pants are off-balance at the knee.
Knee

The knee crosswise grain line also needs to be centered on the crease line. I can’t say whether this is true for a true knock- or bow-kneed people. When creating my pant block, I made sure my legs were wide enough that I didn’t need to worry about protruding calves or other odd shapes. I just needed to know if my leg would sit squarely in the pant leg and the pant would hang plumb. It is not uncommon to find pants drafted with the knee crosswise grain line not centered on the crease line. True Bias Hudson joggers are one example. When testing balance, you need to test the front and back pant pieces since the front may be balanced, but the back piece will not be balanced.
Hip

I’m skipping the crotch for just a moment. The grain line at the hip has been the hardest for me to figure out. I hope to do a full blog post about how pants fit when this is off balance. This measurement is about where the crease line should hit compared to the center front and center back. If the crease line is off even by ½ inch, you will not fit your pants properly because the fit issues disguise themselves as crotch fitting issues.
If the crease line is off on the front pattern pieces, you’ll be duped into think you need to make flat or rounded pubis adjustments. If the crease line is off on the back pattern pieces, you’ll be conned into thinking you need to do a flat or rounded butt alteration. I realize I really, really, really need to do a blog post about this to show exactly what will happen. Don’t worry, I do have it planned. I just have to find the time.
For comparison, Ryan’s crease line is 4 inches from center back, mine is 4 ½ inches. Ryan’s crease line is 4 ¾ inches from the center front and mine in 3 ½ inches. A noticeable difference for sure.
Crotch
When I drafted my pants, I assumed the crotch crosswise grain line needed to be near the center as well. Even in the draping video above, the upper thigh / crotch level is evenly balanced (6 inches and 6 inches). Drafting pants for Ryan taught me that the crotch level does NOT need to be even on either side of the crease line. This blog post’s motivation was to talk about where the crease line should cross at the crotch level because it doesn’t and shouldn’t necessarily be at the center. The crease line placement at the crotch has more to do with your upper leg’s shape and how that mass is distributed. The lesson I learned and hopefully the lesson you take from this post is that the crease line at the crotch does NOT need to bisect it into two equal parts.
Upper Hamstring Crease Line

For Ryan and me, the crease line is near the center of the crotch level for our back pieces. This makes sense because the hamstring, under most circumstances, isn’t going to be a protruding mass that will disrupt the drape of the fabric. Your butt does that, and therefore, your hamstring shape has little effect on balance. However, I’m not willing to say this is an absolute truth. There may easily be circumstances in which the medial or lateral aspect of the hamstring will require more or less fabric depending on the shape, and the crease line will need to be moved off-center at the crotch level.
Upper Quadricep Crease Line

The matter changes completely for the front pattern pieces. The shape of your quadricep will determine where the crease line goes. I’ve spent too much time looking at body images on the internet. From my own research, upper thigh development looks very different between men and women. This makes sense. Our pelvises are shaped differently, so the muscles between the pelvis and knee will take on different shapes and sizes depending upon gender and build.
Focusing on the front plane of the body, what shape does your upper thigh take if you were to slice a cross section and look at it? That’s the question. If your upper thighs are symmetrical, forming a nice semi-circle, then the crease line will be at the center of the crotch level. That’s because if you draw a line parallel with the frontal plane, the point at which the curve and straight line meet is where the crease line needs to go. For a perfect semicircle, that tangent point is centered perfectly along the semi-circle.

Here’s a figure showing a perfect semi-circle with the tangent line parallel with the frontal plane. The point at which the semi-circle and tangent meet is the tangent point, point A, and where the crease line needs to go. On a perfect semi-circle, the distance from the tangent point to the side seam and to the inseam is the same, 313.883 px. Notice that the pant fabric (black line) has even ease around the body. This is important. If the ease around the body is uneven, then the pants won’t fit right.

If your quadriceps’ mass is more lateral, like Ryan, the crease line will be shifted laterally towards the side seam. The crease line is the tangent point, point B. This is the point at which the tangent line and ellipse meet. Point A is the original location of the crease line. You can see point A is no longer the point at which the ellipse and the tangent line meet. The distance from the crease line to the side seam and inseam is now different. Your crease line will no longer bisect the crotch level; it will no longer be in the center.

If your quadriceps’ mass is more towards your inseam, the crease line will also have to shift medially towards the inseam. Look for the tangent point, point C. That’s where the crease line needs to go. Point A, the crease line’s original location, is no longer the point at which the ellipse and tangent line meet, so it cannot be the crease line location now. The tangent point is where the crease line goes.
Why Shape Matters
I went through muslin after muslin with Ryan because I kept drafting pants with the crease line at the center of the crotch level. Every version resulted in awful draglines at the crotch. Lesson learned. The crease line doesn’t have to be at the center of the crotch level. Even if the width of your pants at the crotch level is sufficient, it’ll look like you need more or less room depending on how your body warps the fabric.

In all the examples above, by shifting the location of the crease line to match the tangent point, the amount of ease around the thigh remained equal from side seam across to the inseam. However, if you leave the crease line in the center of the pant, point A, the ease around the leg will be uneven.

The example of more mass towards the inner thigh shows an extreme of what happens if you leave the crease line in the center at point A. Your inner thighs will have NO ease and will be pulling the pants horrible around the crotch. Not a good look. Doesn’t feel great either.
Shape matters! I really want to jump up and down and make this clear. Even if you have all the right widths and lengths for a pair of pants, they can feel simultaneously tight and baggy if the crease line isn’t in the right place! You’ll have too much ease in some areas and not enough ease in others.
Putting It All Together

Drawing the final version of the pants when you have the main levels and crease line has it’s own tricks and such. I’m giving myself too much to do, but that needs to be another post at some point. Here is Ryan’s final version of his pant block.
I didn’t talk about fitting above the hip line, just remember to smooth the fabric and don’t distort the crosswise or lengthwise grain lines. If you are trying to drape on your own body, pin around at the hip line and then smooth to form the waist line. The draping video started at the hip line too and gently smoothed to create the waist line. This suggests that the hip level really is the lynchpin for whether the pants are plumb. More on this later. Fingers-crossed.
Conclusion
Thanks for taking the time to read this overly detailed description about how to adjust pants to fit your quadriceps. Obviously, my knowledge is limited to my experience, and as I learn more about different bodies, I learn more about fitting. Thanks for following along with my pant fitting journey!
Love all the fitting details! Thanks so much for documenting your process as it is really helping me with some of the issues I’ve encountered. I progress, then it becomes all too hard and I give up for a while, but now I’m enthused to have another try at this elusive goal!
LikeLiked by 1 person
You just perfectly described the process and emotions everyone has experienced when trying to fit pants! It’s definitely a continuous process of enthusiasm, energy, obstacles that make you feel defeated, and so on. Best of luck with your progress!
LikeLike
The diagrams you drew were really helpful. Thinking about the placement of the creaseline and keeping it on grain makes so much sense! Thank you.
LikeLiked by 1 person