I’m forever on the hunt for relaxed pants, and unfortunately I do sometimes have to leave my house in something other than joggers. My lower pelvis and right leg like to get cranky and swell from time to time, so restrictive clothing just isn’t something I’m willing to force myself into. Comfort over fashion, always!
Deciding on a Pattern
I’ve been researching all the new outdoor and trail pants available, but each one has had their drawbacks. I had fitting issues with the Leila Makes Topo Pants because the pants aren’t balanced at all! I even did a whole 5-part blog series about that pattern. Despite making changes to improve the balance, my test versions never turned out well enough to move forward with the pattern.
I’ve also studied the Road Trip Pattern Co. Cascadia Jogger (digitally, at least). This pattern is quite a bit more complex because it has numerous panels. As far as I could tell, there are also some balance issues, and given all those panels, adjusting the fit felt like more than I was willing to undertake at the moment.
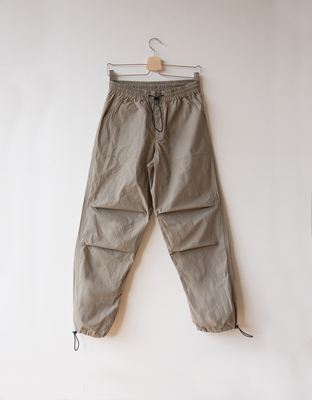
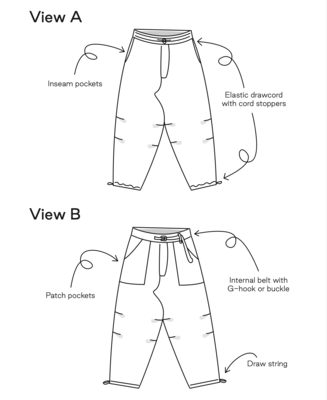
I’ve had the Indigo Indigo Low-Waste Trail Trousers on my list for a while, so I decided to give them a go. The pattern is straightforward and includes nice details like an elastic drawcord with cord stoppers or an internal belt with G-hook. I also appreciated the drawstring cord at the hem, knee pleats (instead of darts) for mobility, and patch pockets. So let’s get into the style and fit of this pattern and go over some of the issues I encountered.
Style and Fit Analysis
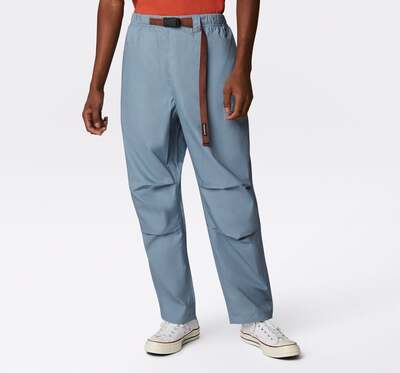
Spoiler alert: the Indigo Indigo Trail Trouser pattern looks strikingly similar to ready-to-wear Converse trousers. I’m not sure who influenced whom. The Trail Trousers feature a relaxed fit with straight side seams, knee tucks for mobility, an elastic waistband with drawstring or integrated belt option, faux fly, adjustable hems (drawstring or elastic cord), back pockets, and your choice of side pockets or patch pockets in the front.
Measurements and Charts
The limited size range for this pattern is really unfortunate. I know the look is completely different, but I would recommend the ZW Block Pant if you are looking for low-waste trousers in larger sizes. And I will always recommend Muna and Broad patterns as well. They aren’t low-waste, but they are definitely size inclusive.

My current body measurements are 39-inch bust, 33-inch waist, and 43-inch lower torso using the measuring band method. I made the size L pattern since the pattern does run big and I figured going all the way up to a size XL would be too much ease.
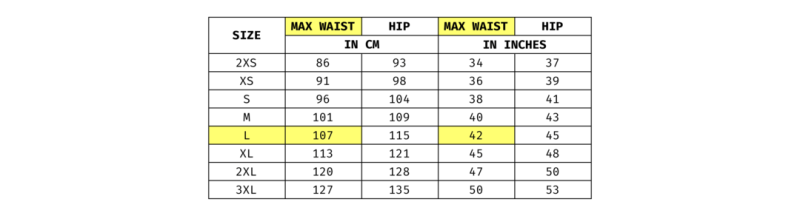
As with all elastic waistband pants, you need to make sure the fully stretched out waist (i.e., max waist) will fit over your hips. Thankfully, this pattern is drafted so that the max waist is the same as the hip measurement used to pick pattern size. Whew! The pattern has 3 inches of ease at the hips if you are between sizes and trying to decide if you should size up or down.
Drawing the Pattern Pieces
The pattern contains incorrect measurements for drafting the front pattern.

The pattern is low-waste, meaning it utilizes as much of the fabric as possible. The pattern pieces are going to look a little different than traditional pants. Rather than providing PDF pattern, you are required to draw out your pattern based on measurements given. Their measurement guide is incorrect for several sizes. Size XS says the front hem should be 22.8 cm. That is incorrect. The front hem should be 23.3 cm. For size L, the front hem should be 26.8 cm and not 25.2 cm. I emailed the company about this issue, but never received a reply.
Fabric Selection
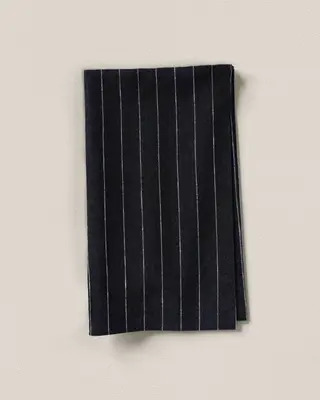
I had such a hard time picking fabric for this project. I ended up going with Pinstripe Linen Cotton Denim from Matchy Matchy Sewing Club. The fabric is 60% linen / 40% cotton, 53 inches wide, and 5.9 oz or 200 gsm. This was my first time using fabric from Matchy Matchy. I don’t know what I was expecting. Fabric that had a tighter denim weave for sure. This fabric ended up feeling like a very thin french terry towel. The fabric works and is OK. When I was envisioning 5.9 ounce denim, I was thinking a dense weave, thinner fabric instead of the chunky thread, loose weave I got.
This is why weight or gsm isn’t fully informative on its own. Two fabrics can have the same weight but feel completely different in your hands. You can artificially increase gsm by going with thicker thread and a looser or more open weave, which gives you a bulkier, more textured fabric. Or you can achieve that same weight with finer thread in a tighter weave, resulting in a smoother, denser fabric. Both might be labeled 5.9 oz, but one feels like a burlap sack and the other feels like smooth silk.
This is exactly what happened with my fabric choice. I was expecting that classic denim hand, something with structure. Instead I got something rough with a soft drape. It’s not bad fabric at all. It’s just not what the weight alone led me to expect. This is why thread count and weave structure are also helpful pieces of information when you’re shopping for fabric online. Weight tells you one part of the story, but it doesn’t tell you the whole story.
Finding Drapeline and Balance Lines
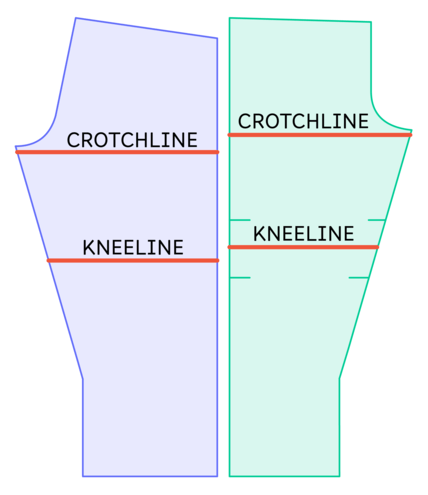
First, draw the kneeline and crotchline
Kneeline: On this pattern, locating the kneeline is straightforward. It sits exactly halfway between the two knee pleats. Simply find this midpoint and mark the corresponding position on the back piece.
Crotchline: This line falls slightly below the bottom of the crotch curve. Draw it parallel to the floor, positioning it so it passes through the point where the inseam meets the crotch curve at the seamline (excluding seam allowance).

Next, find the midpoint of the hem and the midpoint of the kneeline.

Finally, draw the drapeline. This line should start at the midpoint of the hem, pass through the midpoint of the kneeline, and continue as a straight line up to the waistline.
Note that the drapeline will not be perpendicular to the hem because the side seam is straight rather than curved. If you wanted to balance the hem, you could add a subtle curve to the bottom. However, if you’re adding elastic to the hem, this slight unevenness won’t be noticeable.
Checking Pattern Balance
Pant balance refers to how the front and back pattern pieces of pants relate to each other in terms of length, grain alignment, and proportions. A balanced pant pattern ensures that the inseams and outseams are compatible lengths, the grainlines are properly aligned, and the shaping of each piece matches so the pants hang smoothly and perpendicular to the floor without twisting.
Balanced pants hang straight and smooth because the pattern pieces work together harmoniously rather than pulling against each other. Unbalanced pants won’t hang straight, may have unnecessary drag lines or wrinkles unrelated to fit, and the front and back pieces will generally be fighting against each other.

First, fold out the pleats on the front pattern to eliminate the extra length they add.
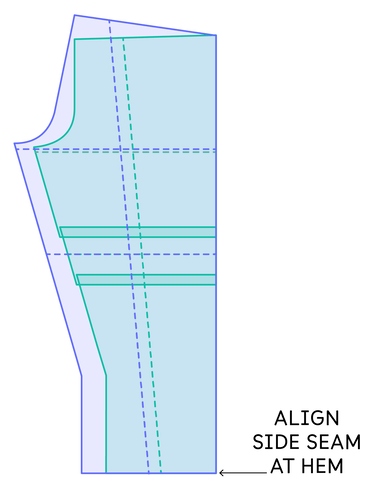
With the pleats folded, start by aligning the front and back side seams at the hem.

First question: do the side seams match from the hem to the knee?
The answer is yes, since both side seams are straight.
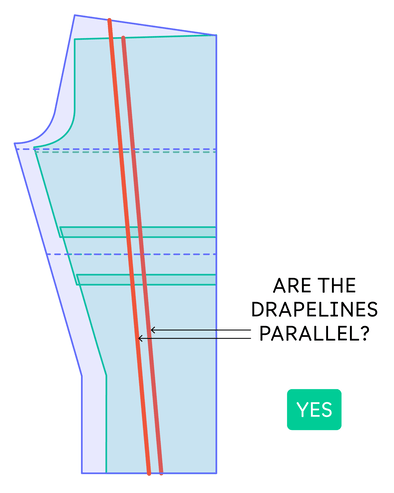
Second question: are the drapelines parallel?
The answer (surprisingly) is yes! When working with straight side seams, it doesn’t take much (i.e., slight shift in midpoint placement at the knee) to change drapeline placement.
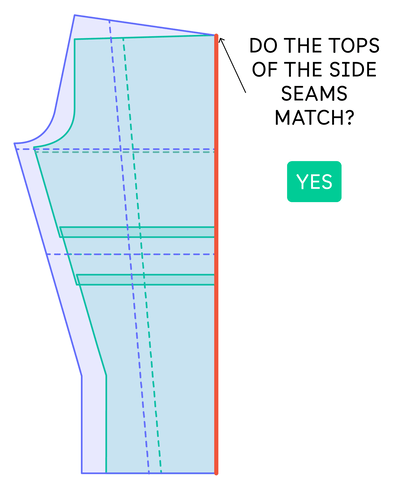
Third question: Do the tops of the side seams match?
Again, yes. This is a good sanity check for your pleat depth. If you didn’t fold out enough fabric for your pleats, the side seams won’t align at the top.

Next, with the pleats still folded out, align the front and back inner seams at the hem.

Fourth question: Do the inseams match from hem to knee?
The answer is yes, even with the slightly unexpected shape.

Fifth question: Are the crotch curves on the same level? The back can be up to 3/8 inches lower.
Yes! This is another good sanity check for your pleat depth. If you’ve taken out too much or too little, the crotch levels will not be close.
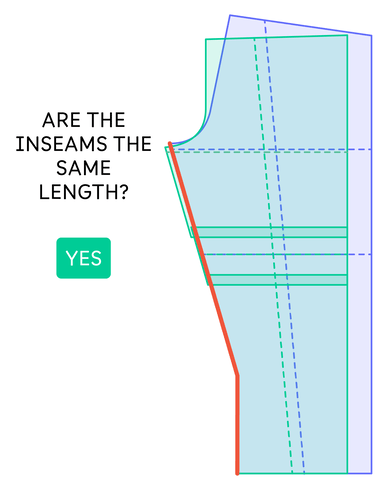
Final question: are the inseams the same length?
When walking the inseams along the stitch line, the back piece can be up to 3/8 inch shorter than the front. For this pattern, the inseam lengths were appropriate.
Since all six questions were answered with “yes,” the pattern meets the requirements for being balanced.
Troubleshooting
Besides the wrong front hem values for size XS and L. There are several other errors, typos, and confusing language and methods with this pattern. The incorrect or unclear wording is highlighted in yellow.
Order Enough Fabric
My fabric was 135 cm wide. I ordered 229 cm. Unfortunately, I needed at least 275 cm. The pattern recommends 218 to 225 cm of fabric that is 110 cm wide, which won’t be enough if your fabric shrinks even a little bit in the wash.
Typos and Confusing Language
Page 4, under the size guide table:
The trouser has a loose fit and a lot of ease around the thighs and calfs. If you want a tighter fit it is recommended to go down one size from your usual.
Calves is misspelled, and the phrase “from your usual” is unclear. I assume they mean one size down from the size that matches your body measurements, but the wording could be clearer.
Page 19, bottom of the page:
Tips: All seams that are overlocked can alternatively be finished with bias tape. And all topstiching can be double.
Odd Instructions
On page 20 you’ll find the instructions for attaching the back pocket. Page 23 begins the section on how to attach the front pockets for View B. It states:
Press in a double 1 cm fold on the slanted side of the patch pocket and on the top of the back pocket.
By this point the back pockets have already been attached, so this line doesn’t make sense in the order it appears.
Finish the Center Back Seam Before Sewing the Inseams
Up to this stage the center front seams have been finished with an overlock or zigzag stitch. The front and back pieces have been joined at the side seams, and the side seams have been finished and topstitched.
On page 25, the instructions have you sew the inseams.
Place the front piece over the back piece, right side to right side, and sew a straight stitch along the entire inner seam. Then overlock the inner seam. Press the seam allowance towards the back of the trousers and sew a topstitch over the seam allowance.
On page 26, you sew the two legs together around the crotch curve and overlock the remaining center back seam, since the center fronts are already finished.
From the wrong side, sew a straight stitch along the curve of the fly pieces and then along the entire crotch curve, fastening the two legs together. Overlock the remainder of the crotch seam, overlapping the overlocked front pieces towards the fly.
I understand that English is not the pattern company’s first language, which explains some of the odd phrasing. But there is no practical reason to finish the center back crotch curve after the legs are already sewn together. It also makes no sense for the overlocking to start somewhere along the center front when the center front seam is already finished.
Thankfully the instructions have you press the center seam to the left and topstitch. Otherwise you would end up with part of the center front pressed open but the center back unable to open flat, since the two sides would be overlocked together.
Bottom line, finish the center back seams right after step 5 (page 22 for View A or page 24 for View B) before sewing the inseams or joining the legs at the crotch. Below is the YouTube sew-a-long with the odd construction method.
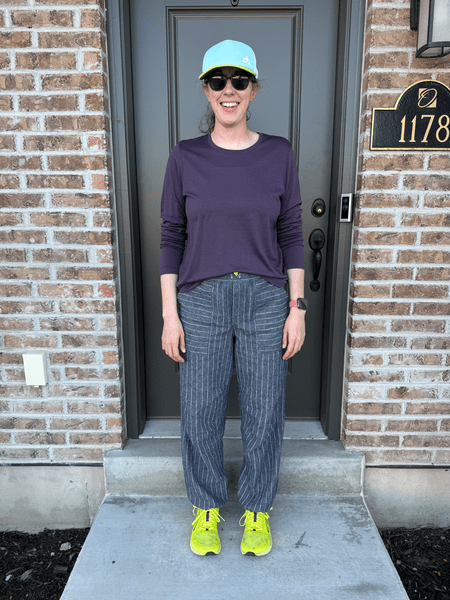
Final Fit Notes
I did not make any changes to this pattern. It fit me just fine with no alterations.
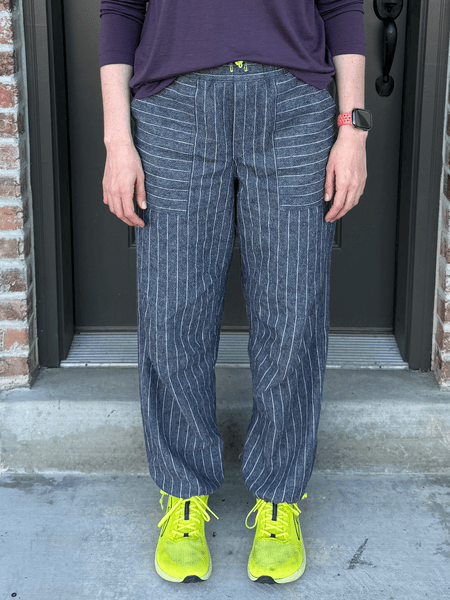
The pants swoop slightly below the knee, something I noticed on all the digital avatars as well. Despite this design feature, the pants fit great and the swooping doesn’t cause any twisting or binding during movement. I’m not sure if this is due to the shaping on the lower legs, the front knee pleats, or the straight side seam design.
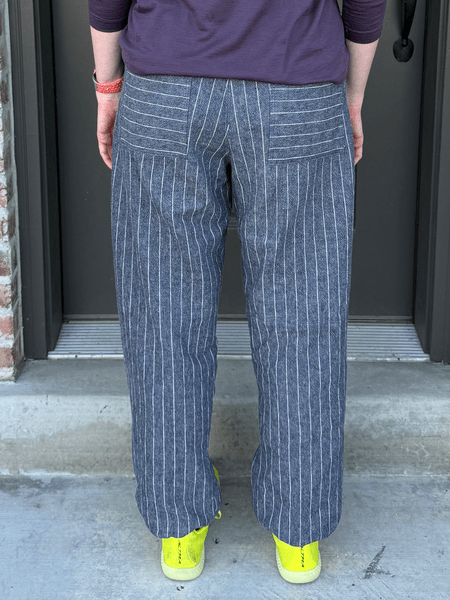
The right leg is pieced together since I didn’t have enough fabric to cut it out as a single piece. I think I did a good job hiding the seam at the knee level.
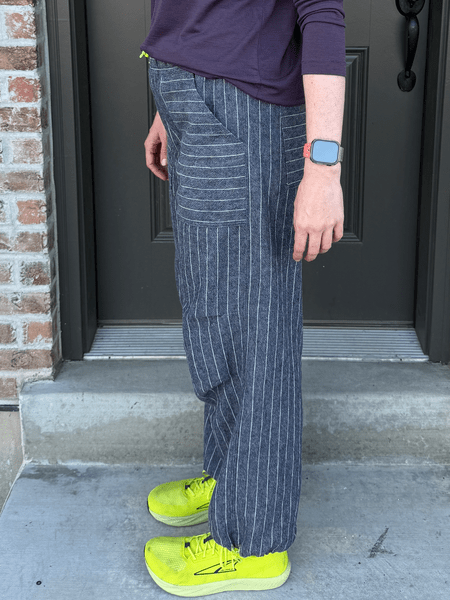
Proudly showing off the skill I learned from Bespoke Educator’s pant course: hiding the seamline between pinstripes so the side seam looks seamless!
Beyond the Seams
I’ve really enjoyed two things these past few weeks. First is this BBC series looking at historical garments, but even better, recreating historical garments with traditional methods! Every episode is absolute fire.
Dovetailing with many themes from the BBC series, I finished reading “Status and Culture” by W. David Marx. The book provides a fascinating framework for understanding status, culture, trends, and fashion. Marx wisely sketches foundational ideas without getting bogged down in particulars. The book would be exponentially longer if he started pulling the threads on each idea and following them to their conclusion.
What struck me most was his argument that status hierarchies are not a modern capitalist invention or cultural aberration, but a fundamental feature of human social organizations. Wherever humans form groups, status distinctions emerge. And crucially, status is zero-sum. Not everyone can simultaneously be high status and for every person who rises, someone else must fall.
What changes over time isn’t the existence of status competition, but rather what confers it. Status derives from various forms of capital: economic (wealth, property), social (networks, relationships), cultural (knowledge, education, taste), and occupational (jobs, titles). In one society it’s warrior prowess; in another, scholarly achievement; in another, wealth accumulation or artistic taste. But the underlying human drive to differentiate ourselves and climb social ladders remains constant. Status dynamics are always at play.
Sewing Community’s High-Status Claim
I read this book seeking a new lens for understanding the social dynamics and changes within the sewing and knitting communities over the past decade. As someone who tries not to follow trends and get sucked into popularity contests, I felt somewhat excoriated, because no one can actually avoid status dynamics. Avoidance is, in itself, a status signal.
I know this will sting, but anyone who has ever stated that something is “handmade” is signaling higher status, broadcasting an embodiment of values like sustainability, craftsmanship, and self-sufficiency. Being part of this knowledgeable, skilled group sets us apart. The sewing community itself is a high-status claim. Yup, that stings!
If that wasn’t painful enough to acknowledge in yourself, consider what happens as these communities grow in person or on platforms like Instagram and Facebook. They hit a classic status paradox: when everyone in the group can sew, mere participation no longer signals distinction or high status. So status seekers need new differentiators within the sewing community: large fabric stashes, enormous sewing rooms, expensive or exclusive fabrics, limited-edition vintage machines, or virtue signaling about zero-waste practices or ethical sourcing. Status can also be conferred based on skill hierarchies: whose fitting method is superior, or what is the “correct” way to attach a zippered fly. Think, too, about how sponsored posts or being a pattern tester for a company clearly signals status. The markers are endless as to what constitutes status signaling, since it constantly shifts and changes like any type of fashion or culture.
Go ahead and claim that being in a group with people who understand and can sew is fun because it allows you to commiserate with people about a hobby you enjoy. That doesn’t negate the status dynamics that will inevitably be at play, even in these shared hobby groups. These groups always risk spoiling the fun of a hobby.
Toxic Dynamics of Status Competition
Traditional forums and discussion boards, and groups in general, often collapse under the weight of these dynamics. We reflexively reward high-status members while ignoring or punishing those lower in the hierarchy, no matter how hard we try to be inclusive within these groups.
I continue to stick to my belief that purely community-building groups cannot exist. Even organizations founded on knowledge-sharing inevitably create hierarchies where expertise confers status. I have witnessed this in academia repeatedly. High-status researchers sabotage those beneath them to maintain their position: they deny grants, reject manuscripts, refuse to cite competing ideas, shame and intimidate people at conferences and meetings, misrepresent competing research as straw men, and so on. The same pattern plays out in craft communities with depressing regularity.
It’s no surprise that every few months social platforms flare up with some new drama. These stories follow a familiar pattern: “Shoppers loved the ‘fabric queen’. Then, order by order, her story fell apart“. In other cases a creator gets accused of stealing or copying something, and followers jump in as a way to signal their own status. Or how often do you see people misrepresenting a fitting method or sewing technique as a straw man only to tear it down to prove their way is better? Yes, people steal, lie, and cheat to elevate themselves; there is a whole section in the book about this. But here is what is equally insidious: those who already hold high status engage in equally toxic behavior to prevent anyone from usurping their position, whether they realize it or not. Just like researchers, high-status makers gatekeep techniques and resources, brush off newcomers’ questions and contributions, shame those who don’t follow “proper” methods, refuse to acknowledge or share others’ innovations, weaponize call-out culture to target potential rivals, and misrepresent others’ work or intentions to discredit them. These spaces stop being about sewing, knitting, or making. They turn into arenas for status competition!
If you do not believe me, just think about Me Made May or Frocktail events. Both of which act as status marketplaces that you must pay or perform to enter. Or the ever increasing creator communities (Patreon, Substack, Mighty Network, Kajabi, etc.) of big names in sewing that reward visibility and consolidate influence under high-status figures.
Anyway, I’m still processing how this book absolutely called me out, even though I try not to get caught up in status and fashion trends. I still make my own clothes, and compared to those around me, this definitely gives me higher status, whether I like it or not. Marx’s framework makes it clear: you cannot avoid status dynamics. They’re woven into the fabric of human social life. The best you can do is recognize them for what they are and make peace with your choices in the end.
My next read during the Holiday break: “Enshittification: Why Everything Suddenly Got Worse and What to Do About It” by Cory Doctorow. I know, just the upbeat, positive, heart-warming book I need right now (insert sarcasm). It’ll be a great time for reflecting about how capitalism has optimized the joy right out of the holidays.

IF YOU FOUND THIS POST HELPFUL, CONSIDER SUPPORTING MY WORK BY SIGNING UP FOR A PAID SUBSCRIPTION.
POSTS OLDER THAN 3 MONTHS ARE NOW FOR SUBSCRIBERS ONLY — YOUR SUPPORT KEEPS THIS SPACE GOING.
INTERESTED IN SUBSCRIBING TO RECEIVE NEW POSTS IN YOUR INBOX?


Leave a comment