MYOG: How to Sew a Lapped Zippered Side Pocket

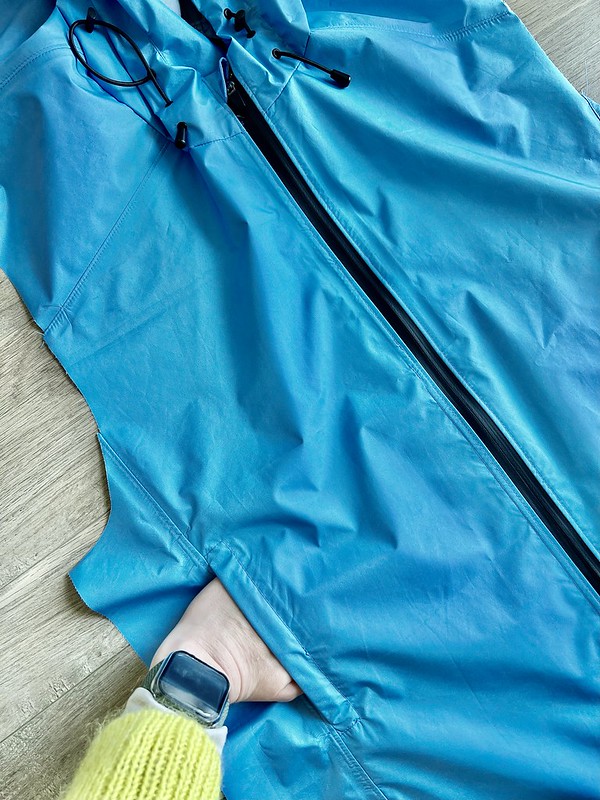
I was stumped on how to design a side pocket for our rain jackets, but eventually, I got it figured out.

Inspiration

A common method is to inset the zipper, leave it exposed and add a shield at the top to prevent water from getting in. The zipper shield is a great idea for zippers that aren’t placed along a side seam.

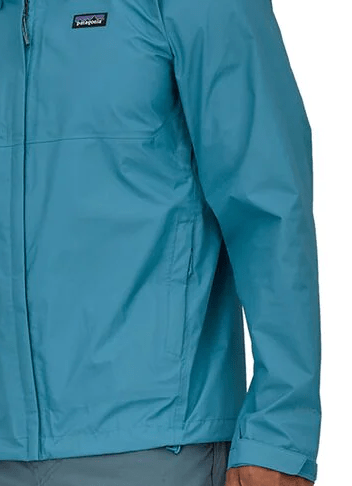
However, I wanted my zipper along the side seam and didn’t want it exposed. Adding a flap would protect the zipper from water. My goal was to make a zippered side pocket like the one on Patagonia rain jackets.

My Method

I was thrilled when I found this YouTube video. It is nearly identical to the method I show in this post. I just improved a few steps here and there:

Mark the pocket opening location and interface the wrong side of the jacket and the wrong side of the pocket lining. I define the wrong side of the lining as the outside of the pocket. For reference, my zipper is 6 inches long and 1-1/4 inches wide. You will want at least 1-¼ inches at the top of the pocket. The depth of the pocket is up to you. Make sure the pocket is also wide enough to line up with the center front of the jacket.

With the right sides together, baste the pocket lining and jacket together. My seam allowance is 5/8 inch, so I basted just shy of 5/8. I was careful not to poke holes outside of the 5/8 seam allowance. Holes in the fabric mean water can get inside, so be careful when sewing and basting.

Stitch around the pocket opening. Clip into the corners and trim the seam allowance.

Here is a close-up of how to clip into the corner and trim the excess.

To prevent the lining from showing, understitch the pocket lining to the seam allowance.

Flip the pocket inside so that the wrong sides are together. Next, place the zipper so that the slider touches the pocket lining. Finally, line the edge along the middle of the zipper tape. My zipper tape extends 1/4 inch past the edge.

I’ve overlayed a zipper so you can see what it should look like. The overlayed zipper is facing up. Notice that the edge is in the middle of the left zipper tape.

To ensure the zipper does not move, use tape to hold the zipper in place.

Stitch across the top of the zipper, down the middle of the zipper tape, and across the bottom of the zipper.

Apply seam seal tape over the stitches.

The seams on my pocket were sewn together using a French seam. First, place the pocket outsides together. In other words, the wrong sides are facing each other. Then, using a 1/4-inch seam allowance, stitch the top and bottom together.

Trim the seam allowance to 1/8 inch.

Turn the pocket so that the insides are facing each other, and using a 1/4 inch seam allowance, stitch the top and bottom together, hiding the raw edge.

The pocket should be taking shape now.

Baste the zipper tape and pocket lining together just shy of 5/8. This will be used as a guide when stitching the side and front panels together.

With a 5/8 inch seam allowance, stitch the side panel and front panel together. Use your basting stitches from the previous step as a guide across the zipper. Make sure you do not catch the flap covering the zipper.

Press the seam allowance toward the side panel and topstitch 1/8 from the edge.

Trim the seam allowance.

Apply seam sealing tape.

The pocket opening is finished. The last step is to close the pocket under the center front zipper.

When you attach the front zipper, before topstitching, trim the pocket so that the raw edge is concealed under the zipper’s seam allowance. It helps to use masking tape to hold the pocket since you cannot pin it to the jacket. Next, topstitch the zipper and apply seam sealing tape along the zipper edge.

There you go!

One thought on “MYOG: How to Sew a Lapped Zippered Side Pocket

Add yours

Leave a Reply

Fill in your details below or click an icon to log in:

WordPress.com Logo

You are commenting using your WordPress.com account. Log Out /  Change )

Facebook photo

You are commenting using your Facebook account. Log Out /  Change )

Connecting to %s

This site uses Akismet to reduce spam. Learn how your comment data is processed.

Website Powered by WordPress.com.

Up ↑

%d bloggers like this: