
Of course, I can provide an in-depth analysis of sewing and fitting underwear! I finally tried out Sophie Hines’s Median knicker pattern and was not disappointed.
Analyzing Style
I don’t have a center grainline to study, but I thought it would be interesting to look at some of the features of the Median knickers. The underwear has a high waist, so it should sit at or above your belly button. The knickers also have full coverage for your butt, and the crotch is cut wide to help everything stay in place.

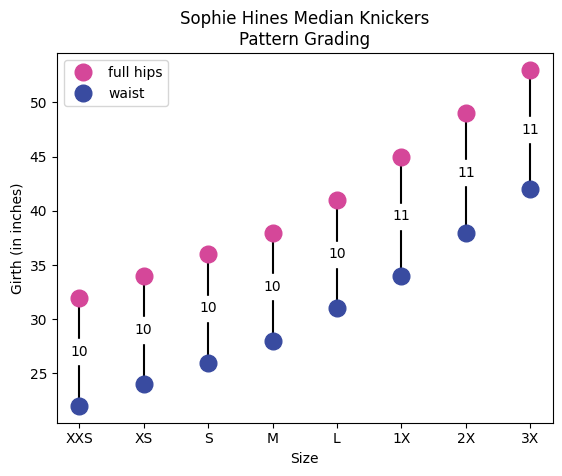
As you will find out, I actually went up a size for my pattern pieces, which got me wondering about the drafting of the pattern. I was curious and made some plots. First, I plotted the body measurements for the waist and full hips for each size and compared the difference. I didn’t have any hypotheses and wasn’t expecting to find anything. I was simply curious to see the distribution of body measurements for the pattern across sizes. The waist and hips increase linearly for the smaller sizes (XXS – M). There’s a 2-inch difference between the sizes and a consistent ratio of 10 inches between the waist and hip measurements. For the larger sizes (L – 3X), the waist and full hips increase more, and the waist-to-hip ratio is larger too. From sizes M to 1X there’s a 3-inch difference between sizes, and from sizes 1X to 3X there’s a 4-inch difference. This difference will impact how you select a size, especially if you are “between” sizes. I don’t think you can immediately claim to size down.

Next, I plotted the waist body measurement versus the waistband elastic measurement to see if there was or was not consistent negative ease across the sizes. When I plotted the data, they showed variable negative ease across the sizes. For example, the waistband elastic for size XXS is cut 1 inch smaller than the body measurement. However, for the 3X size, the waistband elastic is 4 inches smaller than the body measurement. This is why if you are between sizes or just unsure about your size, look at the waist and leg band elastic to aid in your decision instead of automatically sizing down.

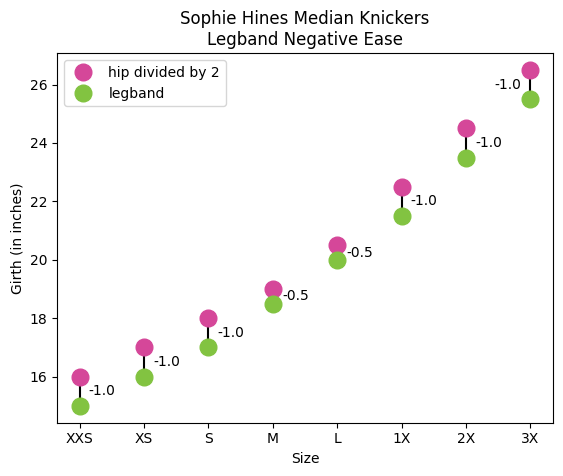
Finally, I compared the leg band elastic measurement with the full hip measurement divided by 2. I understand that taking half the hip measurement is not the same as the girth around the upper thigh, but I thought this figure was insightful nonetheless. The pattern does not include upper thigh body measurements, so halving the hip measurement is the closest option. Not sure what is going on with sizes M and L, but all other sizes have a 1-inch negative ease for the leg band. I think upper thigh measurement is more important and helpful than full hip measurement for determining the correct size for this pattern.
Determining the Correct Size
Here are my current body measurements: waist at my natural waistline is 34 inches, and my full hip is 44 inches. However, let’s take some additional measurements. At the level I want my waistband to actually sit, I measure 38 inches. Around my upper thigh is 26.5 inches. I found that these latter measurements are more helpful in determining the correct size.

If using just my natural waist (34 inches) and full hip (44 inches) measurements, that would suggest I need to make a size 1X. However, I found this size too small, particularly around the leg opening. If I use my preferred waistband measurement (38 inches), this suggests I should make a size 2X.

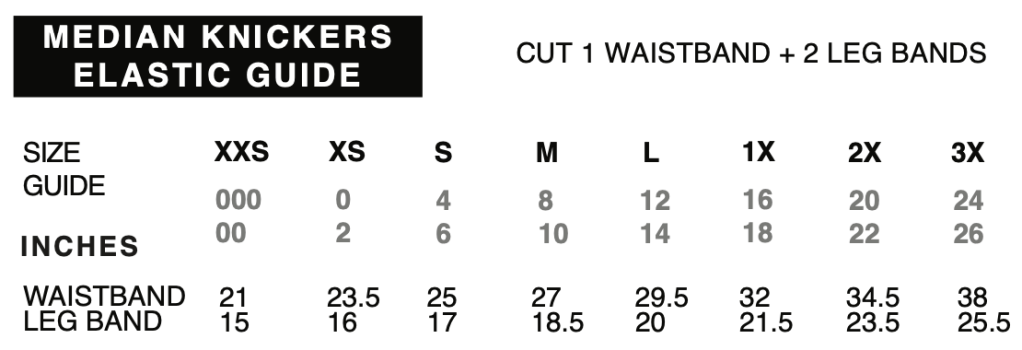
Now, if I consider my upper thigh measurement of 26.5 inches and compare that to the leg band length, I can see that size 1X gives me 5 inches of negative ease (26.5 – 21.5 = 5). That means the leg band has to stretch 5 inches to fit! I’m guessing I need 2-3 inches of negative ease at most for my leg band. Size 2X would give me 3 inches of negative ease (26.5 – 23.5 = 3). Between my updated waistband measurement and the leg band negative ease, I made a size 2X and not a size 1X.
Tips and Tricks
I hate attaching elastic. It’s like trying to catch a greased pig. The fabric and elastic are constantly running away from each other. No amount of pins can hold them together. And no matter how careful I am, I always miss the fabric between the fold-over elastic. Once the fold-over elastic is closed, it is a pain to undo the stitches and shove the fabric back inside. I tried several methods to improve my chances that the fabric would always stay sandwiched between the fold-over elastic: washable glue stick, double-sided tape, pins, clips, and hand basting. I found hand basting the most reliable. The glue and tape were way too messy and sticky. Pins and clamps are just too unreliable.

First, I pin the fabric to the fold-over elastic. I line up the raw edge of my fabric with the center line of the fold-over elastic, where I will eventually fold the elastic. I place my pins perpendicular to the fabric’s raw edge. If the pins are parallel to the raw edge, when I stretch the fabric to baste, I’ll just launch them everywhere.
I follow the quartering method to ensure I’m stretching my fabric correctly. Once quartered, I add a few more pins.
Next, I baste the elastic and fabric together. I stretch the fabric slightly when basting, and I use small stitches.

At the machine, I fold the elastic over, covering up my basting stitches, and stitch the elastic closed in one pass. I like to use a three-step zigzag stitch set to 6.0 mm stitch width and 2.0 mm stitch length. A three-step zigzag helps eliminate tunneling of the elastic. I finish by removing my basting stitches.
It might take a bit extra time to hand-baste the elastic. But it takes no time at the machine to quickly sew the fold-over elastic closed in one pass. The peace of mind of knowing you are always catching fabric in between the fold-over elastic is worth it.
Fabric and Notions

For my fabric, I used microlyrca Air in the panty cut (27 by 26 inches). It’s not the most economical use of fabric, but I get an assortment of fabric colors this way. The material is extremely lightweight, so I used the standard ¾ inch fold over elastic in matching colors. I’m obsessed with the fancy fold-over elastic, but I thought it would be too heavy for the lighter-weight microlyrca air fabric. Because I love these undies so much, I’ve already purchased a couple of their period panty kits so I can always have comfortable underwear.
Alterations

I made a few adjustments to the pattern once I determined my size. I needed to lower the waistband to my preferred location. The center front was lowered by 4.25 inches, and the side seam was lowered by 3.5 inches.

The waistline for the entire back piece was lowered by 3.5 inches.

Finally, I used the crotch width for the size XXS pattern and redrafted the crotch piece. The size 2X crotch width was too wide for my body.
Conclusions
What can I say? I love everything about my new knickers, and I love the rainbow of colors!

This is a really interesting way to determine what size pattern to use. I have always struggled with it.
And, I like the way you attached the FOE. Hand basting other fabrics h slippery fabrics has worked well for me.
LikeLiked by 1 person
I bought a big spool of basting thread and needles. With it always ready and available, I’ll baste anything I can. It’s become my default method over pins or clips.
LikeLiked by 1 person
Great idea about keeping basting thread by your machine! I also like seeking how you hold your hands and needle when basting. I’m always interested in improving my skills.
LikeLiked by 1 person
I just found you via Pinterest. Your writing style is great, entertaining and informative, without annoying grammar or spelling errors. I am just starting to write about sewing on my own blog. I’m looking forward to reading yours more!
LikeLiked by 1 person
Thank you so much! I know I have typos and grammar issues hiding out in my writing, but I work hard to be clear and informative. I’ll have to check out your blog, as I love to hear about other people’s sewing experiences too!
LikeLiked by 1 person
When I change thread on my machines, keeping the one-way rule, I thread the clippings and they’re ready for marking and basting.
LikeLiked by 1 person