Vinyl Covers for Babylock Machines

I got a new machine last year and needed to make a cover. So I thought this would be perfect for updating all my serger/sewing machine covers. This was a super-fast project. It just requires some careful measurements, which is why I’m writing this post. I want to make sure I never lose my measurements because I got them wrong the first time around.

Materials

First, it will be helpful to have a hairdryer. You use the hairdryer to soften the vinyl. This helps when you need to turn the covers inside out. Those corners are pesky, and a hairdryer makes it so much easier.

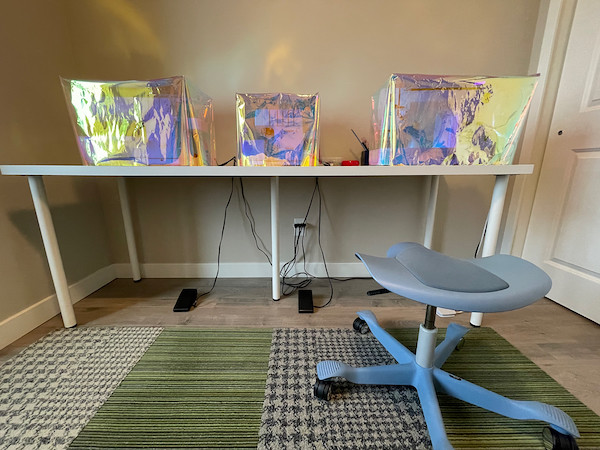
I only needed 2 yards for 12 gauge vinyl to cover all three of my machines. I got my vinyl from Big Z Fabrics: Tinted Plastic Vinyl Fabric, Multi-Color (12 Gauge).

I didn’t need any other unique materials. I just used a fresh needle, and my Babylock Jane and I had no problems sewing the vinyl.

Pattern

The last time I made covers for my machines, I used the idea from Closet Core. I used the same concept for my vinyl covers but left my corners square instead of rounding them. I also didn’t need to fold a hem since vinyl doesn’t fray. Of course, you could always add bias tape on the bottom of the raw edge if you want a cleaner finish.

Jane

My beloved workhorse

Here are the measurements for Jane: width is 21 in, height is 12.5 in, and depth is 9.5 in. These measurements accommodate ease and cords. You don’t want the cover too tight.

Cut one piece 22 in by 34.5 in

The main piece needs to be the machine’s width (21″) plus ½” seam allowance for both sides (1″ total) by the sum of the height (12.5″), depth (9.5″), and height (12.5)”. Cut the main piece: 22″ by 34.5″.

Cut two pieces 10.5 in by 13 in

Next, the side pieces are the depth (9.5″) plus ½” seam allowance for both sides (1″ total) by the height (12.5″) plus ½” seam allowance at the top only. You don’t need to add seam allowance to the bottom since there’s no seam or hem. Cut the two side pieces: 10.5″ by 13″.

Imagine

My knit fabric shark

Here are the measurements for Imagine: width is 14 in, height is 12 in, and depth is 12 in.

Cut one piece 15 in by 36 in

The main piece needs to be the machine’s width (14″) plus ½” seam allowance for both sides (1″ total) by the sum of the height (12″), depth (12″), and height (12)”. Cut the main piece: 15″ by 36″.

Cut two pieces 13 in by 12.5 in

Next, the side pieces are the depth (12″) plus ½” seam allowance for both sides (1″ total) by the height (12″) plus ½” seam allowance at the top only. Cut the two side pieces: 13″ by 12.5″.

Euphoria

My precious

Here are the measurements for Euphoria: width is 21 in, height is 14 in, and depth is 13 in.

Cut one piece 22 in by 41 in

The main piece needs to be the machine’s width (21″) plus ½” seam allowance for both sides (1″ total) by the sum of the height (14″), depth (13″), and height (14)”. Cut the main piece: 22″ by 41″.

Cut two pieces 14 in by 14.5 in

Next, the side pieces are the depth (13″) plus ½” seam allowance for both sides (1″ total) by the height (14″) plus ½” seam allowance at the top only. Cut the two side pieces: 14″ by 14.5″.

Cut Guide

Proof everything fits on 2 yards

Since there is no directionality to the vinyl, I could Tetris the pattern pieces to fit on 2 yards.

Construction

This is EXACTLY how I sewed my corners. The side piece is on the bottom and the long main piece is on top. The long main piece is the one that receives the relief cut when turning.

To sew the cover, start with a side piece and align the “purple” edge with the long main piece on top. Sew using a ½” seam allowance. Stop ½” from the end of the side piece “purple” edge, turn, and sew across the “blue” edge. Stop ½” from the end of the side piece “blue” edge, turn, and sew down the other “purple” edge. Repeat with the second side piece. Clip corners. Using a hairdryer to heat the vinyl, turn the cover right-side out. All done!

Conclusions

I’m pleased with how my covers turned out. The 12 gauge vinyl is perfect. I originally tried 10 gauge, but felt it was too thin. The 12 gauge really holds it shape well.

Now I have pretty multicolor vinyl covers for all my machines! I think I’ll try to make some zippered pouches with the vinyl pieces I have left over.

Leave a Reply

Fill in your details below or click an icon to log in:

WordPress.com Logo

You are commenting using your WordPress.com account. Log Out /  Change )

Twitter picture

You are commenting using your Twitter account. Log Out /  Change )

Facebook photo

You are commenting using your Facebook account. Log Out /  Change )

Connecting to %s

This site uses Akismet to reduce spam. Learn how your comment data is processed.

Website Powered by WordPress.com.

Up ↑

%d bloggers like this: