
After my last few blog posts about fitting tips and tricks when drafting pants, I need to show how I actually draft pants. After drawing dozens of patterns, I do have “my method.” If you need to read my other posts about fitting and measurements, here are the links:
- How to measure for pants
- Crease line placement at the crotch to fit your quadriceps
- Crease line place at the hips
The pants I am drafting here are for a relaxed fit, straight leg woven pants for Ryan. The pants will have a 2-inch elastic waistband, so I don’t need to add darts along the waist. I consider this a good pant block to start with since you can always add darts later to make the waist more fitted and adjust the width depending on the fabric and style you are trying to achieve.
Let’s start at the very beginning

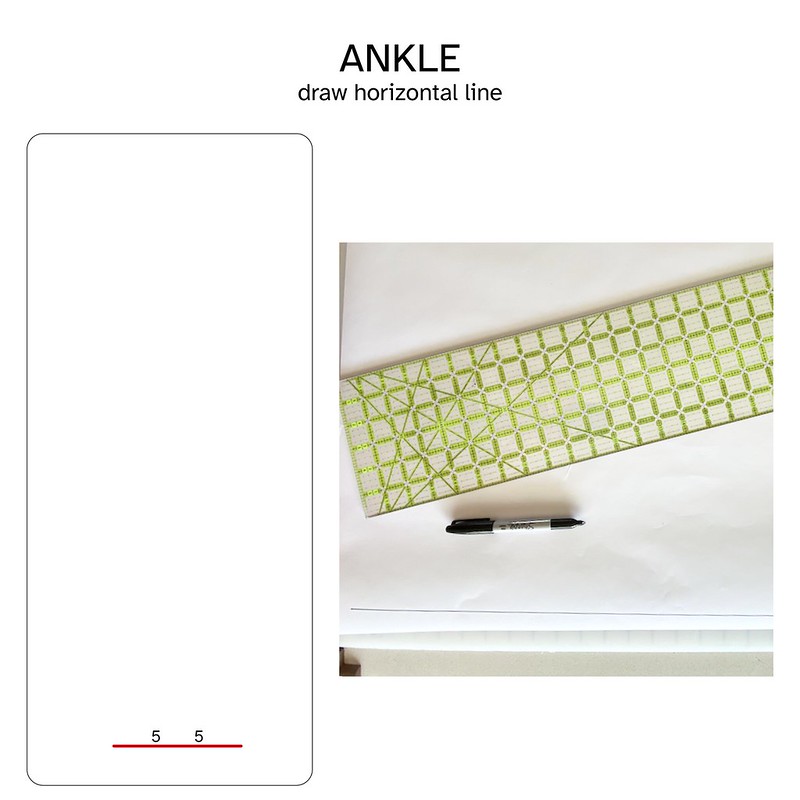
Draw a horizontal line at the bottom of your paper. I don’t worry about the length of the line as I go back and make tick marks for the width.

Draw a line perpendicular to your horizontal ankle line. You want to make sure the perpendicular line, which is your crease line, is in the center of your ankle. I usually just draw a long vertical line and don’t worry about length. I’ll mark the distances I need instead of just trying to draw a line 19.5 inches long.

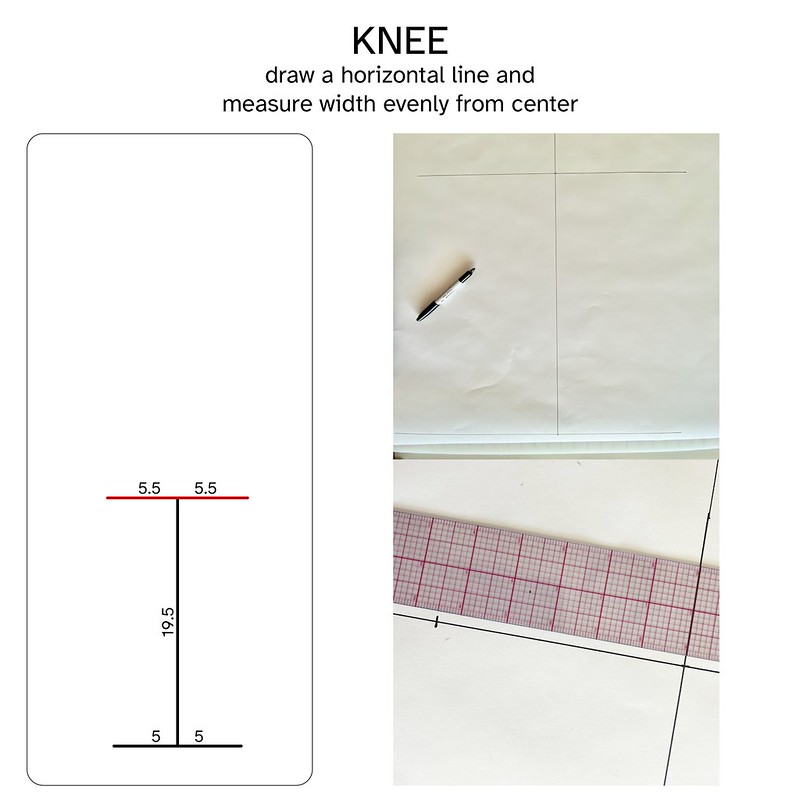
Draw horizontal line at your knee level. Make sure it is centered on the crease line.

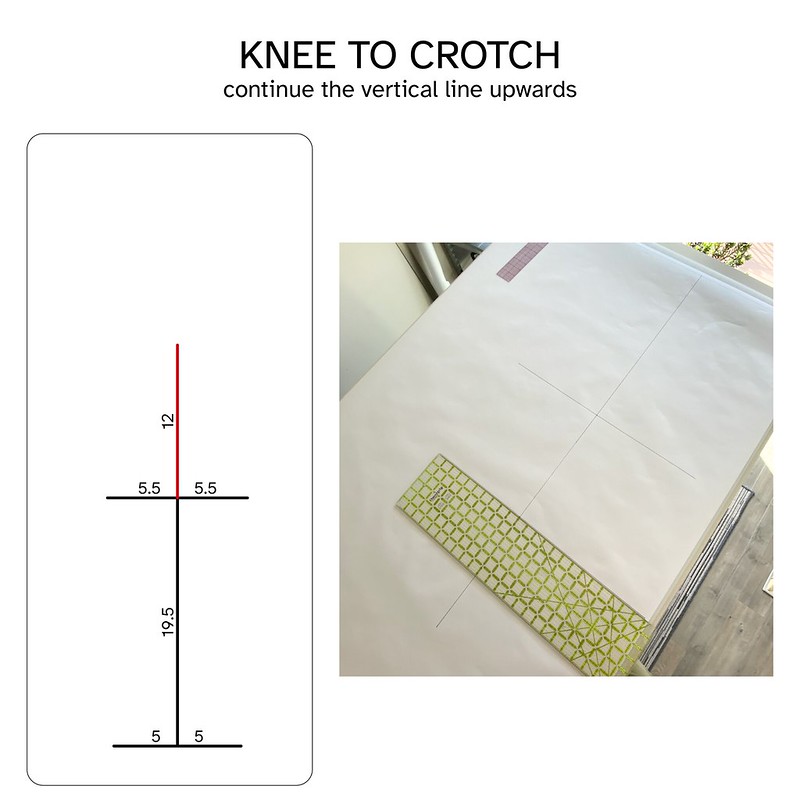
If you haven’t already, continue the crease line.

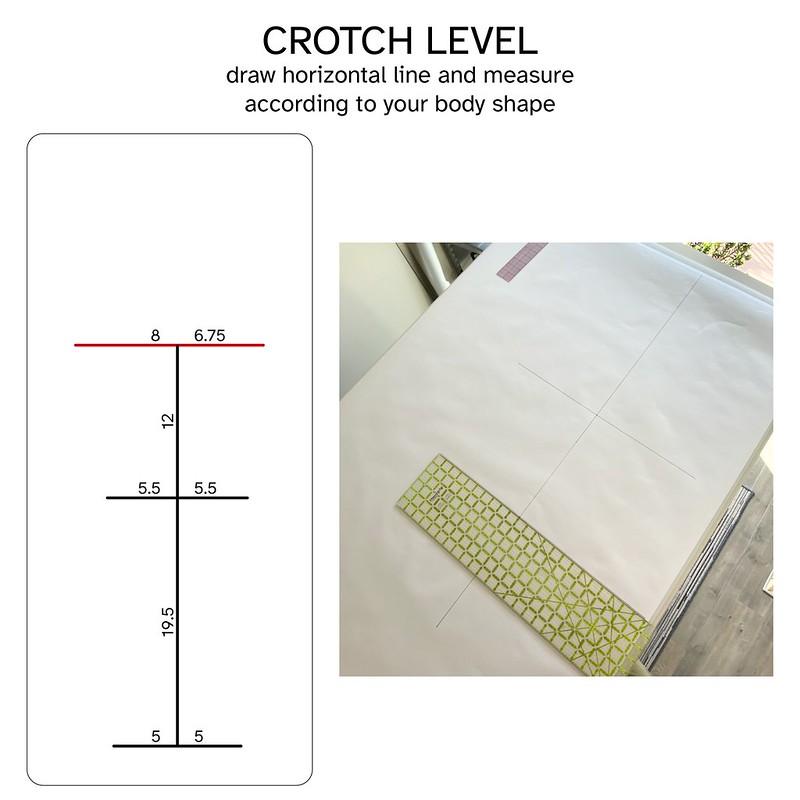
Draw a horizontal line at the crotch level. Depending on your measurements, your horizontal line will not be centered on the crease line.

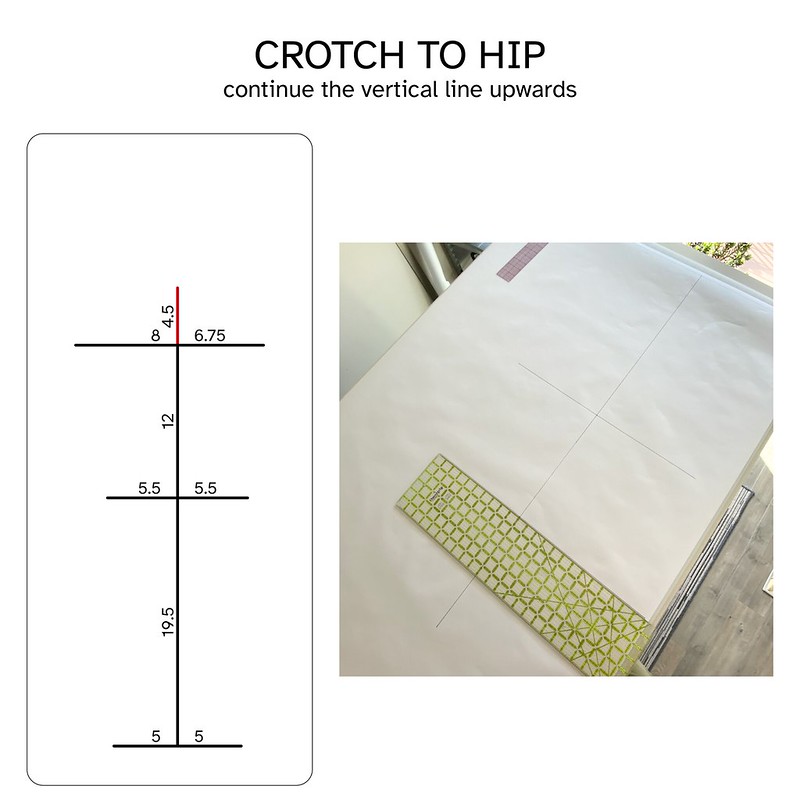
Continue the crease line.

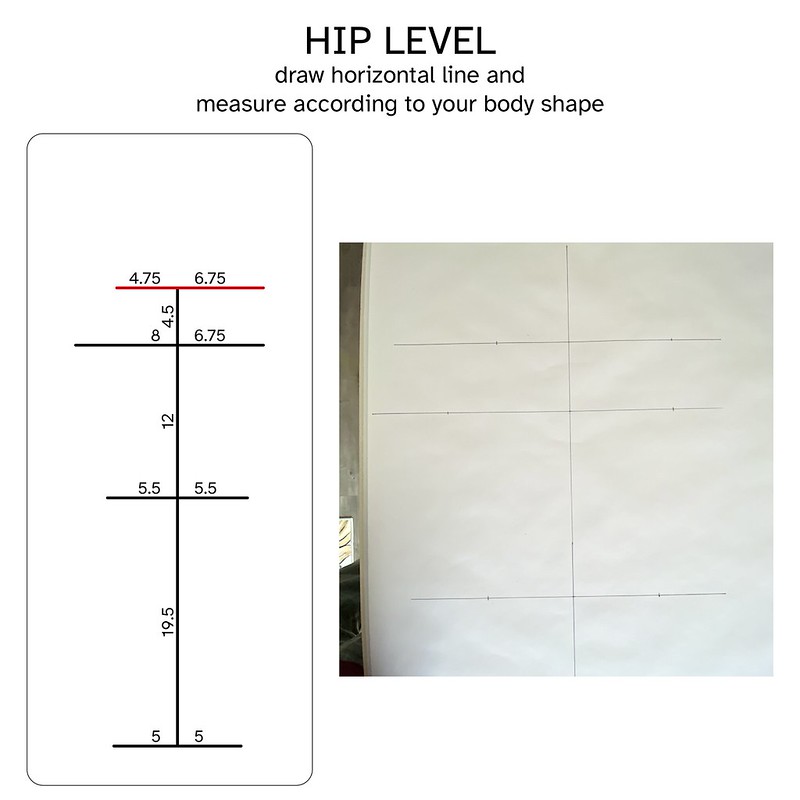
Draw a horizontal line at the hip level. Remember that the distance from the crease line to the center is the most important for pants fitting.
Connecting the Dots

Draw a straight line from ankle to knee along the inseam and side seam.

Draw a straight line from the knee to the crotch level along the side seam. Unless the knee width is really narrow, I have not had to smooth or curve this line in any way.

Using a curved ruler, draw a curved line from the knee to the crotch level along the inseam. I always use my Dritz ruler, and I always place the far edge at the knee. Be careful not to create any weird puckers or shapes when connecting from the knee to the crotch along the inseam.

You don’t want the curve so extreme from the knee to the crotch that you create a point at the knee. That’s why I place the far, least curved end at the knee to create a gentle curve to the crotch hook.
Drafting the Torso

Draw a line perpendicular to the hip level. This is the reference line for the center front / back. In this case, I’m drawing the front.

Depending on your body and fit preference, the length of the rise will vary, but this is why I make sample garments of all my patterns beforehand. I want to check if I need to raise or lower the waistband. Remember that I’m adding a 2-inch elastic waistband to this pattern, so the rise will vary depending on what waistband size I use.
The second issue is how much inward to place the line? I learned through trial and error. Once I was happy with the fit from the hip down, I pinned my sample garment to my underwear at the crease line (no joke) and then smoothed the fabric over to the center front without pulling or yanking. I marked center front, and that’s how I figured where center front needed to go.

Draw a horizontal line from center to the side seam.

From the center, measure the width of your waistband. How did I determine how much up from the horizontal line to place the waistband? Again, trial and error! With a sample garment pinned at the crease line, you can smooth the pants over your body to determine where you want the waistband to hit your hips. Remember not to pull or yank the pants into place. My guess is that the side seam should be ½ to 1 inch above the horizontal plane, but everyone’s different!
Now, if you still have any excess fabric or warbles along the waistband of your pants after pinning at the crease line and smoothing over to the center and the side seam, that doesn’t mean you need to pull things tighter. To get rid of those warbles, you need to add in darts or just make your pants with an elastic waistband. Thank you, 2020!
Crotch Hook

Continue the line drawn for the center down to the crotch level. Draw a second reference line perfectly square with the crotch hook. The crotch hook should have a perfect 90º angle when done. This prevents weird flaps or divots when sewing the pants together. Square corners give you smooth transitions.

Using a curved ruler, draw the crotch hook. You never want your curve to extend beyond those reference lines.

For the pants I have drafted for Ryan and myself, I don’t allow any part of the ruler to extend past my reference lines or my center line. In the image above, the ruler goes beyond the pants along the center front. I would adjust my ruler so that no part of the ruler extends past the center front.

After slightly rotating the ruler, now from the hip to the waist, the ruler doesn’t go beyond the center front. This is just what works for Ryan and me. This may not work for everyone.

I make sure that from the hip point down towards the crotch level, I don’t follow the reference line. When my crotch hook begins, I want it to immediately slope away from the hip point. If the top of your crotch hook follow the reference line, you are actually dropping the horizontal hip line. The hip level is the transition point between the crotch curve and the upper part of the pants. That’s why I make sure that when I draft my crotch curve, the top immediately starts curving.
Conversely, I don’t care where the bottom of the curve hits, so long as I can maintain a 90º angle at the end of the crotch hook. Having a long straight line after the curve hasn’t been a problem for us.
The only legit rules for drafting the crotch curve are: don’t draw the curve past the reference lines and make the end of the crotch hook 90º.
Nearly There

The last line to draft is from the crotch to the waist along the side seam. With your curved ruler, find the best curve extending the entire length that also includes the hip point.
Drawing this line will be an excellent indication of whether you have the correct numbers for your body. Here are some examples.

In my blog post about drafting pants for your quadriceps, which is the crotch level measurement, I mentioned that I really spent a lot of time befuddled. I was befuddled because drafting guides say that the crease line has to be at the center or near the center at the crotch level. Go read that post to know why that rule is bogus. Using the numbers for Ryan but moving the crotch line, so it is centered gives the pants a really odd shape along the side seam from the crotch to the waist. Ryan isn’t shaped like this, and even if he was, you want to gently drape over the body, so putting an indent or divot at the hip level doesn’t make sense. If I tried to draw curved line from the crotch to the waist along the side seam, I wouldn’t be able to, because the hip level would have to be wider than the hip point. I evaluated Ryan’s measurements and confirmed that the hip width was the right value, so that told me the shape of these pants wasn’t going to work.

The other thing that can cause weird shape issues is crease line placement at the hip. In my post about crease line placement at the hip, I question whether measurements are absolute. For example, my crease line is 3.5 inches from the center front. For a straighter figure, I assumed that Ryan would need 3.5 inches or less. If I draft pants 3.5 inches from the center front to the crease line, this is how the front pattern piece would look. Ryan isn’t shaped like this. He doesn’t have curvy hips like the pattern suggests he should. I really did make a sample pant with this shape, and the result was unbalanced pant legs and excess fabric around his hips. The take-home point is that the side seam shape should take on a shape that looks similar to your body.
When drafting pants, if you start having a hard time making smooth transitions / lines, that may be an indication that you need to reassess your measurements. That isn’t to say that they are wrong, just a signal that something might be off. If you draft pants with one of these odd shapes and they work, then awesome, you can ignore my advice.
Finishing Up

Make sure the crease line is drawn from the ankle all the way up to the waistband. The ankle, knee, crotch, and hip lines should all be perpendicular to the crease line.

Add the desired amount of seam allowance (e.g., ⅜-, ½-, ⅝-, 1-inch). I usually at ⅝ inches, but that’s just preference. Add the desired amount to hem allowance. I usually add 1 ½ inches to do a ½ inch fold followed by a 1-inch fold.
You may have to curve or slightly adjust the waistband to get center front and the side seam square. The three locations that need 90º angles are crotch hook, center front at the waist, and side seam at the waist. Having things squared means you’ll have smooth transitions and no weird flaps or divots.
Final Check
Once you have front and back pattern pieces drafted, ensure that the side seam lengths are the same length. You don’t want to make pants and find out that they are ¼ inch different. Next, make sure that the inseam lengths are nearly the same. The back leg inseam can be ½ inch shorter but no more. Pants are often drafted with the back leg inseam ever so slightly shorter. The top of the inseam near the crotch is usually on the bias and can be ever so slightly pulled longer to fit the front leg inseam. This isn’t necessary, so if the front and back leg inseam are the same, that’s fine!
I don’t have any grand conclusions for this post. If you are drafting patterns for yourself, here’s a list of supplies I use. These aren’t affiliate links or anything, so feel free to use what you have or shop around for something that fits your needs.
- Dotted Pattern Paper from Mood Fabrics is great paper for drafting patterns. The dots on the paper makes drawing straight lines easier.
- Dritz 4-in-1 Styling Design Ruler is great for drawing curves.
- Westcott 2″ X 18″ Beveled Plastic Ruler is great for getting precise length and width measurements.
- Omnigrid Non-Slip quilter’s Ruler, 6″ x 24″ is great for drawing long lines and perpendicular lines if you don’t have dot paper.
Looks very interesting. I never though about the 90 degrees at the crotch point. Explains some ultra wacky things I’ve been making. I will review your guide in more detail and let you know if I reach Level 9-Bonus -Round of pants fitting.
LikeLiked by 1 person
You’ve definitely reached Level-9 Bonus Round 😉
LikeLike
I love how you attack this but I got lost along the crotch line, not knowing how many inches belong on either side of the center line. How did you determine 8 & 6.75?
LikeLiked by 1 person
The center grainline placement at the crotch level takes some trial and error. My post “DRAFT PANTS TO FIT YOUR QUADS” talks about fit a bit more.
LikeLike
Thank you. The muslin I just made is the closest yet. What you do makes more sense than all the other books and posts I have read. I thank you! Merry Christmas!
LikeLiked by 1 person