Fitting Workflow for the Sage Tee – Part 4, Sleeves & Neckband

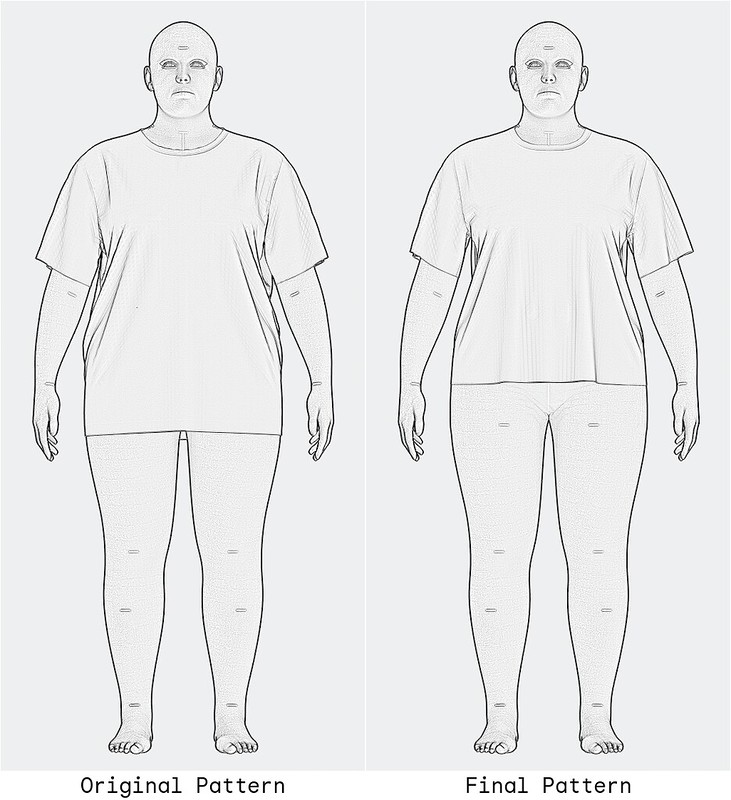
Sleeves and the neckband are the final step in my t-shirt workflow and the one I’m least familiar with! However, I highly recommend watching this YouTube video first so we can all understand the basics of sleeves!

Here are the previous steps in my workflow:

Preparing The Pattern

This series is about how I am trying to apply J Stern’s bodice workflow to develop my own shirt-fitting process. As a reminder, this is by no means a complete tutorial on how to fit a t-shirt or an extensive list of adjustments you can make—particularly this one about sleeves!

Now that the body of the t-shirt is complete mark your seam allowance on all your pattern pieces. Double-check that your side seams and shoulder seams match. If you are unfamiliar with how to walk your pattern, check out the video above.

Sleeve Circumference

Before sewing the sample garment, measure the armhole circumference of your altered front and back pattern pieces along the seam line. Remember to exclude the seam allowance in your measurements. Measure the sleeve curve, which is the seam line sewn to your shirt’s armhole. These two measurements should be the same length for a t-shirt. Using Cornelius Quiring’s tutorial, you will have to experiment with where you add or remove length on the sleeve. You may want to take off or add length from the front only or front and back equally. Experimentation will be necessary!

Neckline Circumference

The other measurements to take are the original neckline and your adjusted neckline. If the overall circumference changes, you also need to adjust your neckband.

The best way I’ve found to calculate the new neckline is with a ratio. The numbers in the following example are made up. The values do not include seam allowance; you would add those at the end. The numerator is the neckband circumference of the original pattern (e.g., 18), and the denominator is the neckline circumference of the original pattern (e.g., 20). On the other side, the numerator is what we are trying to solve for (x), and the denominator is the neckline circumference of your adjusted pattern (e.g., 22).

\dfrac{18}{20} = \dfrac{x}{22} \\[\baselineskip] \dfrac{18\cdot22}{20} = x \\[\baselineskip] \dfrac{396}{20} = x \\[\baselineskip] 19.8 = x

x equals 19.8 inches. Your final neckband, not including seam allowance, should measure 19.8 inches. When you make your sample garment, you’ll be able to double-check whether your neckband is the correct length.

Fitting the Sleeve and Neckband

Once your armhole and sleeves are roughly the same length, now you can make your muslin. This is the first time I will use my knit fabric instead of woven fabric. Here are the questions I asked during this step:

  • Do I have enough movement through the shoulder? Is there any weird pulling, tightness, or reduced movement anywhere?
  • Is the arm too loose or too tight?
  • Is the sleeve too long or too short?
  • Does the neckband sew to the neckline easily without too much pulling? Does the neckband lay flat when pressed with steam?

Sleeve Cap

Taller Sleeve Cap

The sleeve cap is related to the shoulder seam length (see Cornelius’s video above). Sleeve cap height has a lot to do with the look and style you want to achieve with a pattern. But occasionally, you will encounter fit issues with the sleeve cap height. I’m just showing you how sleeve cap height alters the look of a basic t-shirt.

The dotted red line shows a taller sleeve cap. To keep the same length of the sleeve curve, I had to take in the sides of the sleeve. The fit of this sleeve will allow it to hang down straighter. However, the trade-off is in mobility. When you lift your arms, your whole shirt is going to lift.

Shorter Sleeve Cap

With the lower sleeve cap, you need to widen the sleeve to keep the curve the same length. The fit of this sleeve allows a lot more mobility. The shirt will move less when you raise your arms. However, the trade-off is in style. The sleeves are going to be angled outward more than a taller sleeve cap.

Sleeve Cap Recap

A taller cap means the sleeve will be narrower. This style will give you a nice straight shoulder, but you will lose mobility. In the left image above, see how the shirt raises more when the arms raise. A shorter cap means the sleeve will be wider. This style results in a sleeve angled out from the body more, but it gives you a lot more mobility. In the right image above, see how the shirt doesn’t raise up as much when the arms raise. The final style is up to you.

Sleeve Width

This next check is about the sleeve width below the sleeve cap.

The dotted red line above shows a sleeve wider than the pattern. This isn’t necessarily a fit issue if you need more room for your arm. However, excess fabric in this area could cause bunching around your armpit. This is just something to consider as you are altering your pattern.

However, if the pattern is too tight around your arm, that can be a fit problem. The dotted red line shows a sleeve that is narrower than the pattern. If the arm is too tight, it’ll ride up your arm and bunch in your armpit. Again, the final style is up to you.

Sleeve Length

I didn’t put together any photos for this step. It is fairly straightforward. Lengthen or shorten the sleeve as needed. Do you want the sleeve higher or lower on your arm?

Neckband

Even with the ratio method of re-calculating your neckband length. You may find that it doesn’t fit well.

In one scenario, the neckband may be too long. When you sew it into the garment, it’ll be loose and not require a lot of stretching. The final neckband will look warbled even after a good steam press with your iron. Don’t skip the steam press!

On the other hand, the neckband may be too short. You will have difficulty stretching it enough to fit when you sew it into the garment. The final neckband will be tight and pull on the garment.

If you need a refresher on how to quarter your neckband, check out the following video. Note the shoulder seam is rarely the correct place for quartering the neckline:

Final Fit

This concludes my four-part series on how I tested the Elbe Textile Sage Tee pattern. I have one more post showing you my changes and the final fit on my body. I will also compare my adjusted pattern with my old TNT Union St. Tee pattern. Thanks for following along.

One thought on “Fitting Workflow for the Sage Tee – Part 4, Sleeves & Neckband

Add yours

Leave a comment

This site uses Akismet to reduce spam. Learn how your comment data is processed.

Website Powered by WordPress.com.

Up ↑