
HandmadePhD, Grasser No191, True Bias Men’s Hudson, Green Style Iron, Sinclair Lakeside, Jalie Henri
In part 1 of this blog series, I introduced several men’s jogger patterns:
- Grasser No191 (click here for Pinterest Board)
- True Bias Men’s Hudson (click here for Pinterest Board)
- Green Style Iron (click here for Pinterest Board)
- Sinclair Lakeside (click here for Pinterest Board)
- Jalie 3909 Henri (click here for Pinterest Boad)
It is hard to compare the patterns because they are all so different. No pattern has the same grainline placement for the front or back pattern piece at the hip level. Grainline placement at the knee is also different for each pattern. Some patterns are balanced at the knee. Some patterns have more width on the inside of the knee. Some patterns have more width on the outside/side seam of the knee. Before comparing the patterns, I need to adjust these differences (i.e., grainline placement) without ruining the style.
I also talked about two clothing aspects in my first post: fit and style. I further split fit into two categories: drape and size. I want to adjust fit and not style when I alter a pattern. The first and most important adjustment is to ensure the garment is balanced on your body and drapes correctly with your figure. For this post, I will show you what two alterations I would make to each pattern. These two alterations fix the drape of the garment by fixing the placement of the center grainline.
After the drape of the garment is altered, it is easier to judge whether the pants are the correct size. I will also talk briefly about waistband and hip circumference in this post.
Fixing Drape
Center Grainline at the Knee
Fix grainline at the knee first!
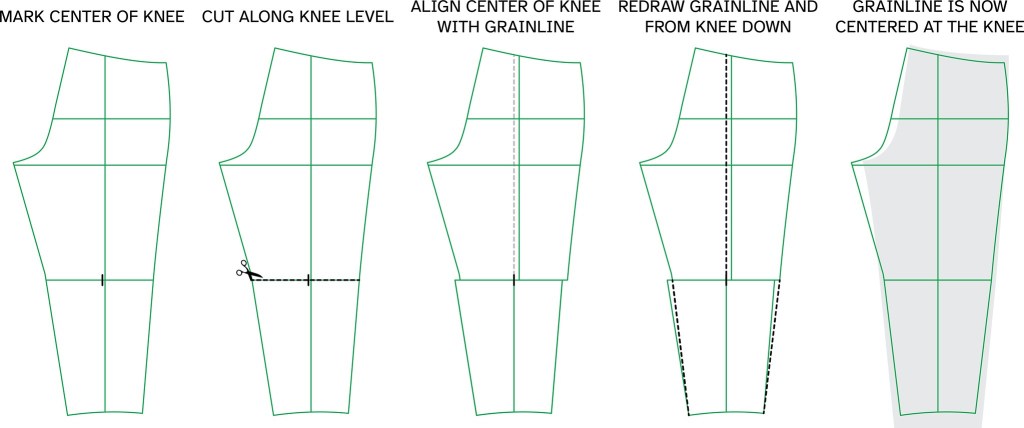
If you want to know more about why grainline placement is important, check out my previous blog post, “Crease Line Placement at the Knee.” I’m using the back piece from True Bias Hudson pants for this example.
- Find the center of the ankle. Draw a line from the center of the ankle vertical to the waistband. This is the center grainline.
- Place a mark at the center along the knee level.
- Cut the pattern horizontally at the knee level.
- Move the upper portion of the pattern to align the center of the knee level with the grainline.
- Finish the alteration by redrawing the legs from the new knee points down to the original ankle points. You will also have to redraw your center grainline for the upper portion since that was the portion that moved.
Notice that adjusting grainline placement at the knee changes grainline placement at the hip level. This is why it is important to first change grainline placement at the knee.
Center Grainline at the Hip

- Find the center of the ankle. Draw a line from the center of the ankle vertical to the waistband. This is the center grainline.
- Draw a horizontal line at the top of the crotch curve for your hip level. Place a mark on the horizontal hip level where your grainline placement needs to go. If you want to find out more information about grainline placement at the hip, check out my previous blog post, “Creaseline Placement at the Hips”.
- You can cut along the hip level, but that’ll mean redrawing the crotch curve. I’ll need to alter the crotch curve later anyway, so instead of doing that step twice, cut along the crotch level instead. In other words, draw a horizontal line at the bottom of the crotch curve and cut along that line.
- Move the upper portion of the pattern to align the mark you made with the center grainline.
- Finish the alteration by redrawing the legs from the new crotch level down to the knees. You will also have to redraw the center grainline for the upper portion.

Subscribe to continue reading
Become a paid subscriber to get access to the rest of this post and other exclusive content.
