
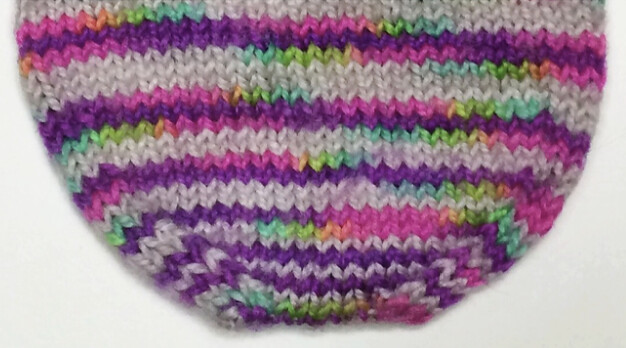
I prefer a rounded toe, given I like my toes to spread naturally. If I’m not wearing hand-knitted socks, then I’m wearing Injinji socks. I altered the standard sock shape a little bit, so it wasn’t so constricting and pointy. The standard wedge cuff-down toe is to decrease one round, then knit one round and repeat these two rounds until done. My method is quite different and makes the toe box area more curved and less square and pointy.

Aside from the subtle shape difference, my sock toe isn’t that strange. What will be odd is that I’m not able to do the opposite for toe-up and cuff-down. My instructions will definitely seem odd, but the toes end up looking the same, as you will see.

Glossary
- dec – decrease
- inc – increase
- k – knit
- k2tog – knit 2 stitches together (1 stitch decreased)
- m1L – make one left
- m1R – make one right
- rnd(s) – round(s)
- ssk – slip 1 stitch knitwise, slip a second stitch knitwise, move these 2 stitches back to the left needle and k2tog tbl (1 stitch decreased)
- st(s) – stitch(es)
- tbl – through the back loop
Cuff-Down
I’ll start with cuff-down since that was the method I perfected before learning toe-up. After you’ve knitted your sock to your desired length, you’ll start decreasing for your toe. Now determining your desired length is always an issue, but I have found that it should reach the bottom of your pinky toe when you try on the sock. This is why in my last post, I emphasized that stitch gauge is so important. If your gauge is off between socks, you’ll either make socks too long (guilty) or too short.
- Rnd 1 (Needle 1): k1, ssk, k to last 3 sts, k2tog, k1; 2 sts dec
- Rnd 1 (Needle 2): k1, ssk, k to last 3 sts, k2tog, k1; 2 sts dec
- Rnds 2-4: knit
- Rnd 5 (Needle 1): k1, ssk, k to last 3 sts, k2tog, k1; 2 sts dec
- Rnd 5 (Needle 2): k1, ssk, k to last 3 sts, k2tog, k1; 2 sts dec
- Rnds 6 & 7: knit
- Rnd 8 (Needle 1): k1, ssk, k to last 3 sts, k2tog, k1; 2 sts dec
- Rnd 8 (Needle 2): k1, ssk, k to last 3 sts, k2tog, k1; 2 sts dec
- Rnd 9: knit
- Rnd 10 (Needle 1): k1, ssk, k to last 3 sts, k2tog, k1; 2 sts dec
- Rnd 10 (Needle 2): k1, ssk, k to last 3 sts, k2tog, k1; 2 sts dec
- Rnd 11 (Needle 1): k1, ssk, k to last 3 sts, k2tog, k1; 2 sts dec
- Rnd 11 (Needle 2): k1, ssk, k to last 3 sts, k2tog, k1; 2 sts dec
Repeat Rnd 11 until 16 sts (8 on each needle) remain. Cut yarn, leaving a tail of at least 12″ long. Thread tapestry needle and graft the toe closed using the Kitchener stitch.
Don’t be intimidated by the Kitchener stitch. There are a few tricks I use to avoid having bunny ears sticking out when done. You should have 8 stitches on your front needle and 8 stitches on your back needle. Follow these instructions until you have 2 stitches remaining on each needle:
- Front Needle: through the first stitch as if to knit and slip off, through the second stitch as if to purl and leave on
- Back Needle: through the first stitch as if to purl and slip off, through the second stitch as if to knit and leave on
When you have two stitches remaining on each needle:
- Front Needle: through the first stitch as if to knit and slip off, through the second stitch as if to purl and slip off too
- Back Needle: through the first stitch as if to purl and slip off, through the second stitch as if to knit and slip off too
The last stitch you worked will be floppy, but if you weave in the end by pulling it through to the other side just right, you shouldn’t have issues. See the video clip below:
Toe-Up
The only way I’ve ever cast on for toe-up socks is using Judy’s Magic Cast-on. It’s surprisingly easy. There’s a ton of YouTube videos, so I’m not going to post anything here. It’s an easy cast-on method.
- CO 16 sts using Judy’s Magic Cast-on method (8 sts on each needle)
- Rnd 1: knit
- Rnd 2 (Needle 1): k2, m1L, k to last 2 sts, m1R, k2; inc 2 sts
- Rnd 2 (Needle 2): k2, m1L, k to last 2 sts, m1R, k2; inc 2 sts
Rep [Rnds 1 & 2] until you have 12 fewer stitches than your final count. For me, my socks are 60 sts (30 sts on each needle), so I knit until I have 48 sts (24 sts on each needle). That means I repeat [Rnds 1 & 2] seven more times.
- Rnds 3 & 4: knit
- Rnd 5 (Needle 1): k2, m1L, k to last 2 sts, m1R, k2; inc 2 sts
- Rnd 5 (Needle 2): k2, m1L, k to last 2 sts, m1R, k2; inc 2 sts
- Rnds 6-8: knit
- Rnd 9 (Needle 1): k2, m1L, k to last 2 sts, m1R, k2; inc 2 sts
- Rnd 9 (Needle 2): k2, m1L, k to last 2 sts, m1R, k2; inc 2 sts
- Rnds 10-13: knit
- Rnd 14 (Needle 1): k2, m1L, k to last 2 sts, m1R, k2; inc 2 sts
- Rnd 14 (Needle 2): k2, m1L, k to last 2 sts, m1R, k2; inc 2 sts
Differences
I realize that for the cuff-down version, I decrease, knit 3 rounds, decrease, knit 2 rounds, decrease, knit 1 round, and then decrease every round until done. You would think that toe-up would be the opposite: increase rounds until the same point, knit 1 round, increase, knit 2 rounds, increase, knit 3 rounds, increase, and done. However, the toes look nothing alike. The toe-up version results in a super short, ugly, and non-functional toe. I had to add a knit round between all the increase rounds, which gave me a much better toe.
The other difference is where the increase or decrease stitches happen. For cuff-down, you k1 and then ssk, and for toe-up, you k2 and then M1L. This may seem weird, but again this is how you get a nice height to your toe box. If you think about it, both methods work with three stitches overall: k1 and ssk is a total of three stitches, k2 and M1L is a total of three stitches. Many toe-up socks say to k1 and M1L, but that’s only 2 stitches and will result in a really flat and uncomfortable toe box. At the end of the row, you either k2tog and k1 for cuff-down or m1R and k2 for toe-up.
Conclusion
I’ve seen even more complicated toe shaping, but the slightly altered wedge toe works well for me. Making it less square and more rounded, I’ve got the toe to be pretty comfortable even for my splayed out monkey toes!

Leave a Reply