
This blog post is chockablock with information. Here is what you will find inside: I put the Winslet’s Tracy Tank through five muslin test versions to get the fit right, and uncovered a pattern with sizing inconsistencies, missing binding measurements, confusing ease allowances, and a few details that made me wonder if the company is connected to some kind of AI pattern generated content farm. You will get the exact alterations I made to each pattern piece, the math behind my 85% binding stretch ratio, details about the knits I used, attachment methods that avoid scratchy edges, and a deep dive into sports bra biomechanics research that explains why racerback straps put more pressure on shoulders than vertical ones. Read to the end if you want to know why researchers use toupee tape in sports bra studies and why someone had to come up with the term “breast slap”.
The Humble Tank Top
Tank tops and I have a complicated relationship. My shoulders, bust, and waist land in three totally different sizes, which makes fit a challenge. I’ve had a bit more success with men’s patterns, but what I want is a women’s tank pattern that actually fits my body. My checklist looks like this:
- NO racerback styles (see the aside at the end of the post; quick version, there’s solid research suggesting bra straps that angle toward the neck are a bad idea)
- Shoulder seams wide enough to fully cover bra straps
- No gapping around the armhole
- High enough under the arm so my sports bra doesn’t show
- Neckline can be high or low—I’m flexible there
- Not tight below the bust, but also not super flowy—just skimming the body
- Hip-length
Loose workout tanks look cute, but the moment you try doing side planks while sweaty, it is game over. I need a tank that moves with me, not one that twists up like a wet rag.

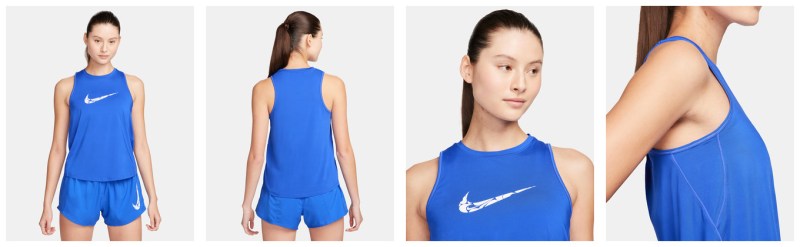
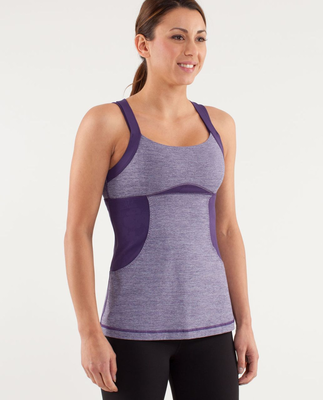
The blue Nike tank comes close. They added a panel under the arm at the bust level to get better shaping. Smart idea. I still want a wider shoulder though. Let me have full bra strap coverage.

This is what happens without shaping: floppy, low underarms and no structure. The expression on the model’s face says it all.

If you try to fix the fit by tightening everything, you end up with gapping at the front armhole and pooling at the back. Not for me.

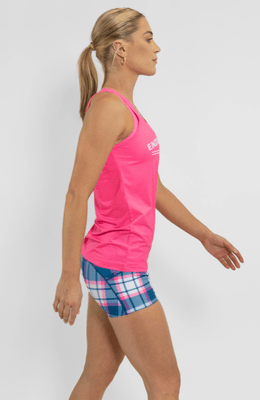
I am also not into tanks where the center front swings away from the body. A clean, body-skimming silhouette is hard to achieve, but that is the goal.
I know what I want, but how am I going to achieve it? To get the kind of shaping I need, you either add a bunch of darts, or you break the pattern into multiple panels so the seam lines do the shaping for you. When you sew panels together, those seams act like darts. They add contour and fit without having to fold out extra fabric. It’s a more complex construction method, but it’s the only way to get a close, comfortable fit across curves without ending up with gaping armholes, pulling at the bust, or fabric pooling at the waist. But what pattern to use?
The problem is that there are not many patterns out there. It is a surprisingly empty part of the market. Here is what I found:
I was most curious about the Winslet’s Tracy Tank, but the company itself raised questions. Some samples look great, others look like no one ever checked the fit. It felt like a gamble, but I figured why not try it. The size range at least was decent.
Analyzing Style and Fit
The Tracy Tank has a relaxed fit with a high neckline and uses a front piece, back piece, upper and lower side panels, and a back yoke. The multi-panel design makes a closer fit possible without darts.
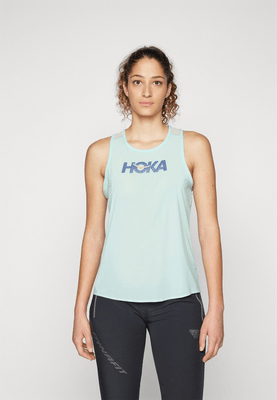
I’ll talk more about this in the alterations section, but my one issue with this pattern is that it doesn’t provide any binding length measurements. The instructions just say, “Attach with a binding attachment!” Not everyone has one (or wants one), so that’s not super helpful. If you attach your binding at a 1:1 ratio with the armhole or neckline, you’ll end up like the woman wearing the Hoka tank above—disappointed and unamused. I found that using 85% stretch worked best for me, but the attachment method also mattered too. Here’s how I calculated length:
- For example, my armhole circumference is 22 inches and 85% of that is 18.7 inches
- I added seam allowance: 3/8 inch on each side, so 0.75 inches total
- Final elastic length is 19.45 inches but I rounded up to 19.5 inches
Sizing
Picking a Size

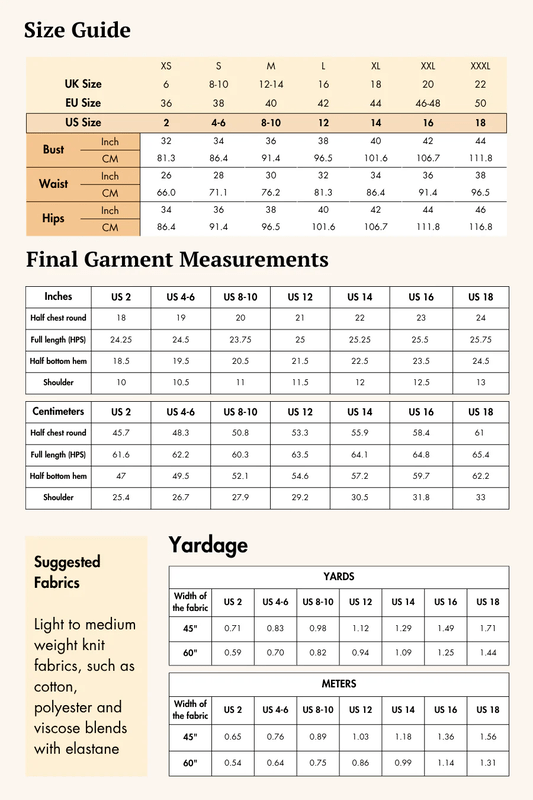
The pattern comes in two ranges. The regular range has busts from 32 to 44 inches, waists from 26 to 38, and hips from 34 to 46. The extended sizes go from 44 to 60 at the bust, 38 to 54 at the waist, and 47 to 63 at the hip. There is no guidance on how or where to measure, or what makes the extended range different from the regular one. Not a great start.
I currently measure 39-inch bust, 33-inch waist, and 42-inch hip (43 inches if using a measuring band). However, I’ve mentioned a few times in the past that I need to pick a size based on my high bust measurement, which more accurately represents my larger frame.
In a typical body form, your high bust should be smaller than your full bust, and the difference between your full bust and high bust measurement would tell you your cup size:
- 1 inch = A cup
- 2 inches = B cup
- 3 inches = C cup
- 4 inches = D cup
- 5 inches = E cup (or DD)
- 6 inches = F cup (or DDD)
However, my high bust and full bust are both 39 inches, and I don’t have less than A cups. So if I take my high bust and reverse-engineer the “expected” full bust measurement (since most patterns are drafted for a B cup, meaning a 2-inch difference), I’ll be able to pick my size that fits my frame:

Based on my full bust alone, I fall between a size 12 and 14. Based on the “calculated” full bust and my hip measurement, I’m between size 14 and 16. I ended up choosing a size 16, since it accounts for my larger frame and should give me enough room at the hips.
Final Garment Table

The pattern did, thankfully, include a final garment measurement table. However, the extended size range didn’t include any information about hip circumference. Because that information was missing, I measured the pattern pieces myself. That kind of omission is a red flag.

For the chest, I measured across the bottom of the armhole parallel to the floor. For the regular size range, my measurements matched the final garment table exactly. But for the extended size range, I was nowhere close. My measurements were 4 inches larger for sizes 18 through 28, and 2 inches larger for sizes 30 and 32.
For the hip, I measured across the bottom hem. Again, my numbers matched what was listed for the regular size range. But for the extended range, there were no listed values, so I have no way to verify if my numbers are correct.
Based on these measurements, the pattern has 4 inches of positive ease at the chest in the regular size range and 6 inches of positive ease in the extended range. For the hips, there’s 3 inches of ease in the regular range and 4 inches in the extended. Why so much ease at the chest?

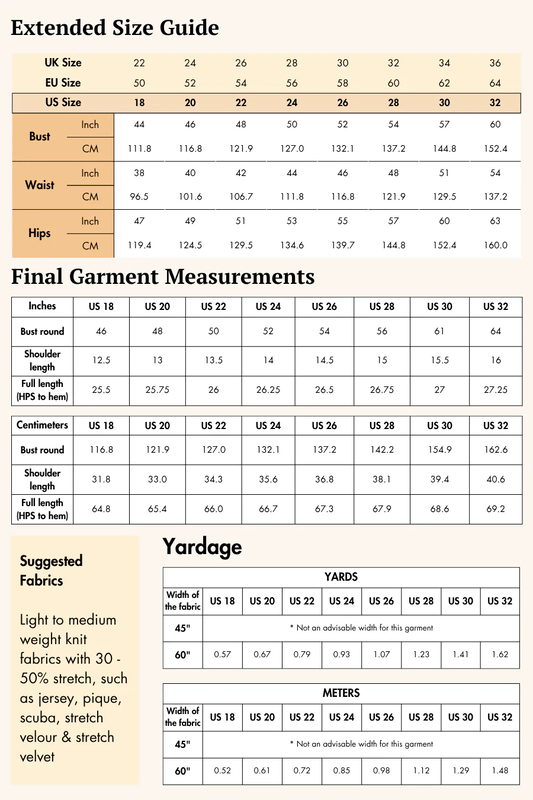
There were other oddities in the final garment table. It took me quite a while to figure out what shoulder measurement they meant. Eventually, I think I figured it out. For the regular sizes, I was able to replicate the measurement by going from outside shoulder to outside shoulder on the back pieces. But using that same method on the extended size range gave me results that were 1.5 inches larger than what the chart said.

In the end, there are quite a few inconsistencies in the size chart and final garment measurements. The pattern doesn’t include any guidance on how the extended size range differs from the regular range. There’s also no explanation of where or how to measure your body when choosing a size. And it would be really helpful to know the intended fit of the garment since the pattern has more ease at the chest and less at the hips, which feels counterintuitive for an athletic tank top. All the examples I showed at the beginning (minus the Hoka) have a tighter fit at the bust. You’ll get better range of motion the closer the garment sits to your body and that’s the point of athletic styles, full range of motion.
My spidey senses were already tingling just from looking at the website and product images, it felt like this pattern company might be a content mill cranking out AI-generated patterns without careful drafting. These sizing issues haven’t done much to ease that suspicion.
Materials
I made two tank tops using two different fabrics from Blue Moon Fabrics.
The first is Allure Polyester Spandex with Wicking. I need fabric that can handle a lot of sweat, and this one delivered. According to their site:
“Allure is a 4-way stretch polyester spandex double knit with wicking properties; ideal for high performance active wear. Its lightweight composition and temperature-regulating capabilities make it ideal for fabricating a variety of compression and base-layer apparel, ensuring you stay comfortable and dry no matter the activity. Allure is designed to give you the most comfortable experience possible, with fabric that moves with you and maintains breathability and moisture management. Its quick-drying capabilities make it easy and convenient to wash and wear.”
The fabric content is 82% polyester, 18% spandex with a weight of 230 gsm. It has 4-way stretch and comes in 42 colors. I’m in love with this fabric. It actually gets softer and more comfortable the more you sweat in it. The drape of the fabric is flowy and soft.
The second fabric I tested is Harmony Ultra Soft Nylon Spandex Double Knit. Like Allure, it’s technically a double knit, but I specifically wanted to try a nylon-based option instead of polyester. The description intrigued me:
“Harmony is a 4-way stretch Ultra Soft Nylon spandex double knit ideal for high performance active wear. Its lightweight composition and temperature-regulating capabilities make it ideal for fabricating a variety of compression and base-layer apparel, ensuring you stay comfortable and dry no matter the activity. Harmony is designed to give you the most comfortable experience possible, with fabric that moves with you and maintains breathability and moisture management. Its quick-drying capabilities make it easy and convenient to wash and wear.”
The fabric content is 69% nylon, 31% spandex, with a weight of 210 gsm. It’s available in 52 colors.

Release: 4/2012
This fabric immediately reminded me of my early 2010s Lululemon tops. Specifically, the Lululemon Chaturanga Tank, which was released in April 2012 and made from Luxtreme, also a 69/31 blend—just like Harmony. The fabric has a crispness to it and drapes more like linen than a soft spandex knit. That’s actually a plus here, since the top has a bit of billowiness that allows for airflow during workouts.
Alterations

The pattern comes with seam allowance drawn on all the pieces. Yay! And although I’m not showing it, the front and back pieces are actually drafted fully and not on the fold.
I tested this pattern using cotton muslin. I know, strange. The pattern isn’t supposed to have negative ease anywhere, so I was able to dial in the fit about 99% using woven muslin before doing a final test in spandex. I just didn’t finish the neckhole or armholes on my test versions. And I had to go through a LOT of test versions to get the fit right, and here’s the result of all that testing. I will say it was easy altering this pattern in woven muslin, because you could immediately see all the warbles and distortion.

Just to make my diagrams easier to replicate, I removed all the seam allowance from the pattern pieces.
Front Panel

- Remove 1/2 inch from center front
- Widen shoulder by 3/4 inch
- Remove 2 inches from the top side seam and raise the armhole 1-1/4 inches
- There’s a notch on that side panel that I blended everything into
Back Panels

- Remove 1/2 inch from the top of center back, but only 3/8 inch from the bottom of the yoke
- Lower center back of the yoke 1/2 inch
- Widen the shoulder 3/4 inch
- Widen the bottom side of the yoke 2 inches

- Lower the top of center back 1 inch
- Widen the top side by 1-1/4 inches
- Raise the armhole 1-1/2 inches
Side Panels

- Remove 3/4 inch from the side that sews to the front
- Raise the armhole 2-3/4 inches on the side that sews to the front
- Raise the armhole 1-3/8 inches on the side that sews to the back

- Remove 3/4 inch from the top edge—but only on the side that connects to the front panel
Workflow

Having all these panels made it so much easier to adjust the fit to my body. You may ask, how did I tackle all these changes? I used the same workflow I mapped out for my Elbe Sage Tee months ago.
- Fitting Workflow for the Sage Tee – Part 1, Shoulders
- Fitting Workflow for the Sage Tee – Part 2, Armhole
- Fitting Workflow for the Sage Tee – Part 3, Body
- Fitting Workflow for the Sage Tee – Part 4, Sleeves & Neckband
Version 1: Original, unaltered pattern. I used this version to figure out how much I needed to widen the shoulders and how much excess to remove from the center front and back necklines. I was able to test and confirm those center front and back adjustments directly on this version.
Version 2: Focused on reshaping the armhole, especially under the armpit. I pinned and removed excess fabric until it fit the way I wanted. I also measured and decided how much I wanted to raise the armhole in Version 3.
Version 3: With the armhole raised, I continued refining the shape to get the fit just right. More tinkering, but it paid off.
Version 4: Shoulders looked great, armhole looked great—the last issue was the back yoke. It was a mess. I added extra seam allowance and had Ryan help by carefully pinning it while I wore it, so everything laid flat. Based on his pinning, I redrew the yoke curve to better match my actual shape.
Version 5: I made this version using 4-way stretch spandex from CV Linens and used it to test how I wanted to add the bias binding. There were two things I needed to figure out: how long the binding should be and which method to use for attaching it. At first, I attached the binding using a 1:1 ratio with the neckhole and armhole circumference. Everything stretched out—badly. The armholes and neckhole lost their shape and completely changed the fit of the garment. It was really discouraging. I was about to go back and remove more fabric from the side seam, but decided to try reducing the binding before I over-fit my tank top. Anyways, here’s the exact text from the PDF (typos are kept as is):
“Use a binding presser foot to bind the neckline and the armholes. Cut 4 bias strips of length for the front neckline, back neckline and both side armholesel with a width of about 3.2 cm. Place the binding strip inside the binder. Stitch about 1 inch to secure the bind, then insert the neck seam allowance inside the binding (fig. 7a). Start sewing the neckline from one end to the other. Cut the excess strip.”
Determining Binding Length
Reducing the binding worked! I found that using 85% of the circumference was perfect. Not too tight, not too loose. Just right. Quick reminder of the math, I used 19.5 inch binding for my 22 inch around armholes. My neckhole is 21 inches around, so let’s calculate the length of binding:

Attaching the Binding
I ended up making two test versions using the CV Linens spandex just to figure out my preferred attachment method. Assuming you’re attaching your binding in the round like I am, here are a few different ways you can approach it.

At first, I figured a double fold would be bulky and might cause problems, so I tried a single fold with a raw edge on the inside. With the right side of my top and the right side of my binding together, I attached the binding using my serger. Then I flipped the raw edge to the inside, making sure the binding extended past the stitching line so the stitches wouldn’t show. Next, I had to decide how to secure it with topstitching.

Whether you’re using a coverstitch machine or a zigzag stitch, you have some options for stitch placement. If you stitch from the outside and go as close to the edge as possible, the raw edge on the inside remains exposed—which makes it scratchy and uncomfortable to wear. You can attempt to trim this raw edge, but you risk cutting your garment and you will expose the serger stitches.

Another option is to center your coverstitch or zigzag right over the folded edge to trap the raw edge underneath. In theory, this would create a cleaner finish—but in practice, my coverstitch machine doesn’t deal well with the height difference between the folded layers. If this works for you and your machine, awesome!

The only way I could get a clean, non-scratchy edge was with a double fold. I was worried it would be too bulky, but it turned out fine. However, using the same right-side attachment method still left the inside edge floppy and a little messy—no matter how close I topstitched.

My preferred method is to attach the binding to the inside of the garment first. That means the right side of the binding touches the wrong side of the top. Then I flip the binding out to the public side.

With the binding flipped to the outside, I extend the folded edge slightly past the serger stitching and topstitch close to the edge. That way, I’m just barely catching the edge on the inside too. The methods results in a clean, secure finish on the inside and outside! Win-win.
Binding Width
I also ignored the pattern’s recommendation of using only 1-1/4 inches and instead cut my binding 1-1/2 inches wide. Here’s how that breaks down at each step:
- When attaching with my serger, the blade trims off 1/8 inch and the stitch itself gives me a 1/4-inch seam allowance. That’s 3/8 inch total.

- To create the double fold on the inside, I need 1/4 inch.

- To cover the 1/4-inch-wide serger stitches on the outside, my double fold on the outside needs to be 3/8 inch wide, so that’s 3/8 on the double or 3/4 inches.

- Altogether, that’s 1-3/8 inches, and I add an extra 1/8 inch to account for all the folding—bringing the total to 1-1/2 inches.

To make life easier, I also apply 1/4-inch double-sided stay tape to the right side of the binding. That way, when I fold the fabric over to the front, I can iron it in place and it holds exactly where I need it before topstitching. Unfortunately, my beloved SewkeysE tape doesn’t come in 3/8 inch wide, only 1/4 and 1/2. But that’s okay. Eyeballing 3/8 inch isn’t a problem. The tape helps stabilize the fabric and makes getting a consistent 3/8-inch double fold much easier.
And to be maximally odd, I hand-basted the double fold, ironed it in place, and then topstitched. I found that pinning with needles and trying to iron just wasn’t as accurate as hand-basting. And don’t even think about folding and pressing in one step—it’s way too fiddly. You’ll burn your fingerprints right off.
Final Fit
Poorly fitting, free tank top patterns that treat armholes like an afterthought and ignore real shaping need to be retired for good. Just because a garment looks simple doesn’t mean it’s simple to fit or construct. Tank tops come with their own set of technical challenges: curved seams, strap placement, armhole depth, bust shaping, binding methods… just to name a few.


A well-fitting, well-constructed tank is every bit as fussy as jeans. Maybe even more so. Working with stretchy knit fabric is a pain. Polyester spandex can be especially tricky to sew. Home machines often struggle to get the needle through cleanly, and skipped stitches are a constant frustration.


Anyway, the point is: tank tops deserve better.
I really like the fit of my tank top. The armhole sits close to my body for maximal movement. I only have a little sports bra strap showing in the back. The tank drapes straight down and doesn’t swing away from my body. The lower half isn’t too loose, but also isn’t ridiculously tight. And most importantly, the tank top stays in place during tough workouts. That’s all that really matters.
Personal Aside
So why do I hate racerback styles? I stumbled across a blog post that actually cited scientific research, and I had a full “wait…someone has legit researched that?!” moment. I dropped the phrase “bra strap orientation” into PubMed—something I didn’t even think was a searchable topic and instantly fell down a rabbit hole of biomechanics, sports bra design, and fit. No regrets. Here’s what I learned:
What Makes a Sports Bra Effective
The primary purpose of a sports bra is to reduce breast motion, which is one of the main sources of pain and discomfort for women during exercise. Excessive vertical breast displacement is the source of exercise-induced discomfort and social embarrassment. There’s some research, but not a lot, on breast biomechanics and even less on what makes an effective sports bra. However, from the studies that do exist, some specific design features stand out.
There are three main types of sports bras: encapsulated, compression, and combination. Encapsulation bras support each breast in a separate cup and are usually made with rigid material in the cups, strong elastic in the band, and wide padded straps for comfort. Compression bras are made of elastic material that presses both breasts together against the chest wall. Combination bras do both, and they tend to be the best at reducing vertical movement.
Other design features that make a real difference include vertically oriented wide straps, high necklines, adjustable underbands, and underarms that sit higher and closer to the armpit (in other words, larger side depths). Together, these features perform best in reducing breast displacement.
One of my favorite quotes from the literature comes from Coltman et al. (2015): “A front closure (Style 4) separated the two cups with a small connection at the centre front. Although this looked sexy, the bra cups did not firmly hold the breast, so the medial-lateral breast movement was not well controlled.” In other words, a bra might look great, but it will do a terrible job at supporting anything.
But there’s often a trade-off between biomechanical support, comfort, and performance. The sports bras that perform best in motion reduction are often rated lowest in comfort. Design features that create a subjective sense of support—like tight underbands—can actually restrict breathing and reduce running economy.
On top of these design challenges is a widespread knowledge gap around breast health and bra fit. One study reported that as many as 85% of women wear sports bras that fit incorrectly, turning bra-related discomfort into a major barrier to physical activity. Another study was especially telling: women admitted they’ll sacrifice comfort if it means matching their outfit. If they’re wearing a racerback tank, they’ll choose a racerback bra even if it’s not their most supportive option. Fashion wins, support loses. I’m guilty of this. I refuse to even consider racerback tank patterns, because I won’t wear a racerback bra.
Strap Orientation
A sports bra has three primary components: the band, the cups, and the straps. The band and cups are meant to carry the weight of the breast tissue and reduce motion. The straps simply hold the bra in place. But what often happens, especially for people with larger breasts, is that the straps are over-tightened to lift and support the bust. That’s not their job. When the straps bear too much weight, they create high pressure on the shoulders, which can lead to soft tissue and nerve damage, headaches, muscle strain, and reduced circulation.
Strap orientation came up a lot in the research. Does vertical versus cross-back placement change anything in terms of shoulder pressure, breast motion, or comfort? It turns out strap orientation doesn’t affect breast motion, but it does influence shoulder pressure. Cross-back straps create significantly more pressure than vertical ones. In one study, women found the extra pressure uncomfortable; in another, they said it made them feel like they had less bounce, likely because more pressure can feel like more support, even if actual movement isn’t reduced.
Researchers have suggested that some prefer cross-back straps because they’re less likely to slip off the shoulders. A stable strap might feel more supportive, even if it doesn’t reduce breast motion. But here’s the key point: the straps shouldn’t be doing that work anyway. The bra band is supposed to carry the load. The straps are just there to hold the bra in place.
The research on strap orientation was surprisingly relevant to my next project, a 50L frame backpack. Ideally, straps should run vertically over the acromion process and lateral clavicle, sitting at the apex of the shoulder. Straps that rest on the upper trapezius cause more issues, especially when bearing weight. I ran into this in my daypack design too. I had to make the straps wide enough to fit both my frame and Ryan’s. In the end, we found that wide straps sitting toward the outside of the shoulders worked far better than narrow ones digging into the traps.
Funny
Some of the research actually made me laugh. One study on running in deep water described how “upward buoyant forces decreased the instantaneous vertical breast velocity and prevented the breasts from reaching their end range of motion,” effectively reducing what they called “breast slap” (Cochrane et al., 2020). Running bare chested in deep water to study “breast slap” dynamics? Really?!
I also found it interesting how most studies measured sports bra effectiveness, two infrared-emitting diodes taped to each nipple with double-sided toupee tape. I couldn’t make this stuff up if I tried. Thankfully, there was a more recent study that questioned the validity of these measuring techniques, so hopefully future research can be slightly more nuanced.
Anyway, it was an unexpectedly interesting and informative rabbit hole. Besides the lack of athletic sports top sewing patterns, there’s also a serious lack of good sports bra options. I couldn’t find any that aligned with the research recommendations. These were the patterns that kind of came close, but would still require significant changes:
- Pin-Up Girls: Alison Sports Bra
- Pin-Up Girls: Kerri No-bounce Sport Bra
- Porcelynne Jackie Sports Bra
- Greenstyle Endurance Sports Bra
- Etoffe Malicieuse Supporter
- Primrose Dawn Maritza Sports Bra
- Apostrophe Patterns MyFit Sports Bra
We have ways to go before styles like the Sweaty Betty Zero Gravity sports bra make it into home sewing patterns.

Bowles, K.-A., & Steele, J. R. (2013). Effects of strap cushions and strap orientation on comfort and sports bra performance. Medicine & Science in Sports & Exercise, 45(6), 1113–1119. https://doi.org/10.1249/mss.0b013e3182808a21
Coltman, C. E., McGhee, D. E., & Steele, J. R. (2015). Bra strap orientations and designs to minimise bra strap discomfort and pressure during sport and exercise in women with large breasts. Sports Medicine – Open, 1(1), 21. https://doi.org/10.1186/s40798-015-0014-z
Haworth, L., Aitkenhead, R., Grecic, D., & Chohan, A. (2024). Understanding experience, knowledge and perceived challenges related to bra fit for sports participation: A scoping review. Research in Sports Medicine, 32(2), 302–315. https://doi.org/10.1080/15438627.2022.2102922
Kipp, S., Leahy, M. G., & Sheel, A. W. (2024). Sports bra restriction on respiratory mechanics during exercise. Medicine & Science in Sports & Exercise, 56(6), 1168–1176. https://doi.org/10.1249/mss.0000000000003403
McGhee, D. E., & Steele, J. R. (2010). Breast elevation and compression decrease exercise-induced breast discomfort. Medicine & Science in Sports & Exercise, 42(7), 1333–1338. https://doi.org/10.1249/mss.0b013e3181ca7fd8
Navalta, J. W., Ramirez, G. G., Maxwell, C., Radzak, K. N., & McGinnis, G. R. (2020). Validity and reliability of three commercially available smart sports bras during treadmill walking and running. Scientific Reports, 10(1), 7397. https://doi.org/10.1038/s41598-020-64185-z
Norris, M., Blackmore, T., Horler, B., & Wakefield-Scurr, J. (2021). How the characteristics of sports bras affect their performance. Ergonomics, 64(3), 410–425. https://doi.org/10.1080/00140139.2020.1829090
Yick, K.-L., Keung, Y.-C., Yu, A., Wong, K.-H., Hui, K.-T., & Yip, J. (2022). Sports bra pressure: Effect on body skin temperature and wear comfort. International Journal of Environmental Research and Public Health, 19(23), 15765. https://doi.org/10.3390/ijerph192315765
Zhou, J., Yu, W., & Ng, S.-P. (2013). Identifying effective design features of commercial sports bras. Textile Research Journal, 83(14), 1500–1513. https://doi.org/10.1177/0040517512464289

IF YOU FOUND THIS POST HELPFUL, CONSIDER SUPPORTING MY WORK BY SIGNING UP FOR A PAID SUBSCRIPTION.
POSTS OLDER THAN 3 MONTHS ARE NOW FOR SUBSCRIBERS ONLY — YOUR SUPPORT KEEPS THIS SPACE GOING.
INTERESTED IN SUBSCRIBING TO RECEIVE NEW POSTS IN YOUR INBOX?

And about sports or other bras.. Yes, strap placement is very important. Ideally in all wireless bras (and wired sports bras are an oxymoron!) the front straps should be vertically aligned with the apex of the breast for best support, and the attachment of the back strap can vary a bit to help prevent fallout. But fallout can have some other causes, one being not addressing shoulder slope for instance. And the other being that shoulder grading is grossly inaccurate in all American patternmaking at least, leading to larger sizes (ie average) being off by whole inches. But also for instance my chest is very rounded (see fashionincubator for discussions of that common variation) so I need to bring in my back straps about an inch to compensate, which works great. But I’m a bit worried to hear you speak about the acromyon in the context of straps – the acromyon is where your set-in sleeve seam belongs, not your straps. The straps belong where the trapezius disappears behind the collarbone, usually a couple inches in from the acromyon. Although of course you’re right to avoid straps right on the trapezius, which hurts whether you’re talking about 5lb of breast or 20kg of pack. And the function of bra lower bands and pack hip bands is exactly the same, they provide most of the support but you don’t want to tilt into strangulation levels of constriction
I should point out that the 85% ratio you came up with for bands is classically recommended, but only as part of a 75-85% range. The ideal ratio depends on the stretchiness of your specific knit, and varies with every single fabric. Hence the much easier if less mathematically enclined method of just slapping it on.. After an initial fold for tidiness, you just attach the band, giving it a more or less subtle pull as you go around less or more curves. And then give a tiny handstitch at the end to keep it all in place, if you’re feeling extra precise. It takes some practice to feel the right amount of pull, but I assure you acquiring that skill is well worth a couple sloppy bands and will save you so much time in the long run
I tried 75% on my red / orange tank at first and it ended up too tight for that fabric. The band pulled on the armhole and neckline and I started getting warbles again. I took the binding off and redid the band at 85%, which turned out to be the sweet spot for me. It’s wild how different each fabric can be until you test it. Honestly, I think that’s why I don’t mind taking things apart. I’d rather unpick seams than let the frustration of removing coverstitch or serger thread stop me from getting a project just right. People dread seam ripping, but like anything else it gets easier with practice. Thanks for your helpful comment!
Oh my absolute goodness. What an incredible thing you’ve done with this post. In the words of Cordelia Chase… I have to call everyone I have ever met, right now.
The Cochraney rabbit hole you fell down goes against what I would have guessed — I always assumed racerback would be most supportive, even though I know the straps aren’t supposed to carry the breastal weight. I also thought breast slap was something else — in the British sitcom Miranda, this happens to the main character when she rolls over in bed and one breast slaps the other. (She models this in her standup with her hands, highly recommend.)
I don’t need an exercise bra, nor do I wear binders anymore, and both are because of my longcovid that means my life is pretty sedentary (sewing is my main physical activity). But I and many friends and former patients have had respiratory, muscular, and occasionally skeletal injury from wearing binders to flatten the breastal tissue for gender reasons. (A great reason for top surgery to be accessible to all who want/need it, but.) So I can image that, similarly but differently, ratcheting up the tightness of the bra band to compensate for not-great fit would cause similiar problems — in a more localized spot, for better or worse, but also more during rigorous activity which is surely exacerbating. And like you pointed out…certainly would compromise athletic performance (lung function, possibly comfort and or range of motion at a certain point…)
Are you highlighting the Sweaty Betty (great name, very happy confident comfortable model) because that’s the dream — vertical straps that click together towards the top to keep them in place? Wouldn’t the clicking move some of that weight-bearing closer to the traps? I’m imagining two vertical straps but with points of insertion (in the back bra band) that are slightly more medial than usual, but not to the point of the center back, so that they’d feel more secure but not pull on the shoulders overly.
Okay I literally need to go tell several people about this brilliant write-up. So happy for you and your new knowledge about breast care/maintenance and your excellent new garment!!
I love the name Sweaty Betty too. I wanted to highlight this bra because of the seamless construction, the shaping in the front cup that gives both encapsulation and compression, the high underarm and neckline coverage, and the adjustability in both the band and the straps. I’m not wild about the upper clip either since it sits somewhere between straight straps and a true racerback, but it does fix the strap-slip issue that a lot of people deal with. It gives the security of a racerback without loading the traps as much. It was also a nice chance to feature a brand that isn’t SHEFIT, since that’s the one everyone on social media seems to talk about. Thank you for your thoughtful comment!