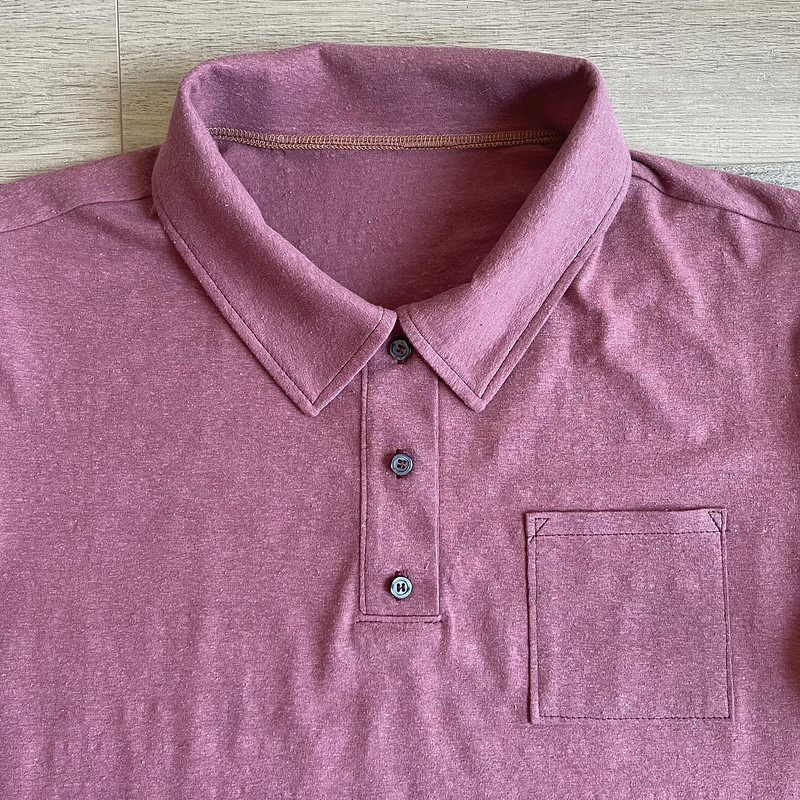
I used a pattern not available anymore to add a polo shirt collar to Ryan’s standard t-shirt pattern. You can download the collar and button band pieces by clicking the button below, but obviously, the pieces are just for Ryan’s size.
I want to document the method since the original instructions were translated from Russian and weren’t very clear. I have seen other polo shirt patterns, so maybe these instructions will help with those patterns as well:
- https://wardrobebyme.com/products/draper-polo-shirt
- https://sinclairpatterns.com/products/oliver-classic-knit-polo-shirt-for-men-pdf
Neckline Measurements

Ryan’s front neckline measures 5 ¼ inches from the center front to the shoulder seam. The seam allowance for this pattern is ⅜ inches.

Ryan’s back neckline measures 4 ¼ inches. When sewn together, Ryan’s neckline circumference measures 17 ½ inches. Remember if you add together the lengths (4.25 + 4.25 + 5.25 + 5.25 = 19), you’ll need to remove the seam allowance amount (19 – (0.375 * 4) = 17.5).
Assemble the Collar

I used tricot fusible interfacing that has 4-way stretch, just like my knit fabric. I tried the collar multiple ways:
- Interface both collar pieces entirely
- Don’t interface either collar piece
- Interface only one collar piece
- Interface within the seam allowance of both collar pieces
The final solution is the best. If you interface the entire collar piece, the collar is too bulky when attached to the neckline. Attaching the interfacing within the seam allowance keeps the collar thin enough along the neckline. I didn’t like how floppy the collar is with no interfacing, and trying to interface only one collar piece failed instantly since the two pieces need to be eased together.

With right sides together, stitch the upper and under collar together with a ⅜ inch seam allowance. You will have to stretch the under collar since it is smaller. Stretch / ease between the mark on the pattern piece.

The under collar is slightly smaller than the upper collar, and this is to help the seam stay hidden when worn. When the collar is flipped right side out, make sure to align the bottom raw edge together. Press the collar nicely before top stitching.
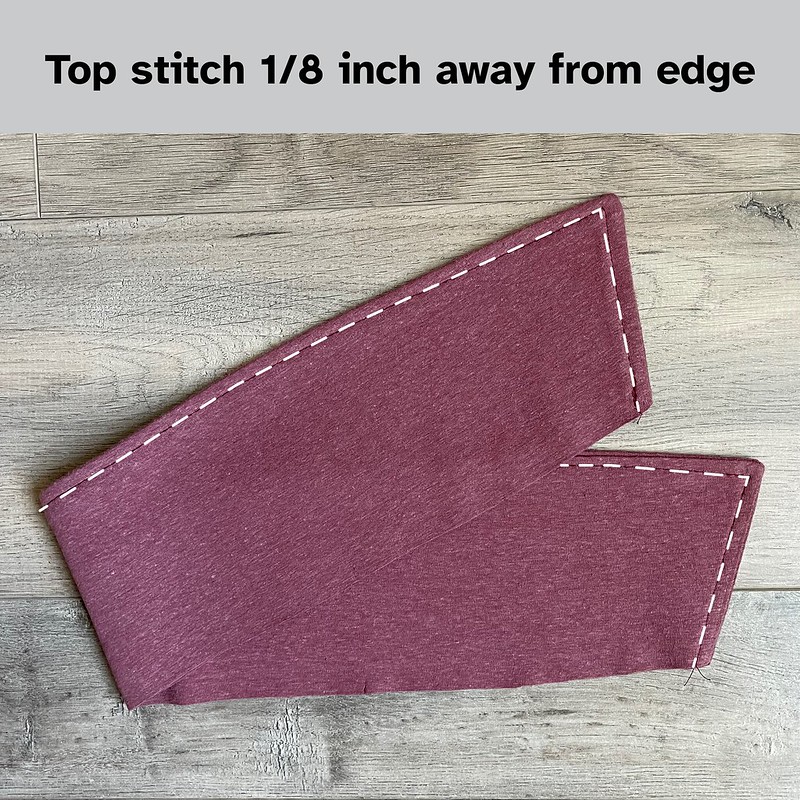
Top stitch ⅛ inch away from the edge, making sure the bottom raw edges stay aligned together.
Prep the Front Placket

The pattern I used removed part of the center front, specifically, 6 ⅜ inches from the neckline down and ⅜ inches from the center front on the fold.

I live and die by the SewKeysE stay tapes. They sell both single-sided and double-sided stay tapes. For cases like this placket, I used Extremely Fine Fusible Knit Stay Tape to lightly stabilize the fabric. The first time I made this pattern, I didn’t use stay tape and immediately regretted it.
Attach Button Band

You will want to interface one side of the button band where the buttonhole and buttons will be attached. Again, the first time I made this pattern, I interfaced the whole dang button band, and it was too thick to sew. So be judicious with your interfacing. This would also be an excellent time to press ⅜ inch along the other side of the button band and attach double-sided stay tape to the right side if using it (see below).

With right sides together, attach the button band to the placket using a ⅜ inch seam allowance. Next, stitch ⅜ inches past the placket where the mark is made on the button band pattern piece. Make sure the left and right sides are even at the bottom because this will form the base of your placket.

Press the button band and seam allowance towards the center front.
Shoulder Seam

This is the first step that uses a serger and not just a regular straight stitch on your sewing machine. If you don’t have a serger, use a stretchy stitch like a zigzag stitch to attach the front and back pieces along the shoulder seam.
I always stabilize my shoulder seam. Because I have a massive roll, I add thin swimsuit clear elastic to the seam along the back piece. When I press the seam towards the back, the elastic is hidden. You can also use the same Extremely Fine Fusible Knit Stay Tape attached to the wrong side of the back shoulder.
Attach Collar

First, I basted the collar to the neckline. With the right side of the shirt facing you, the under collar is facing down, and the upper collar is facing you. If you forgot to mark where the collar should end on the button band, measure ¾ inch from the seam.
Double check that your shoulder seam allowance is pressed towards the back of the shirt. It’s a lot easier to fix this now than after the seam has been finished. Those seam allowances are squirrelly and like to flip.

This step can also be done earlier when the interfacing for the buttonholes is being attached. Fold over the 3/8 inch seam allowance on the other side of the button band and press well. I also added ¼ inch Extremely Fine Double Sided Fusible Stay Tape. This will be extremely helpful when the button band is flipped right side out and top stitched together. You don’t need to pin and this helps guarantee you will catch the inside to the button band. Trust me. You’ll see why adding the double-sided stay tape to this seam allowance is such a great hack. Don’t remove the paper backing until you are ready to complete the button band.

Fold the button band nearly in half with right sides together. I like to extend the folded edge ⅛ inch past the placket stitch line, so the stay tape is hidden when the button band is turned right side out. I know when I top stitch the button band closed, I’ll catch the fabric in the back.

Baste stitch the button band together as well. Make sure all seam allowances are folded towards the center front, so when the button band is turned inside out, raw edges are hidden completely.

I finished the neckline with my serger, but if you wanted to get fancy with twill tape, you could add that as well to conceal the neckline.

Turn the button band right side out and give everything a good press. Using your preferred method, top stitch the neckline seam allowance away from the collar. Because the polo shirt doesn’t need to maintain a stretch neckline, I just used a straight stitch and not a zigzag stitch.
Finish Button Band

From the corner of the placket, snip at an angle to the end of your placket stitch line. The bottom will be folded down towards the inside of the shirt.

Remove the paper backing from the double-sided stay tape if using. The button band should extend slightly past the stitch line and cover any remaining stabilizer around the placket. The double-sided stay tape along the seam allowance will hold the button band together before sewn—no need for needles. Iron the button band and top stitch from the front side, ⅛ inch away from the edge along the length of the whole button band.
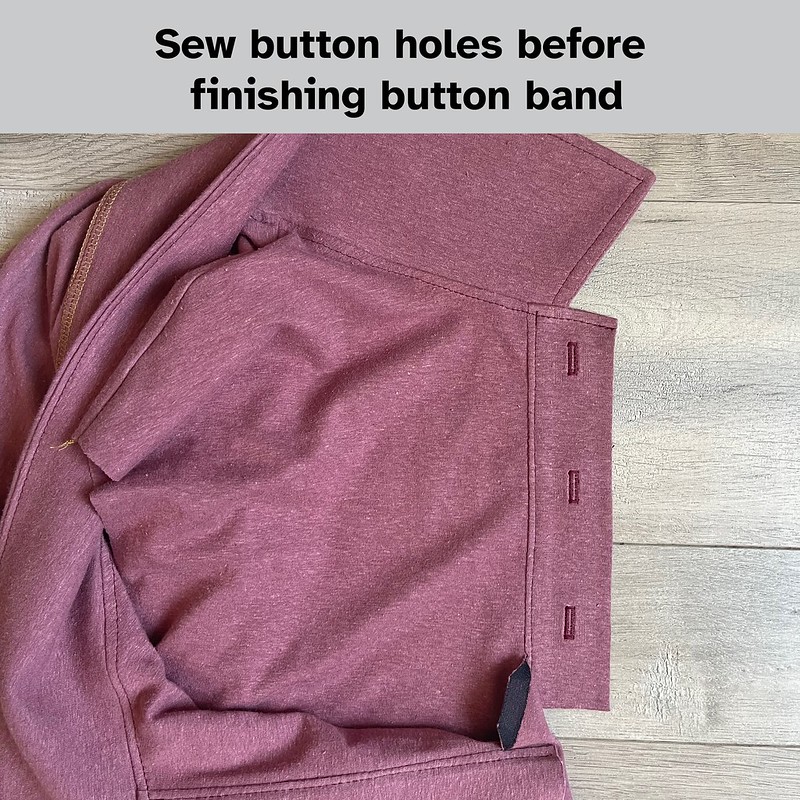
Before finishing up the button band, add your buttonholes now! It’s much easier to get that bottom buttonhole made when there isn’t any seam to work over. My machine couldn’t make the bottom buttonhole on the first two shirts I made because it was too bulky. I also knowingly didn’t mark where buttons should go because buttonholes depend on button sizing and the number of buttons used.

This next step is just like stitching the sides of a welt pocket. With everything flipped to the wrong side of the shirt, stitch all the layers together: bottom of the placket and both button bands. Take your time aligning the button bands on top of each other.

Finish the bottom however you want: serger, twill tape, or bias tape!

I like to top stitch the bottom of the button placket to make sure it stays down and doesn’t try to flip upwards. However, I think this top stitch is just a personal preference.
Conclusion
Not the scariest collar and placket / button band I’ve ever had to sew. With a little patience and the right amount of interfacing, you can get a really great looking polo shirt collar!


What 4-way tricot fusible interfacing are you using for the collar? I can’t find any. Thanks!
LikeLiked by 1 person
I used Fashion Sewing Supply ProTRICOT Deluxe Knit Fusible Interfacing. It’s a 4-way stretch interfacing. I haven’t found that type of interfacing anywhere else. I believe Pellon has a version of tricot interfacing as well, but I’ve never used it.
LikeLike
Terrific tutorial! The order of the steps is a bit different from what I have seen and I will give this a whirl when I am ready to sew my polo-neck dress. 😀
LikeLiked by 1 person
I have yet to sew a collar and I appreciate how detailed and well explained your directions are! I especially love the pics, as I am very visual and like to see how the fabric looks like as I’m sewing. Great post, and your collar looks amazing! ☺️
LikeLiked by 1 person