When you are on a path of discovery, the best advice is often the last to be found. My blog is intended to reflect my journey as I learn more about sewing, knitting, and baking, so things will feel out of order. If I were writing a book, this blog post would probably be one of my first chapters, but blogs go in the opposite direction. For several years now, I have fumbled around with the idea that pant fitting has more to do with shape and less to do with size and this post is the culmination of all my learning.
History

Two years ago, I wrote a blog post about doing an alteration referred to as a “knock knee” alteration. The point of the post was to argue that the alteration should be renamed “wide hip” alteration since the adjustment was made not at the knee but up at the crotch level. Admittedly even now, I wouldn’t know what to call this alteration.
The issue with this adjustment is that there’s more to it than just pivoting at the crotch level. You have to raise the side waistband since length was removed from the side seam. Next, I could never figure out what happens with the crease line? In the end, the whole balance of the pant goes wonky.

I was using this alteration because, with most pant patterns, my pant legs would swing towards my inseam, and I would have excess fabric bunched up along the side seam at my knees. Even after getting the leg to fall straight from the crotch level with this knock-knee/wide-hip alteration, the pants from the crotch up never fit right.

A year ago, Michele at https://winmichele.com/ talked about crease line placement at various cross-grain line points (e.g., hip, crotch, knee, and ankle), which sparked an idea in my head. I’ve spent the last year drafting pant blocks for Ryan and myself, focusing solely on where the crease line needs to go and shifting the cross-grain line levels right and left to get a pant pattern.
My latest blog post was about crease line placement at the crotch. A quick summary of that post is the crease line does not have to be anywhere near the center at the crotch level for the front or back pieces. For Ryan and me, the crease line is at the center of the ankle and knee, but after that, it all depends on our body shapes. I’m still tweaking this placement for myself as I make more pants of different material and styles, so the process of learning is still on-going.
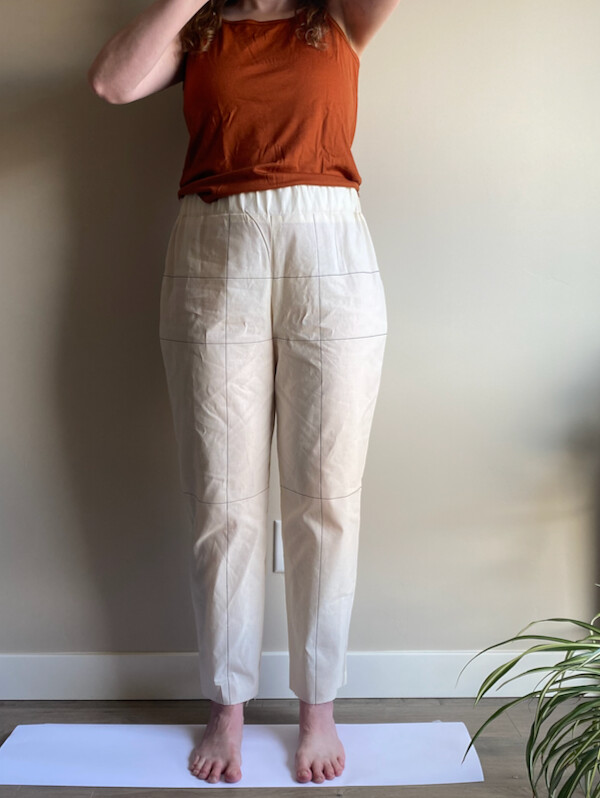
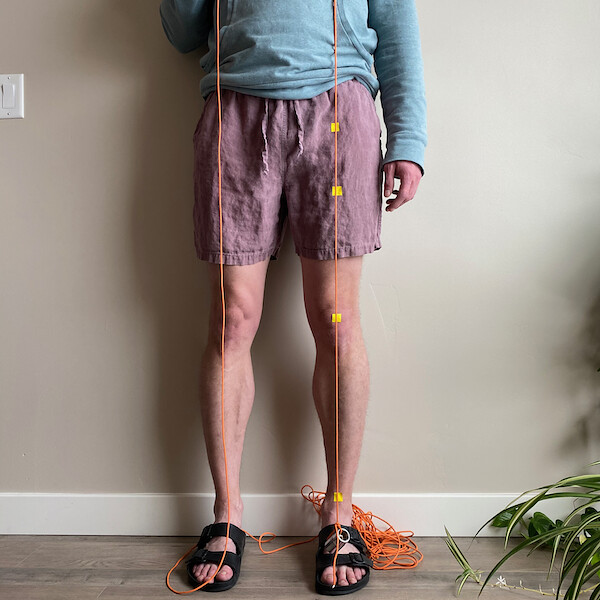
In the last year, I’ve learned that crease line placement at the hips (i.e., top of the crotch curve) is the first thing you should worry about. From the hip level, your pant legs should drape straight up and down or plumb. In all my photos, I’ve drawn the crease line and major cross-grain lines. Cross-grain lines stay level with the floor, and the crease line should be plumb.
Goldilocks Principle
For this post, I made 5 muslin pants that will be used to show you what happens when the crease line is off at the hip level:
- Front and back with correct crease line placement at the hip level
- Front with crease line placement ½ inch too wide
- Front with crease line placement ½ inch too narrow
- Back with crease line placement ½ inch too wide
- Back with crease line placement ½ inch too narrow
Crease Line Placement at the Hips

The middle image shows the crease line at 3.5 inches from center front (CF) at the hip level. Red dots indicate the crease line placement at the hip, crotch, knee, and ankle. The left image shows the crease line at 4 inches (½ inch too wide). The red dots from the center image are copied to show the crease line has shifted laterally towards the side seam at the hip and crotch level. This causes the leg to swing inwards at the ankle. The right image shows the crease line at 3 inches (½ inch too narrow). The red dots show the crease line has shifted medially towards the center front at the hip and crotch level. This causes the leg to swing outwards at the ankle.

What happens to the pattern when I shift the crease line at the hip level? Short answer, the crotch hook length also changes. I realize this is backward, and I will need to show how I draft patterns, but briefly, I start from the ankle and draft up from there. The ankle and knee measurements don’t change. I also don’t change the crotch level measurements. When I move the hip level left or right, I keep the waistband relationship to the hip the same. In blog reverse order, drafting pants is my next post!
Side tangent. I’m still learning about drafting pants above the hip level, so that’s why I’m focusing on the hip level down. How do you determine the angle of center front and center back? Do you bring in the side seam or front seam when you have a gaping waistband? When and where are darts needed? The only bit of advice I have is the same advice from my last post, pay attention to the length- and cross-grain lines of the fabric and smooth the fabric over your body, and don’t try to pull or tug things into place. In the drafting video shared in my last post, the designer started at the hip and draped pants down and up from that level, so I do the same. It makes the most sense.
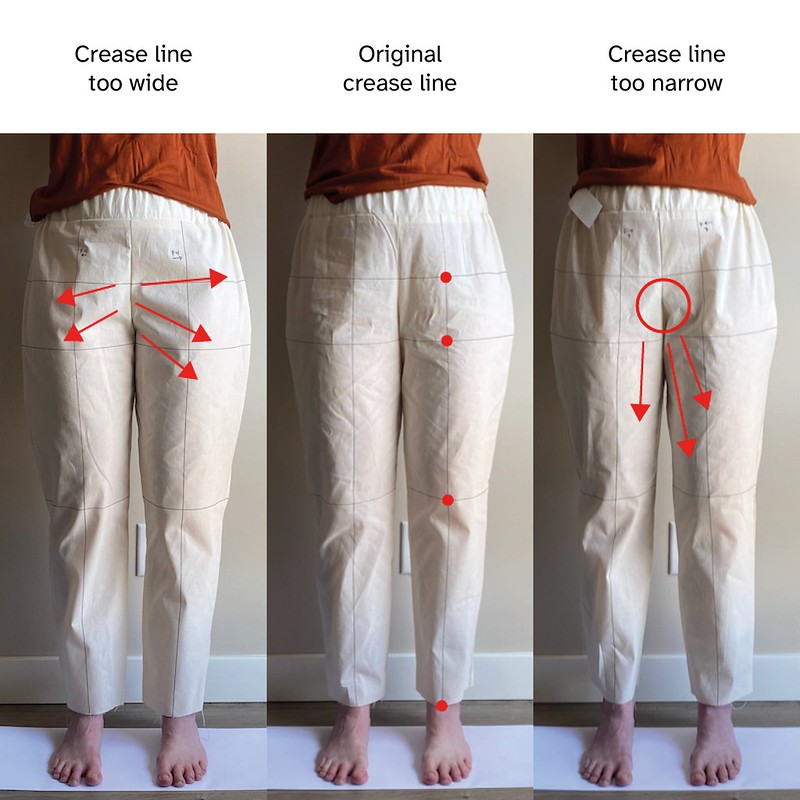
When I shift the crease line placement, this will impact the crotch hook length, and you can see that in the fit of the pants. When the crease line is too wide, the crotch hook length is too short, and you see the tight radiating drag lines from the crotch. When the crease line is too narrow, the crotch hook length is too long, and you see the downward draglines and pooling fabric at the crotch. I’m sure you’re thinking, well just lengthen or shorten the crotch hook length now! Here’s why that won’t work.
Don’t be Fooled!
The combination of crotch hook length issues and legs that are not centered at the ankle means you can’t just go lengthen and shorten the crotch hook. Why? Let me try to explain.

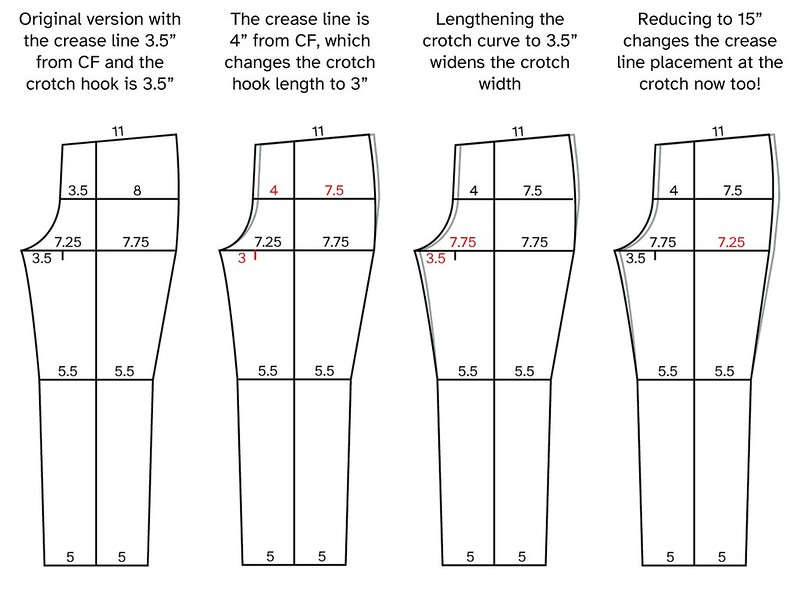
For this example, let’s say the crease line placement at the hip is too narrow and is shifted medially towards center front. That means the crotch hook length is too long. Ok, so you think that to get rid of the vertical draglines and excess fabric at the crotch, you’ll just reduce the crotch hook length. When you do that, you are also shortening the width from the inseam to the crease line at the crotch level and the overall width at the crotch level. You see where this is going? Now that pants are too tight across your upper thighs at the crotch level, so you add width at the side seam. As a result, the crease line placement has also moved at the crotch level and not just at the hip level. From experience, if this adjustment isn’t needed, you’ll end up causing the leg to not only swing off-center, but it will twist on the leg too!
The same thing happens if you try to extend the crotch hook length. Have you ever been altering pants and every alteration you make ends up causing new and worse issues to arise? That is a good indication that alterations aren’t needed. Instead, you need to rethink about getting the pattern balanced correctly for your body so that is drapes straight up and down. Otherwise if the crease line isn’t place correctly your alterations will only end in catastrophe.
Crease Line Placement Alters Shape

Just like the front pattern pieces, when you change crease line placement on the back pieces, this causes the leg to swing off-center at the ankle.

I see a lot of women struggle with pants that look like the ones on the far left. Don’t you just hate it when you have unsightly excess fabric across your hamstrings and simultaneous tight draglines suggesting you need to make a big butt adjustment? The left image is how nearly 99% of all RTW pants fit on me. My whole life, I thought my butt and hips were too big and too wide. Nah. I just needed to redraft my pants.
What I find most fascinating about this whole process is that the overall width NEVER CHANGES. On all of these muslins, which includes 2+ inches of ease, my waistband measures 44 inches, my hips measures 46 inches, my upper thigh at crotch measures 30 inches, and so on. I hope this blows your mind. What looks like sizing issues actually isn’t; I just need to redraft pants to fit my shape!

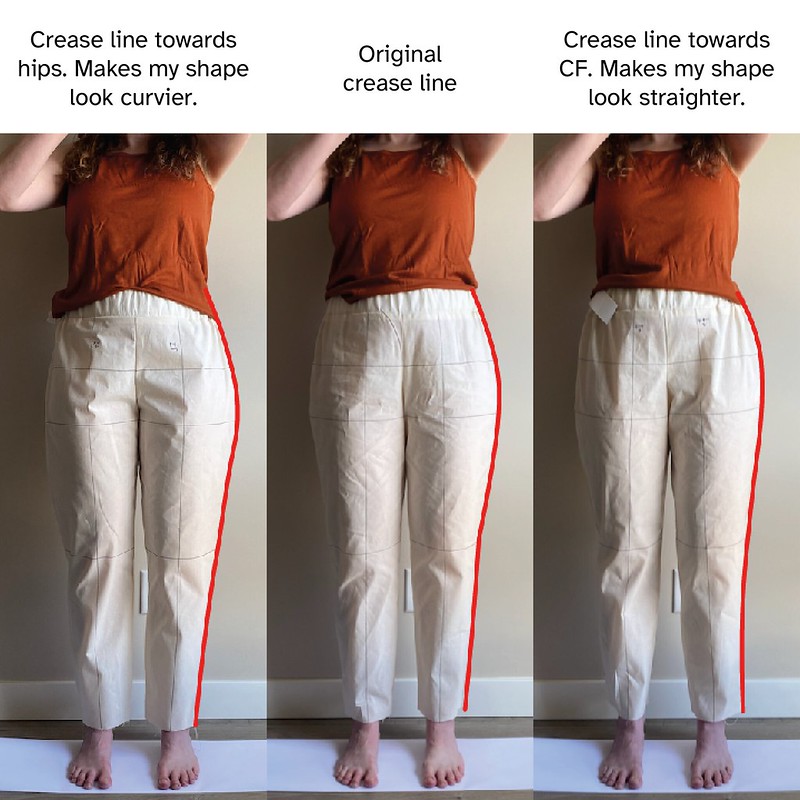
Given the rest of the pant measurements, you can see how the general shape of the pants changes depending on crease line placement at the hips. When the crease line is moved towards the hips, pants will have a curvier profile. When the crease line is moved towards the center, pants will have a straighter profile.
Not Always Obvious
I have a limited sample size, but based on Ryan and myself, crease line placement isn’t always obvious. My crease line is 4.5 inches from center back. The crease line for Ryan, who obviously has a straighter figure, is 4 inches from center back. This makes sense.
However, when I look at crease line placement for the front, it doesn’t make sense. My crease line placement from the center front is 3.5 inches. You would think Ryan’s crease line should be smaller than 3.5 inches with his straighter figure, but it isn’t. Ryan’s crease line placement from the center front is 4.75 inches. Yeh, for real!
If you find yourself confused, I really liked double-checking with a plumb bob. Start by placing a mark at the center of your ankle and the center of your knee. You will have to adjust your stance, moving your legs closer together or further apart until the plumb is centered at both the ankle and knee. Finally, you can place marks at the crotch and hip level where the plumb crosses. This was how I finally confirmed that Ryan’s front crotch measurement from the inseam to the crease line is 8 inches and from the crease line to the side seam is 6 inches. When measuring at the crotch level, be sure to include ease. You don’t need to include ease when measuring from center front or back to the crease line at the hip level. This method was perfect for confirming that his crease line placement at the front hip level really is 4.75 inches!
Conclusions

I no longer think about fitting pants in terms of common alterations. When you start adding up multiple alterations on a single garment (e.g., big butt, thin thigh, leg twisting, and swing, etc.), you really aren’t looking at the bigger picture. The overall shape of the pant does not fit your shape, and the pant doesn’t need to be altered it needs to be redrafted. In none of my examples on this post, did I change the garment’s overall width, but go look at all the common alteration books published, and they’d say I need to add or remove width depending on the issue. I find these books utterly unhelpful because they all assume the same thing; everyone has the same tube-like shape.
You won’t find crease line placement discussed anywhere obvious. The internet just gives you guides on how to iron pants with a crease line. Sigh. I’ve purchased half a dozen pant fitting books over the years. I’ve rented textbooks from the university since I have access. They all talk about sizing issues that cause the fit problems. I’ve never seen an alteration/fit book talk about shape. I fit perfectly in a single-size range (33″ waist / 42″ hip). For sewing patterns, that’s usually around a size 12 / 14, just depending on the brand, but the pants never fit. It’s not that the size is wrong; the pattern just isn’t drafted to fit my body shape, a point I emphasized in my post two years ago about knock knee vs wide hip alterations. If there is information about shape in the fashion industry, it isn’t well documented. I’m not a big fan of restricted data / information, an opinion I’ve developed as a scientist. I support sharing and being open with methods, so I will continue to share my journey.
As always, thanks for visiting my blog and reading these long posts!


Writing from Toulouse, France.
I find your post very interesting. I understand why pants Nevers fit me and make me feel inconfortable. Hip,butt and waist measures do not correspond to ONE Size of pant of any common brand
Excuse my English.
I would appreciate more drawings to help me modify my paper pattern.
I will read again all your explanation of your post.
Thank you very much for sharing
Merry
LikeLiked by 1 person
Thank you so much!
LikeLike
I haven’t read your article HOW TO FIT PANTS WITH A LASER LEVEL: MAY JEANS FROM MAKE BY TFS yet, but I wanted to ask about how do you go about establishing the hip crease line?
LikeLiked by 1 person
The laser level. Go check out that post. It should help answer your question.
LikeLike
Your work has been wonderful. Thank you very much for sharing your experiences and reflections. I haven’t read anything this significant in a long time. Thanks from Brazil.
LikeLiked by 1 person
Thanks so much for this blog! I’m a mechanical engineer and this makes more sense to me than anything else I have seen, to address my pants fitting issues.
LikeLiked by 1 person
I posted a description about your findings and a link to this page on patternreview.com Fitting Woes. Hope more people find your blog and we all stop thinking we are “too big” or “not curvy enough” etc.
LikeLiked by 1 person
Thank you!
LikeLike
Does the final crease line become a grainline reference?
LikeLiked by 1 person
I redefined grainline as “center crease line” since grainline has a broad and general meaning. There’s cross grainline, length grainline, and when pattern place an arrow to mark grainline they’re only truly indicating lengthwise grainline. With all the possible interpretations of grainline, I wanted to use a term that signified the lengthwise grainline that is in the middle of the pant and that balances the pant on the body. Someone suggested I use “center crease line” and that’s the term I’ve used since. Thanks for your question!
LikeLike
Ok. So is your crease line parallel to the grainline?
LikeLiked by 1 person
Yes.
LikeLike
I think I learned A LOT here, but I am going to have to test this out before I am certain. It seems so weird! But makes sense, I’ve gotten 5 pant drafts done, and read about a gazillion books. The more serious ones that I referenced never just scoop out a section, there’s always a balancing action to the side seam. I was ready to write off that idea, but this actually matches that in a way. Anyways, I’ll be a new follower to this blog for sure! LOL I have the same trouble with the internet and the books, way to many ideas, none quiet written in a way that will allow me to do more with it!
LikeLiked by 1 person
I don’t know how to express my gratitude to you on how helpful and a miracle your blog is. I stumbled upon it a few days ago on pinterest and I have been completely lost in your articles.
All my life I struggled with clothes that never fit and finally am I being able to make. Thank you
LikeLiked by 1 person
It’s probably too late to be helpful for you, but Singer’s Sewing Pants That Fit addresses this, though with different language! A lot of their alterations are accomplished by cutting horizontally across the crotch above the crotch extension and shifting the hip/waist/crotch area on the x axis, which has the same result of moving that unit relative to the grainline/crease line (which isn’t moved) and then blending back into the leg. It’s the only fitting book I own and I love it with a red-hot love, it might be a fun read just to confirm a lot of what you’ve discovered.
LikeLiked by 1 person
Thank you for the recommendation! I will definitely check it out. After spending money on over a dozen unhelpful books, I’ve been jaded about spending more money on fit guides that don’t work.
LikeLike
I found this very intriguing! Your blog post inspired me to make a muslin of a trouser sloper. I always have issues with excess fabric at the back and weird folds at the side seam below the hips. I noticed that altering my posture by pushing my bum backwards /rotating my pelvis “fixed” the problem. I then googled for pattern adjustments for forward tilted pelvis and found a youtube video by iconic patterns. I noticed that the alteration they suggest also shifts the placement of the crease line. Don’t know where I’m going with this comment. But thank you for sending me down the rabbit hole!
LikeLiked by 1 person
I’ll have to go find that youtube video from Iconic patterns. Posture definitely has an influence on how garments fit! Thanks for sharing.
LikeLike
This post is great! Keep up the good work!
LikeLiked by 1 person
Once again, an enormous thank you for documenting and posting all this information. Like you, I have many fitting books and have read them all and tried their methods and usually end up in despair at fixing an issue but creating another!
I was coming to much the same conclusions about balance being a large component of the problem, but lack your perseverance. It is very difficult to fit oneself and my patience is limited, but now I feel I have enough information to give it another go!
Grateful thanks and I look forward to the next instalment.
LikeLiked by 1 person